7* Raid - Hisuian Decidueye (Grass Tera) - October 6-8 rerun 13-15

Arceus-Poison is a pretty strong solo mon for this:

:Arceus-poison:
Arceus-Poison @ Toxic Plate
Ability: Multitype
Tera Type: Poison
EVs: 4 HP / 252 Def / 252 SpA
Modest Nature
IVs: 0 Atk
- Acid Spray
- Iron Defense
- Judgment
- Recover

Wait for the t1 stat clear, get to +6 defense, then acid spray and judgment to victory.

Also been enjoying PhysDef Iron Moth for online:

:iron moth:
Iron Moth @ Covert Cloak
Ability: Quark Drive
Tera Type: Poison
EVs: 252 HP / 252 Def / 4 SpA
Bold Nature
- Lunge
- Acid Spray
- Morning Sun
- Sludge Wave

Lunge is great for nullifying the boss’s boosts and making it weaker, and even with no SpA investment, Tera Poison Sludge Wave vs -6 SpDef Decidueye-H does great shield damage.
 
Tera: Poison
Ability: Levitate
Item: Wiki Berry (or nature-appropriate equivalent)
EVs: 252 HP, 252 Def, 6 Spe
Nature: Bold
Taunt
Stockpile
Acid Spray
Sludge Bomb/Clear Smog
Something I am wondering is, would Neutralizing Gas actually do anything?
Disabling Scrappy seems like could actually be useful with many people actually bringing ghost types
 
Something I am wondering is, would Neutralizing Gas actually do anything?
Disabling Scrappy seems like could actually be useful with many people actually bringing ghost types
Does Neutralizing Gas affect your allies in Raids or just the raid Pokémon?
 
Does Neutralizing Gas affect your allies in Raids or just the raid Pokémon?
That is honestly my actual question. Back then I was not able to gauge if ruin legendaries abilities affect the party either

Edit: Honestly, at least this early, online is just not worth it.
It's full of people either bringing mons weak to flying (expecially Koraidon or Ogerpon), or just Skeledirge / Ceruledge forgetting the boss has Scrappy and proceed to get obliterated.

The solo with Arceus is 100% free, don't hurt yourself, don't do this online.
 
Last edited:
That is honestly my actual question. Back then I was not able to gauge if ruin legendaries abilities affect the party either

Edit: Honestly, at least this early, online is just not worth it.
It's full of people either bringing mons weak to flying (expecially Koraidon or Ogerpon), or just Skeledirge / Ceruledge forgetting the boss has Scrappy and proceed to get obliterated.

The solo with Arceus is 100% free, don't hurt yourself, don't do this online.
The poison arceus posted earlier or a different build that I’ve missed?
 
The poison arceus posted earlier or a different build that I’ve missed?
The same
:Arceus-poison:
Arceus-Poison @ Toxic Plate
Ability: Multitype
Tera Type: Poison
EVs: 4 HP / 252 Def / 252 SpA
Modest Nature
IVs: 0 Atk
- Acid Spray
- Iron Defense
- Judgment
- Recover
In fact I was too lazy and only EVd 252 spatk on mine, prolly even more free with full EVs.

Fwiw I actually got crit by +3 Brave Bird at some point and on no defensive EVs it hits for over 3/4 of your HP, so I recommend making sure to keep yourself above 70% just in case.
In fact after checking calcs I got lucky Woweeee

+3 0+ Atk Decidueye-Hisui Brave Bird vs. 0 HP / 0 Def Arceus-Poison on a critical hit: 334-394 (87.6 - 103.4%) -- 25% chance to OHKO
+3 0+ Atk Decidueye-Hisui Shadow Claw vs. 0 HP / 0 Def Arceus-Poison on a critical hit: 196-231 (51.4 - 60.6%) -- guaranteed 2HKO

With EVs:
+3 0+ Atk Decidueye-Hisui Brave Bird vs. 4 HP / 252 Def Arceus-Poison on a critical hit: 272-321 (71.2 - 84%) -- guaranteed 2HKO

Fwiw once it uses grassy terrain it may actually use Leaf Blade once in a while, but it basically hits same as Brave Bird anyway
+3 0+ Atk Tera Grass Decidueye-Hisui Leaf Blade vs. 4 HP / 252 Def Arceus-Poison in Grassy Terrain on a critical hit: 266-313 (69.6 - 81.9%) -- guaranteed 2HKO after Grassy Terrain recovery

Strat is simple, waste turn 1 (idk, use Iron Defense or Acid Spray), wait for the buff clear, Iron Defense to +6, Acid Spray to -6 (usually debuff clear will have happened by the time you're at +6 def), Tera, ha ha judgement go brrr, use Recover when needed.

That said if you luck out and roll any of the AI that can lower its attack (like the various Chilling Water users, unfortunately not the intimidaters) it's even more free.
 
The same

In fact I was too lazy and only EVd 252 spatk on mine, prolly even more free with full EVs.

Fwiw I actually got crit by +3 Brave Bird at some point and on no defensive EVs it hits for over 3/4 of your HP, so I recommend making sure to keep yourself above 70% just in case.
In fact after checking calcs I got lucky Woweeee

+3 0+ Atk Decidueye-Hisui Brave Bird vs. 0 HP / 0 Def Arceus-Poison on a critical hit: 334-394 (87.6 - 103.4%) -- 25% chance to OHKO
+3 0+ Atk Decidueye-Hisui Shadow Claw vs. 0 HP / 0 Def Arceus-Poison on a critical hit: 196-231 (51.4 - 60.6%) -- guaranteed 2HKO

With EVs:
+3 0+ Atk Decidueye-Hisui Brave Bird vs. 4 HP / 252 Def Arceus-Poison on a critical hit: 272-321 (71.2 - 84%) -- guaranteed 2HKO

Fwiw once it uses grassy terrain it may actually use Leaf Blade once in a while, but it basically hits same as Brave Bird anyway
+3 0+ Atk Tera Grass Decidueye-Hisui Leaf Blade vs. 4 HP / 252 Def Arceus-Poison in Grassy Terrain on a critical hit: 266-313 (69.6 - 81.9%) -- guaranteed 2HKO after Grassy Terrain recovery

Strat is simple, waste turn 1 (idk, use Iron Defense or Acid Spray), wait for the buff clear, Iron Defense to +6, Acid Spray to -6 (usually debuff clear will have happened by the time you're at +6 def), Tera, ha ha judgement go brrr, use Recover when needed.

That said if you luck out and roll any of the AI that can lower its attack (like the various Chilling Water users, unfortunately not the intimidaters) it's even more free.
Cheers mate, will find my Arceus to get this built
 
The same

In fact I was too lazy and only EVd 252 spatk on mine, prolly even more free with full EVs.

Fwiw I actually got crit by +3 Brave Bird at some point and on no defensive EVs it hits for over 3/4 of your HP, so I recommend making sure to keep yourself above 70% just in case.
In fact after checking calcs I got lucky Woweeee

+3 0+ Atk Decidueye-Hisui Brave Bird vs. 0 HP / 0 Def Arceus-Poison on a critical hit: 334-394 (87.6 - 103.4%) -- 25% chance to OHKO
+3 0+ Atk Decidueye-Hisui Shadow Claw vs. 0 HP / 0 Def Arceus-Poison on a critical hit: 196-231 (51.4 - 60.6%) -- guaranteed 2HKO

With EVs:
+3 0+ Atk Decidueye-Hisui Brave Bird vs. 4 HP / 252 Def Arceus-Poison on a critical hit: 272-321 (71.2 - 84%) -- guaranteed 2HKO

Fwiw once it uses grassy terrain it may actually use Leaf Blade once in a while, but it basically hits same as Brave Bird anyway
+3 0+ Atk Tera Grass Decidueye-Hisui Leaf Blade vs. 4 HP / 252 Def Arceus-Poison in Grassy Terrain on a critical hit: 266-313 (69.6 - 81.9%) -- guaranteed 2HKO after Grassy Terrain recovery

Strat is simple, waste turn 1 (idk, use Iron Defense or Acid Spray), wait for the buff clear, Iron Defense to +6, Acid Spray to -6 (usually debuff clear will have happened by the time you're at +6 def), Tera, ha ha judgement go brrr, use Recover when needed.

That said if you luck out and roll any of the AI that can lower its attack (like the various Chilling Water users, unfortunately not the intimidaters) it's even more free.
this is by far the easiest strat to beating this thing. No online needed. Just maybe need to remind myself to check the tera type before starting :row:
 
GUYS I found the best counter

Corviknight

make sure speed is above 157

taunt, iron defense/bulk up then Drill Peck, it can't do a thing to you, the more Triple Arrows the better.
 
taunt, iron defense/bulk up then Drill Peck, it can't do a thing to you, the more Triple Arrows the better.
Outside of the perfectly appropriate name for something we found out 2 pages ago...

Corviknight is *not* a perfect counter. It's a reliable one, but you can actually get deleted by a poorly timed crit after the Sword Dance.
All it takes is 2 crits in a short time or crit when you're in KO range.
+2 0+ Atk Tera Grass Decidueye-Hisui Triple Arrows vs. 252 HP / 252+ Def Corviknight on a critical hit: 246-289 (61.5 - 72.2%) -- guaranteed 2HKO
+3 0+ Atk Tera Grass Decidueye-Hisui Triple Arrows vs. 252 HP / 252+ Def Corviknight on a critical hit: 306-361 (76.5 - 90.2%) -- guaranteed 2HKO

With a high crit move, that *can* happen. It's unlikely, but can and will every few attempts.
It's why I keep recommending to just go Arceus. I've seen plenty of online attempts on Corvi die from 70% hp to a crit (without considering the other 3).

Honestly don't use Corviknight if you can avoid it, if you want a sure kill, go Arceus (if you have one), it's hilariously free. If you don't have one... well hope the RNG is on your side.
 
Throwing out other random ideas just in case maybe there's something more accessible than Arceus to try: Would Skuntank be any good? Can Haze to prevent Triple Arrow debuffs, has Helping Hand/Acid Spray/Screech for a few supporting damage options at least.

Maybe Farigiraf with Sap Sipper? Absorbs Leaf Blade with Sap Sipper (which can persist into a Tera) and is immune to Shadow Claw, has access to Helping Hand and Screens, or can even do weird shenanigans like Skill Swap (in case you don't trust Randos to remember Scrappy or want Intimidate to work for a Solo?) or use Power/Guard Swap to Steal Decidueye's Boosts away/give it any Triple Arrow drops accumulated without the Clear Smog dilemma (maybe avoid the latter if the team's Acid Spray Special Attackers of course)
 
Honestly speaking if you are looking at support mons, you want ideally stuff that resists BOTH fighting and grass, expecially fighting to avoid the high crit + defense drop combo. There are a lot of workable options but i would really try to avoid having to eat +3 high crit moves.
 

Chou Toshio

Over9000
is an Artist Alumnusis a Forum Moderator Alumnusis a Community Contributor Alumnusis a Contributor Alumnusis a Top Smogon Media Contributor Alumnusis a Battle Simulator Moderator Alumnus
That is honestly my actual question. Back then I was not able to gauge if ruin legendaries abilities affect the party either

Edit: Honestly, at least this early, online is just not worth it.
It's full of people either bringing mons weak to flying (expecially Koraidon or Ogerpon), or just Skeledirge / Ceruledge forgetting the boss has Scrappy and proceed to get obliterated.

The solo with Arceus is 100% free, don't hurt yourself, don't do this online.
I agree the online makes it WAY harder than it has to be, as is often the case for normal 7 star. But like against Chestnaught, I feel like sometimes the “puzzle” of the raid doesn’t feel “solved” until ballbuster solution to win the online raid found. Like sure we could efficiently farm Chestnaught endlessly with Appletun solo, but I think the raid became so much more satisfying after the Espathra build came out and made it impossible for online noobs to lose it for you.

Or maybe it’s just me being too lazy to go through resetting the raids again and again because it requires going through all the parent controls I put on the Switch because of my kids.

Inversely Mewtwo becomes much less interesting for replay ability when you realize how unreliable the offline solo necessitated. I like it most when both solutions are found.
 
Something I am wondering is, would Neutralizing Gas actually do anything?
Disabling Scrappy seems like could actually be useful with many people actually bringing ghost types
I actually had Neutralizing Gas at first, but I could never figure out if it actually benefited my allies. On more than one occasion I saw an ally with Intimidate return from fainting on a later turn and the messages for Intimidate activating and Scrappy blocking it popped up, which shouldn’t have happened since my Neutralizing Gas was active.

I think Neutralizing Gas only affect the raid boss’ interactions with you specifically, with allies still experiencing the effects of Decidueye’s Scrappy on their end. That’s why I ended up changing to Levitate, to reduce message pop-ups for me.
 
Honestly, the only reason I am not usng Arceus is because, well... I can't. I have Legends Arceus, yes, but 1: I haven't caught Arceus yet (In fact, I haven't even beaten it yet. Only because after completing the 3rd area I decided I would try to max out my star rank before heading to the next, and I'm also planning on catching every Pokemon that is possible to catch before I get to the point of no return) and 2: Even if I did, I don't have Home, nor do I plan on paying for it.
 
Honestly, the only reason I am not usng Arceus is because, well... I can't. I have Legends Arceus, yes, but 1: I haven't caught Arceus yet (In fact, I haven't even beaten it yet. Only because after completing the 3rd area I decided I would try to max out my star rank before heading to the next, and I'm also planning on catching every Pokemon that is possible to catch before I get to the point of no return) and 2: Even if I did, I don't have Home, nor do I plan on paying for it.
While this won't help with the former, the latter isn't an issue for whenever you do get there: Home has a free plan that gives you a box to work with and you can still move things across switch games just fine.
 
I agree the online makes it WAY harder than it has to be, as is often the case for normal 7 star. But like against Chestnaught, I feel like sometimes the “puzzle” of the raid doesn’t feel “solved” until ballbuster solution to win the online raid found. Like sure we could efficiently farm Chestnaught endlessly with Appletun solo, but I think the raid became so much more satisfying after the Espathra build came out and made it impossible for online noobs to lose it for you.

Or maybe it’s just me being too lazy to go through resetting the raids again and again because it requires going through all the parent controls I put on the Switch because of my kids.

Inversely Mewtwo becomes much less interesting for replay ability when you realize how unreliable the offline solo necessitated. I like it most when both solutions are found.
I think I'm a bit inbetween with this opinion.

I do like when raids give a bit of leeway from the "solving" and actually let people experiment a bit, and many times we did come out with builds that can "carry the bads" (I still remind mud slap gastrodon somehow carrying some guy who had hecking Garchomp on the Greninja raid...)

...some raids however are just so absurly difficult online that it just isn't worth it. I've tried several times for this one, and even when the team was "normal" or even 4 corviknight, there's been losses due to someone getting crit into oblivion.

This is just one of these raids I don't feel is worth doing online. Moreso because looks like the general playerbase is not aware of the existance of Scrappy and keeps bringing relatively squishy ghost types which get absolutely obliterated by +3 Shadow Claws and Triple Arrow crits.
 
I managed to clear 2 out of 4 attempts with randoms using Corviknight, so if you are just looking to catch one and be done with, Corviknight is probably fine for those without Arceus. I actually ran Iron Defense and Bulk Up because I didn't really need the 4th slot and I wanted to get my defense up sooner then boosted my attack a bit. Don't think I would try to farm the raid with it.

Interestingly, both of the times I won were with Skeledirge partners, despite Scrappy they weren't dying constantly. My using Taunt to block the boosts likely had something to do with it. I was getting more annoyed with flinch than crits. I had 3 flinches in a row more than once.
 
Interestingly, both of the times I won were with Skeledirge partners, despite Scrappy they weren't dying constantly. My using Taunt to block the boosts likely had something to do with it. I was getting more annoyed with flinch than crits. I had 3 flinches in a row more than once.
Skeledirge having Unaware makes it tankier than other mons. I am assuming that the AI prefers using Shadow Claw on them due to being weak to it so they should be less at risk of being crit.
0+ Atk Decidueye-Hisui Triple Arrows vs. 252 HP / 252+ Def Skeledirge: 84-100 (20.3 - 24.2%) -- guaranteed 5HKO
0+ Atk Decidueye-Hisui Brave Bird vs. 252 HP / 252+ Def Skeledirge: 75-89 (18.2 - 21.6%) -- possible 5HKO
0+ Atk Decidueye-Hisui Shadow Claw vs. 252 HP / 252+ Def Skeledirge: 90-106 (21.8 - 25.7%) -- 0.9% chance to 4HKO

The buff clear pulse being at start makes it less likely to be caught without the ability and they won't have to eat +3 nukes.

The main difference with Corviknight is the fact Dirge cannot boost its defense so you are going to be taking 20%+ of your HP per turn of damage and ironically it doesn't matter if someone debuffs the boss due to Unaware, meaning you kinda rely on someone to provide Reflect, defensive Cheers or other ways to not die, or either ways have to use Slack Off / Heal Cheers way more often than you would with Corvi.
Probably a WoW at start would also be helpful.
The benefit obviously being that you do WAY more damage than Corviknight can even dream of since your main damage move also buffs you.
 
1696605507764.png

1696604532447.png


A raid boss that is immune to Intimidate may be Azumarill's greatest challenge yet, but we can still manage to push forward to victory in yet another 7 star Azumarill solo win and we don't even need to hit super effectively or have Taunt to do so. The timing on this clear is very tight which isn't helped by Decidueye's erratic move choices, and I even had to make a whole new Tera Fairy Sap Sipper Azumarill set for this one.

1696604626642.png
1696604634023.png


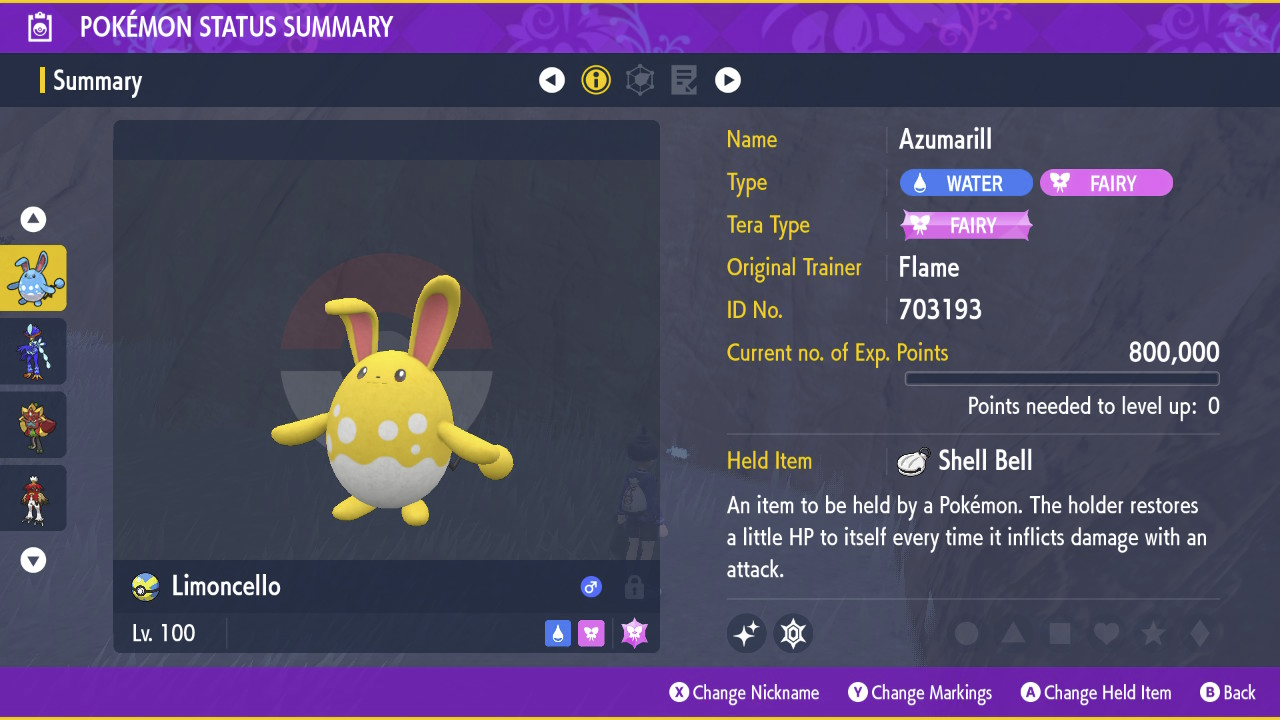
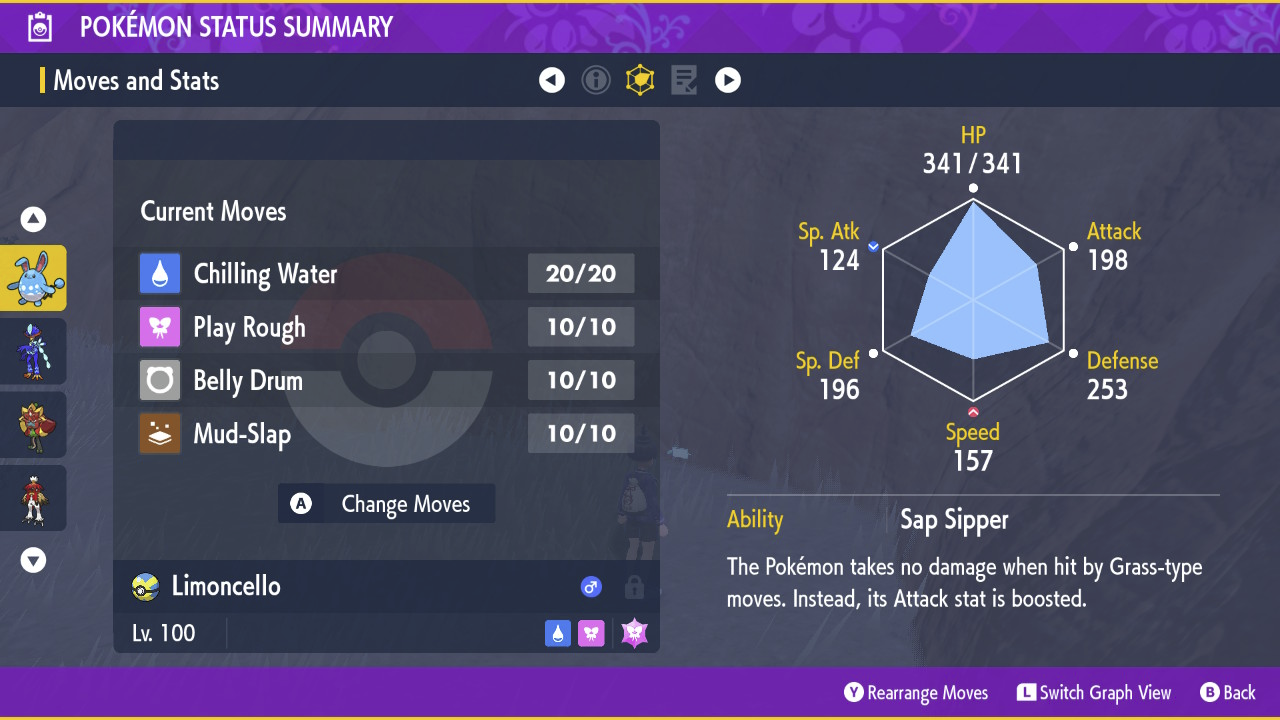
Azumarill runs Jolly with 28 Speed EVs to outspeed Decidueye, which allows it to avoid taking hits before debuffing and not get flinched. The rest of the EVs go into Attack (I have 248 here because of suboptimal vitamin order) and 238 Defense to maximize our bulk against Decidueye. Chilling Water is the key to survival, and I have it in the first slot instead of Mud-Slap because it ends up as the more consistent move to spam, especially when the raid randomly sets your cursor to slot 1. Reducing attack ends up more consistent than reducing accuracy here and having enough HP is important when we need to find time to set up, though one Mud-Slap for each phase is nice to reduce Decidueye's hit rates below 100. On my first attempt I tried Tickle, but the debuff cleanse + shield rendered that a poor approach, and so Chilling Water was my best bet to reduce its attack afterwards. Another option was Defense Curl, but it is more vulnerable to high damage ranges on +3 crits rather than directly lowering Attack, and is longer to set up after a death compared to Chilling Water being able to be done on my first life.

You may ask if Tera Poison/Flying Tera Blast would deal more damage due to being super effective and having no miss chance, and the answer is yes. I only thought of it after many iterations of the current strategy, and by then I thought that Play Rough still had a path to victory so it was just a matter of convenience and also using a natural tera type. I will give Play Rough some credit for having a chance to lower Attack, which may make a difference when there's very little time to properly set up Mud-Slap and Chilling Water at times.

1696615715825.png
1696615722338.png

1696615735293.png
1696615751128.png

This clear took many attempts and I actually had to sleep on it to figure out how to make enough time to win. Over many iterations of this battle I have come up with a fairly set turn-by-turn strategy for Azumarill's victory, and now I will detail my findings about how to handle this raid with Azumarill. Note that I will add some visuals, but they are mostly from various other failed runs since I didn't take many pictures of this winning attempt until the end so HP and time may be inconsistent.

Part 0: Resetting for AI
Getting a solid AI group is important. I found that dealing with Bulk Up's defense boost alone is just too slow to deal meaningful damage, so I need an AI that can lower Defense in the early phases which basically comes down to Weavile and Arcanine with Leer. In the end I decided to reset to lock in some AI and got Weavile first. I feel like both of these are pretty interchangeable, but Weavile can randomly freeze while Arcanine can randomly burn which may arguably be better for survivability.

1696615954797.png

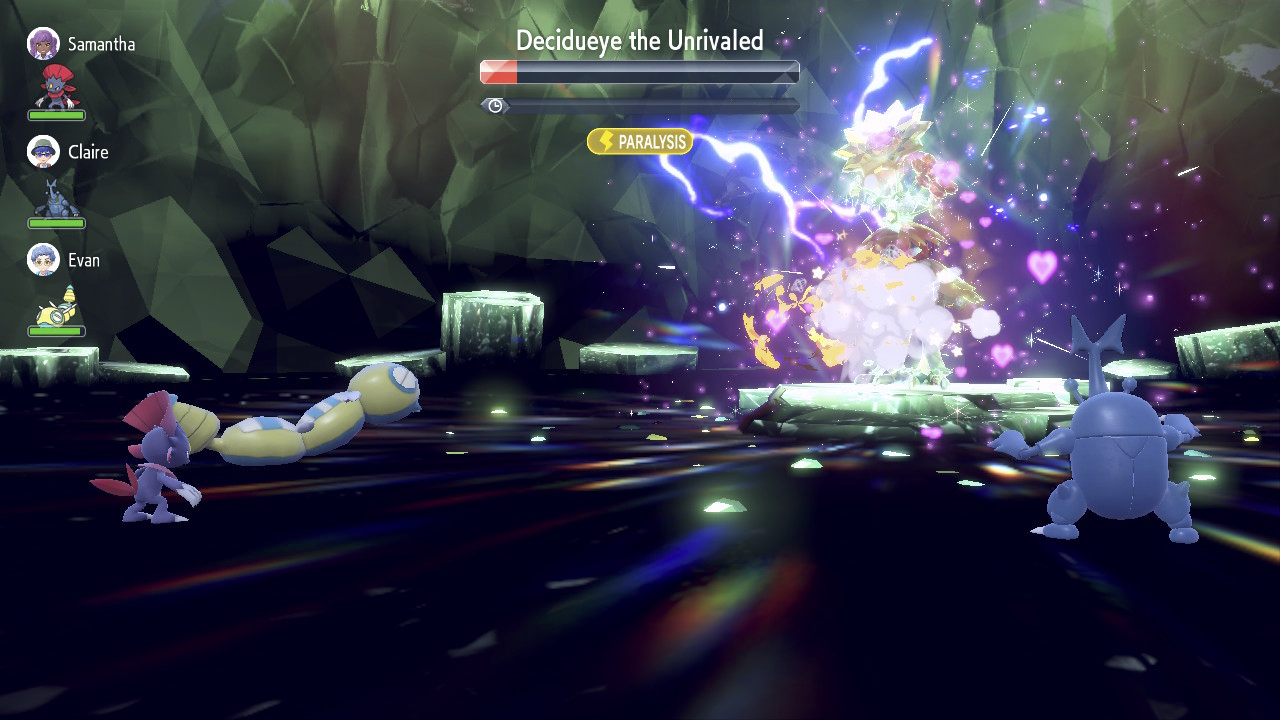
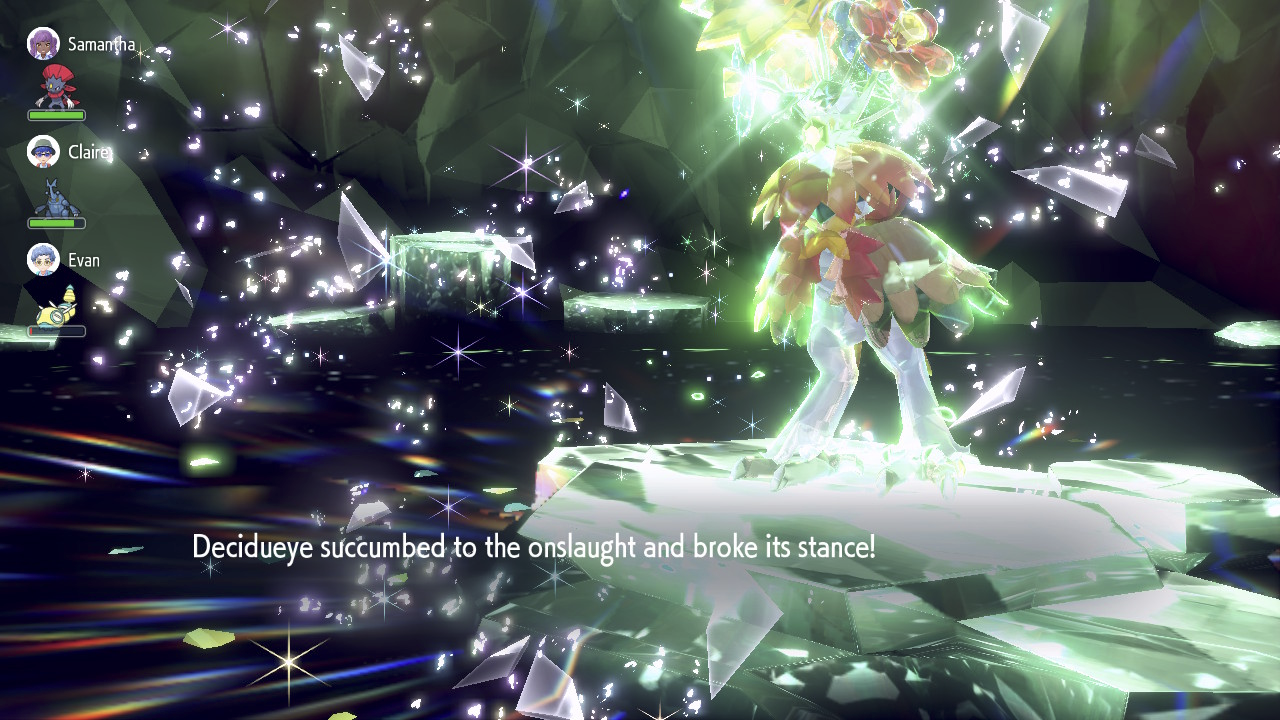
Sometimes Weavile freezes were a thing, but with Decidueye getting double actions around half its HP, that's 8 chances for it to thaw out on a turn which is not very reliable to keep it stopped. I did actually get a freeze in my winning attempt, but it was on the turn I broke shield anyway so it didn't even get to move afterwards, and it thawed out on the AI's turn (I think the turn order made it so I broke the shield and the AIs got a turn of stun for that, and the next turn Decidueye was lastly stunned for me and it could hit the AI moving afterwards) so it didn't actually help me.

1696604889053.png

(The peak of AI chip damage before the shield that I have seen.)

The other AI I got were Heracross and Dudunsparce, and this was actually pretty important. Despite all the weaknesses on this team, it doesn't really matter because the AI naturally outspeeds so they can move before dying, and the AI has no respawn timers so it doesn't really matter if they die. Heracross likes to spam Megahorn and combined with Weavile's Leers, this can cause a lot of chip damage that can make a real difference when damage is the main bottleneck of the run (though the above screenshot got Decidueye to double action range too early and failed).
1696614723496.png

I found it worth resetting to get the AI's chip damage at least around the letter "a" in Unrivaled before the shield, but sometimes I would get even farther. Dudunsparce can put up Glare which can help survivability but isn't totally necessary with all the other AI options that can help like Staraptor, Sylveon, Umbreon, Drifblim, maybe Bellibolt but it doesn't seem to prefer Discharge, and the HP threshold for the required setup pre-sheild is lax enough that it's not totally necessary.

Part 1: The Start Pre-Shield

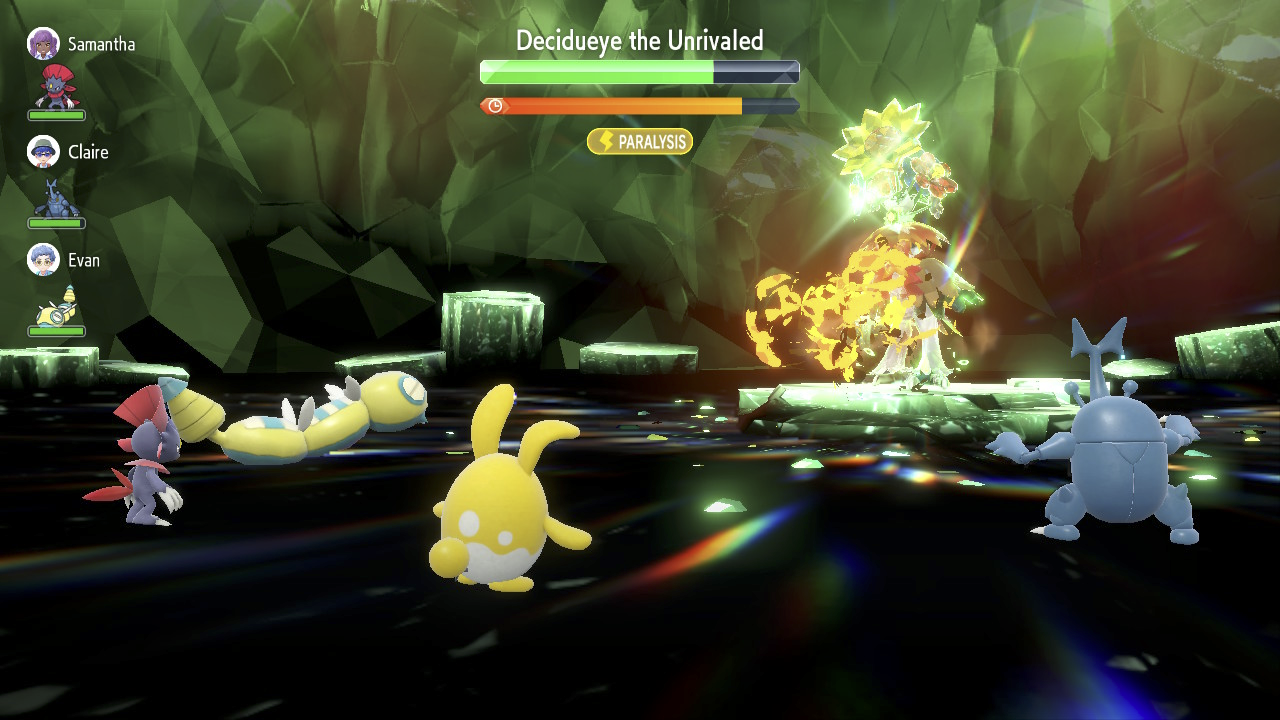
This is where the raid starts in proper. Before the buff reset + Bulk Up action, I like to put up 1 Mud-Slap and 1 Chilling Water, though sometimes I mash into Chilling Water first. Mud-Slap adding a miss chance is appreciated but not something we can afford to invest multiple turns in, so I only hit 1 in this phase. After the Bulk Up turn, I spam Chilling Water for consistency and usually get 3 turns of actions in this part, which is where most of the AI's chip damage will come into play, so it's important to actually attack here instead of stalling the timer. Bulk Up can be stopped by Dudunsparce's Glare which is occasionally helpful.

1696615407896.png


I feel like Decidueye usually picks randomly in this part and sometimes it doesn't find out I have Sap Sipper for the first 2 turns, and so when it resets my ability it may accidentally manage to hit Leaf Blade on the same turn, which confused me for a bit. Otherwise usually its AI chooses not to Leaf Blade after Sap Sipper is discovered, and afterwards it only chooses it on the turn after the ability reset wears off which is too late. With ideally 2 Leaf Blade fails and chances of weak moves, Azumarill has a good chance of preserving enough HP for the next phases.

Part 1.5: Decidueye's Moves
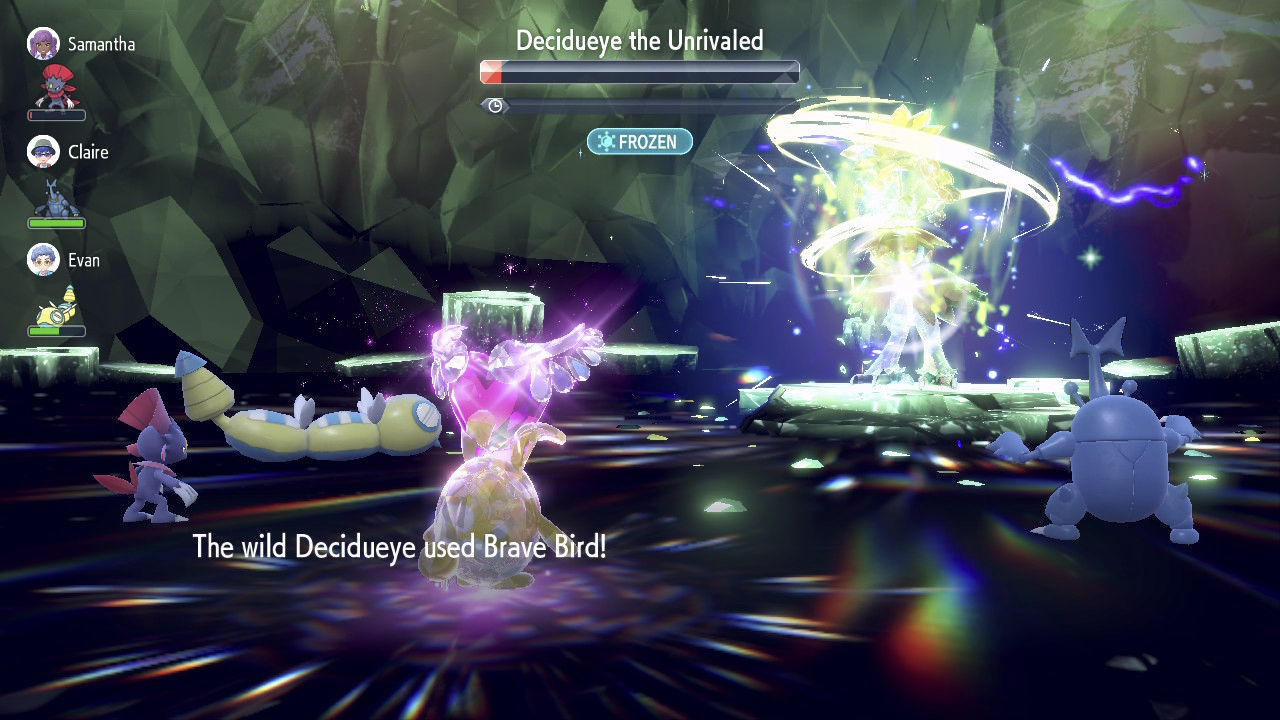
Here we can talk about Decidueye's attacks and how they affect Azumarill, and its move choices feel fairly random, with a good chance of anything showing up even from Turn 1 when Sap Sipper is unrevealed. Brave Bird is the strongest of the bunch by far, with Shadow Claw and Triple Arrows being weaker but having a solid crit chance. Leaf Blade usually leads to some free turns earlygame, and sometimes even it uses it as its double action in the endgame which is strange. The scripted Leaf Storm is irrelevant, but Grassy Terrain is actually a boon for us.

It is fortunate Decidueye is light on resets unlike the past few raids, but it's still a tough fight with its reset + Swords Dance + shield combo. As mentioned, Bulk Up is a major problem if left unchecked and the AI Leer is what makes this clear possible. The double actions start around above 50% HP, and so it's a delicate balance to chip Decidueye down enough in Phase 1 so that the battle is winnable, but not too far down that it starts doubling after Swords Dance.

Part 2: Shield and Sacrifice
1696614777799.png

After about 3 turns, Decidueye will reset its debuffs, put up a shield, and Swords Dance. Depending on timing you can sometimes sneak in Chilling Water between the debuff reset and Swords Dance going up but usually it doesn't happen. At this point Azumarill has to rely on some degenerate tactics from the Mewtwo solo strategies I found that may be a glitch, and I feared it might have been patched now that cheers showed up as durations, but fortunately it was not patched. The Mew video mentioned that dying while you have cheer duration up will preserve the cheer effects infinitely after you respawn, and so I thought this could be a major factor for Azumarill's victory adding on 2 extra multipliers for the rest of the battle where it's needed most. The cheers don't show up on your status screen, but the difference is definitely felt and I confirmed with damage calcs on the defense cheer, as well as noting that I would heal about 70-80 with Shell Bell with the Attack cheer active.

1696614665034.png

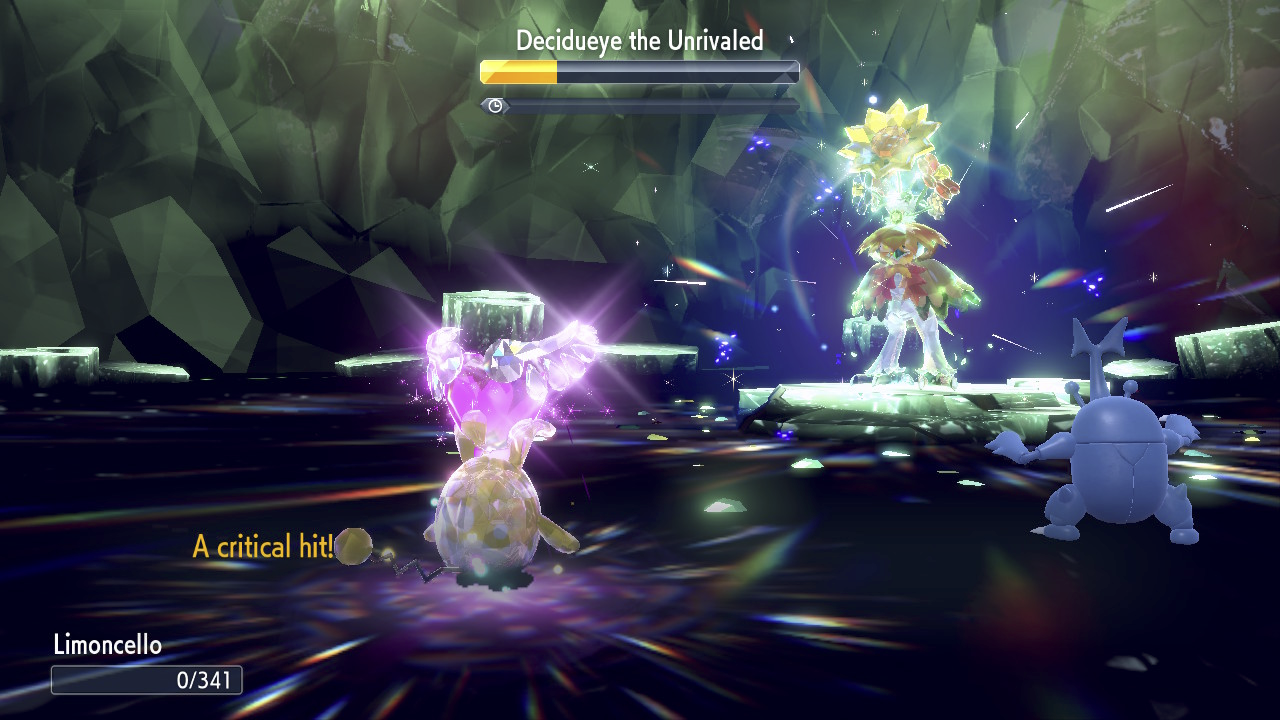
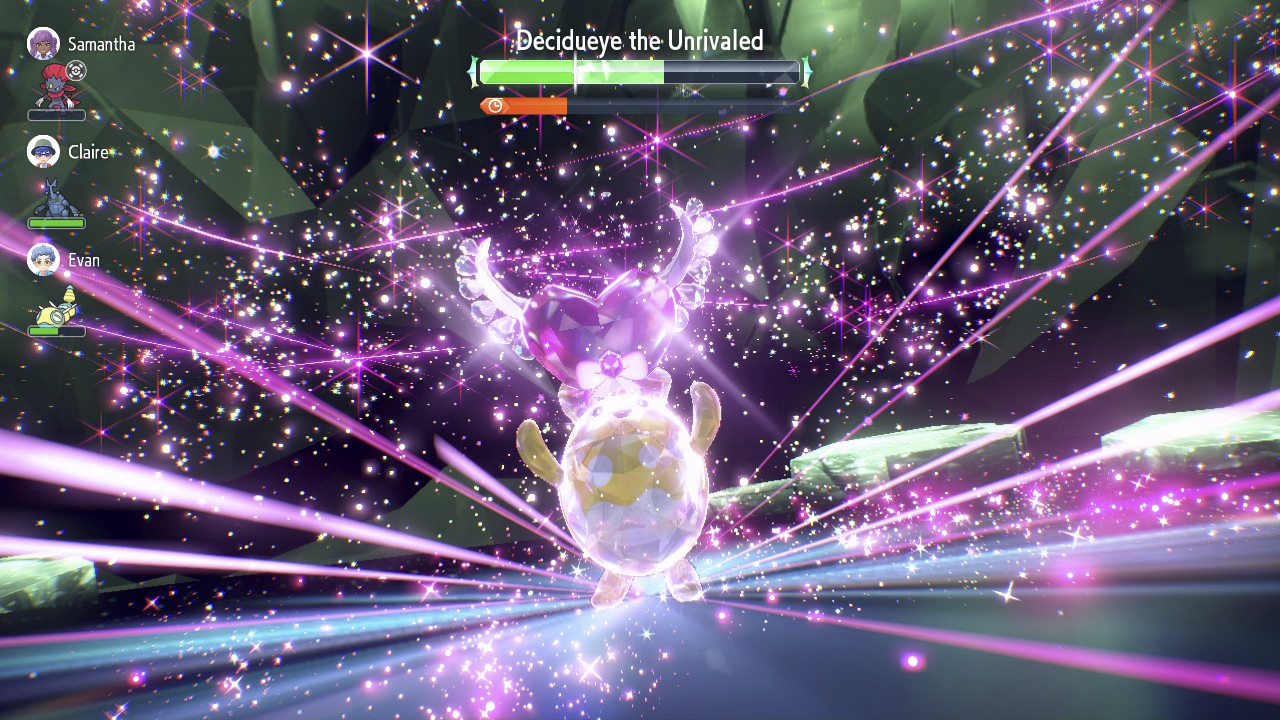
My strategy for this section is to use Chilling Water, Defense Cheer, and Offense Cheer into death. Usually Azumarill only needs about above 50% of its HP to take 2 hits, and in this run I got critical Brave Birded to that point, but was still able to survive thanks to a merciful Shadow Claw pick. It is preferable to avoid any defense drops before this point as well.

Part 2.5: Death and Waiting
1696615388581.png
1696615446678.png

At this point you skip over some timer and trigger Decidueye into setting Grassy Terrain and Leaf Storming, or sometimes the other way around. Even if Azumarill is alive for this somehow, Leaf Storm is no threat and Grassy Terrain helps out a lot to get the last heals set up. Sometimes the countdown starts before Decidueye sets moves and sometimes it happens after everything which can be bad.

Part 3: Debuffs and Rebuffs
1696614980301.png

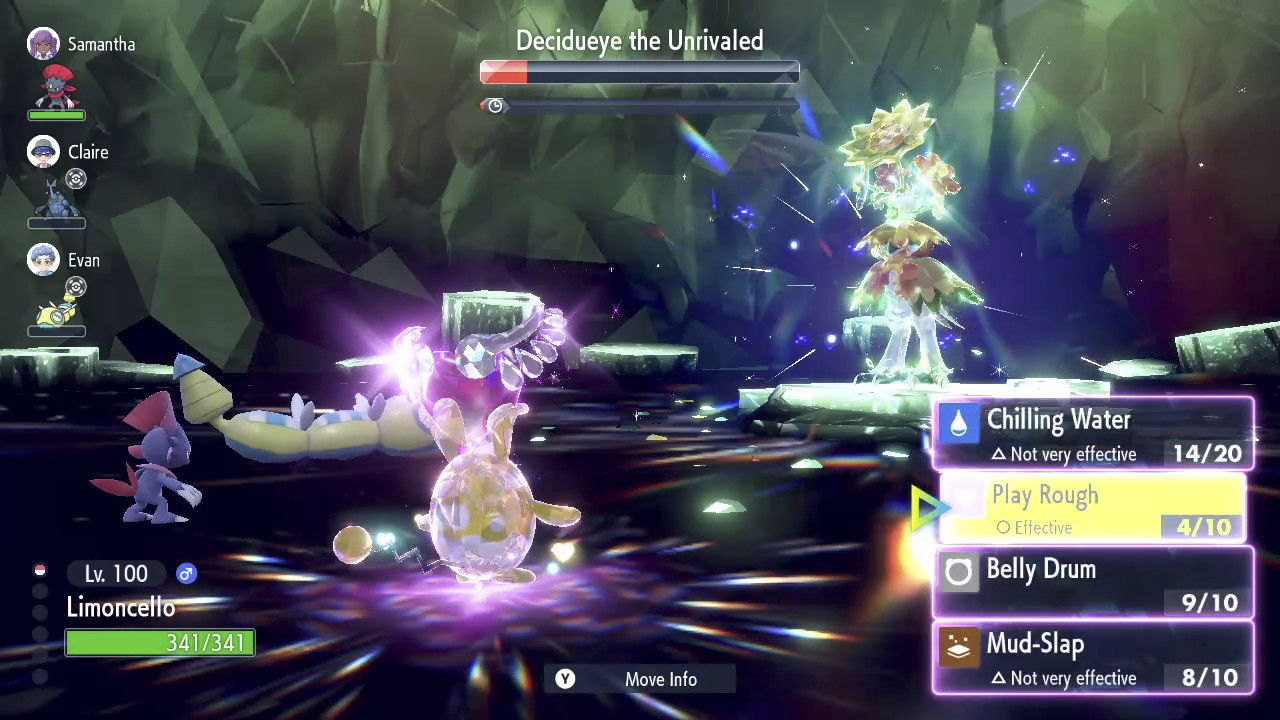
After respawning, this is when you set up debuffs and prepare to buff up with Belly Drum afterwards. In earlier attempts I tried to get greedy with Chilling Water and multiple Mud-Slaps, but I just did not have the turn count for it to work. I had to shave off some turns somehow and I was in the middle of refining the process in this winning attempt. I ended up deciding to just go for 1 Mud-Slap just to add the miss chance to possibly save animation time later on, and also going for only 1 Chilling Water to put its attack down to neutral. In previous runs I would try to get Decidueye to -1 Attack which would let me outpace 2 Brave Birds with Play Rough healing, but this was the only way I could think of to save a turn by taking a risk over being safe.

1696614944402.png


As I learned from the Delphox raid, taking less turns gives the AI less turns to RNG screw you, so I decided to settle for that and start buffing up. Grassy Terrain helps mitigate chip damage you take while setting everything and Belly Drumming, and after that you can start to spam Fairy tera Play Roughs until the end. Technically you could tera earlier to deal more shield chip damage but Mud-Slap and Chilling Water do so little anyway and I prefer to save the long animation until I know I'm in a viable position.

Part 4: Rough Play

1696615010692.png
1696615022475.png

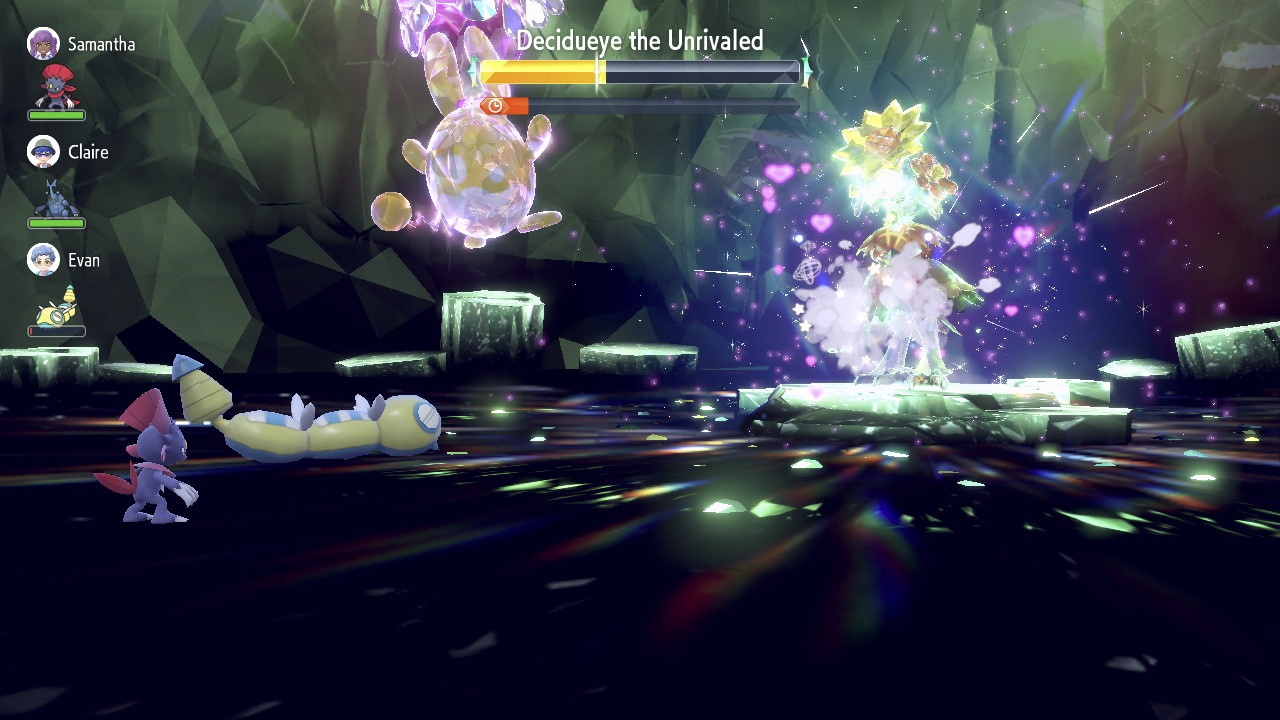
At this point all you can do is spam Play Rough, and there is not much time left so you're lucky to get even 5, but somehow in this run I managed to sneak in up to 7 uses. The hardest part is actually breaking through the shield, because if you can break through then you basically get 2 free hits on him because of the stun turn, and then your AI status moves can actually pierce through and help out somewhat. There is really no other strategy to this point and it just relies on having enough time to click, as well as Azumarill not missing while Decidueye should miss for the least animation time wasted. I think it took about 4-5 Play Roughs to pierce the shield. Ideally Decidueye would just hit for weak Shadow Claws or Brave Birds that you can outpace with Shell Bell healing and some misses, but Triple Arrows defense drops can be a problem even this late into the run. It's also at this point that Decidueye randomly Leaf Bladed me on the second move sometimes and this was happening on a regular basis.

1696614873565.png

In this winning run it was down to the wire with the timer and I mashed Play Rough as fast I could, with my move cursor fortunately not resetting. After the HP warning you usually only have time for 1 turn, but sometimes you can sneak in 2 if animations are fast enough and the turn ends before the timer depletes. This is when I got the freeze from earlier that didn't help me since it wore off by the time I got to input this last turn anyway. Decidueye actually got 2 attacks on me posthumously and I think that's because the AI Weavile actually finished it with Ice Punch, so I didn't get a shot of the Decidueye fainted text on my end.

1696616141143.png
1696616267649.png


Part 5: Conclusion
1696606058291.png


I thought this was going to be very simple for Azumarill, but being immune to Intimidate made Decidueye much more of a problem than I was expecting on top of it setting up Attack buffs, so I was driven to some extremes but it was still barely winnable which I have to give Game Freak some credit for after Mewtwo. I'm still not a fan of the lowered timers lately which was the real bottleneck here, which made this very reliant on AI getting enough damage off in the start to get me through the rest of the way, which is something I didn't expect at all. You can see from my PP usage that I used about only 16 turns of PP, plus 2 cheers and the time spent dead, and this was a run that went down to the entire timer. Maybe if I remembered Toxapex had Chilling Water then the post-shield phase could be made smoother, but I was satisfied with this AI team.

EDIT:
1696618434274.png

I forgot to add this in, but here is a picture of Decidueye using Leaf Blade randomly near the end of the raid that I want to highlight.
 
Last edited:
(The peak of AI chip damage before the shield that I have seen.)
Incidentally, probably due to how late the shield is on this raid, I feel this is one of the few raids where the AI actually contributes to significant damage when doing solo.

I'd honestly prefer if they get us a bit more "late shield" raids tbh.
 

DougJustDoug

Knows the great enthusiasms
is a Site Content Manageris a Top Artistis a Programmeris a Forum Moderatoris a Top CAP Contributoris a Battle Simulator Admin Alumnusis a Smogon Discord Contributor Alumnusis a Top Tiering Contributor Alumnusis an Administrator Alumnus
I don't know which online personality or website is telling people to use Ceruledge or Skeledirge for this raid, but the usage of those two mons is through the roof and it is NOT a good choice. So just in case this Smogon thread has influence over the random online players looking to clear this Decidueye raid, I want to make this public service announcement:

- PLEASE STOP BRINGING CERULEDGE, SKELEDIRGE OR ANY OTHER GHOST TO THE DECIDUEYE RAID -
These pokemon are NOT immune to Triple Arrows because Decidueye has Scrappy, and it also carries Shadow Claw which hits you super-effectively.

Ok, I got that off my chest... I know it won't make much of a dent in the number of bad mons randoms bring to this raid, but I feel a little better now that I have shouted it here lol. And for the record, I am not saying those mons can't work at all against Decidueye if built and played correctly. But 99% of the people bringing Ceruledge and Skeledirge to this raid are using them thinking they are immune to Fighting and clearly are unprepared for this raid.

With that said, after losing twice trying to solo with Corviknight and bad luck with crits, here's the mon I used to solo my raid relatively comfortably:

:sv/armarouge:
Armarouge @ Shell Bell
Tera Type: Fire
Bold Nature
EVs: 252 HP / 252 Def
- Lava Plume
- Acid Spray
- Clear Smog
- Iron Defense

There are a couple of ways you can play this at the start of a solo battle. You can start with an Iron Defense to offset the damage of that first SE Shadow Claw that you are gonna get hit with, but realize that Decidueye is going to reset you pretty quickly anyway. For that reason, I like to do an Acid Spray, even though it will erase its own debuffs pretty quickly also. But an Acid Spray begins building tera for you, and potentially helps any special attacker NPCs. Turn 2 is pretty much set in stone: Clear Smog to wipe out the Bulk Up buff it gets. Then give it another couple of Acid Sprays and tera ASAP which takes super-effective Shadow Claws off the table. Clear Smog one more time after the boss Sword Dances and you're good to go.

From there, the rest of the battle is a matter of buffing your defense with Iron Defense to offset the drops that will come from Triple Arrows, and hitting with Lava Plume to spread burn and get juicy recovery from Shell Bell since the owl has no SpDef from all your Acid Sprays. Eating an early crit Shadow Claw with this Armarouge hurts a bit, but later in the battle the crits are not much of a problem because you get back lots of health from Tera Lava Plumes against Decidueye's harshly debuffed special defense.

This isn't a perfect solo strat, but I found it easier than Corviknight, because Armarouge has tools to deal with most of the problems caused by the walking hax factory that Decidueye is in this raid.
 
Last edited:
Did the Arceus method with my ancient Toys R Us arceus, since it meant i didnt need to burn exp on it.

It really is full proof, love it. I even got an exceptoinally easy run of it because I got the CPU Bellibolt who Paralyzed it early on and I just kept getting a bunch of free turns throughout.


Also, weirdly, it only used Leaf Storm on one of the AI? I assumed it was a "hit everyone" type turn.
 

Users Who Are Viewing This Thread (Users: 1, Guests: 0)

Top