
Chesnaught + Skeledirge Stall


I RAN OUT OF SPACE. DIVIDED INTO 2 POSTS. 1/2.
I RAN OUT OF SPACE. DIVIDED INTO 2 POSTS. 1/2.
This team is outdated! Just a little something i thought i'd share. I got reqs on the latest Gliscor suspect (click to see) with this team, so you can definetely use it if you're playing in a format where this ban for some reason isn't in effect, as a throwback with friends, or whatever you want. Really just here as a novelty of sorts. Had to get this out of my system.
THE TEAM >>>>>> https://pokepast.es/bdc36eba4df6edfd<<<<<< THE TEAM
It's also uploaded publicly as team 123774
This is my first time doing something like this, so please bear with me!
Intro
It's also uploaded publicly as team 123774
/view team 123774This is my first time doing something like this, so please bear with me!
Intro
Why stall?
To me, Tera is the epitome of both unfun and uncompetitive. I hate going up against offensive teams and being cucked out of a win by a Tera i couldn't have predicted, be it because it's very out of the ordinary or for some other reason. I find this to be a very common occurence when i play something that isn't a slow, steady pace with very clear outcomes in every turn (crits aside), so i fall back on stall to not get tilted out of my mind every time i try going on the SV OU ladder.
Stall, as of Roaring Moon's ban, is consistent. Against the very common HO teams (as in the style, not any particular teams), you always know exactly what to do and there is very little room for deviation from the plan you'd use. Sure, there is room for getting predicted and/or outplayed, but as long as you're both good and experienced with this playstyle, you should not have any problems with equally skilled players.
The general teambuilding process
Stall, as most of you might already know, is very straightforward. Your team is focused on dealing as much passive damage as possible instead of the traditional direct means, this means that your primary source of damage would be entry hazards, status conditions, trapping moves and weather (which this team does not use) among other forms of passive damage. This makes it almost mandatory to include at least one Pokémon capable of fulfilling the following roles: hazard setter, wall(s), Knock Off absorber, status absorber and Unaware user. As of generation 8 with the introduction of Heavy-Duty-Boots, it's equally mandatory to include a Knock Off user.
A good stall team must include these roles if it wants to succeed. This metagame is stacked to the brim with both Pokémon that nuke everything and those that can compress multiple of the aforementioned roles into one team slot, so handpicking & studying your team composition is essential to face the dominant Hyper Offense teams.
Individual Pokémon's purposes, usage tips and checks/counters
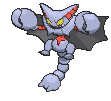
 Gliscor, the Annoyance
Gliscor @ Toxic Orb
Ability: Poison Heal
Tera Type: Ghost
EVs: 252 HP / 252 Def / 4 SpD
Impish Nature
IVs: 30 Spe
- Knock Off
- Spikes
- Toxic
- Protect
Gliscor, the Annoyance Gliscor @ Toxic Orb
Ability: Poison Heal
Tera Type: Ghost
EVs: 252 HP / 252 Def / 4 SpD
Impish Nature
IVs: 30 Spe
- Knock Off
- Spikes
- Toxic
- Protect
What do I need to know?
- Gliscor is quite possibly singlehandedly keeping both stall & balance minimally PLAYABLE in the face of the dominant Hyper Offense teams. It's very hard to break for a lot of Pokémon thanks to it's great set of tools. After losing access to Roost, Poison Heal + Toxic Orb + Protect is a must have for any defensive Gliscor to assure it's longevity. Healing 12% per turn is not only an almost 2x as better Leftovers (6.25% per turn), but it means that you both cannot be statused once activated and that you don't care about being hit with Knock Off, since you don't depend on holding the item to heal after one turn.
- Knock Off is prefered over Earthquake to assure your passive damage from your Spikes, your most valuable tool, does not go ignored against opponents with Heavy-Duty-Boots, and assures those immune (such as Enamorus
 ) will still take damage from your teammates' Stealth Rock. It can also be useful to make opponents like Choice Band Rillaboom
  not hit you as hard as they would, making them more manageable for your team to play against. Sadly (for the best, honestly, let's be real here) it's damage output does not even begin to compare to STAB Earthquake. This may leave Gliscor in awkward positions, namely against enemy Glimmora
  , where it has to chip it down slowly until it dies, alternating between Knock Off and protect as to avoid the 2HKO of Power Gem; but is ultimately a better pick for stall Gliscor.
 - Spikes, as i said before, will be your main source of damage against most teams. After 3 stacks grounded opponents will take 1/4th (25%) of their max HP in damage upon switching in. Even if you cannot guarantee every layer, trying to set up one before switching out is a good idea to put spinning pressure & some damage on your opponent. It has almost no risk involved, except if Hatterene
 is part of your opponent's roster. More detail on this in the Usage Tips section.
 - Toxic is the bane of every offensive & defensive Pokémon except steels/poisons such as Gholdengo
 , Slowking-Galar
  and Heatran
  , or immunities like Manaphy
  and other Gliscor . Landing it immediately cripples whatever it hits extremely hard on the long term, making it much harder for your opponent to manage the passive damage over the course of the game. It has very little risk to it, if any.
 - Protect is necessary to assure your Gliscor's longevity. It effectively makes you immortal 2/3 turns, since getting OHKO'd is very hard, and you can protect immediately after for a 24% heal over 2 turns. This is the riskiest move Gliscor has, however. It's very predictable, which opens up an opportunity for your opponent to switch in something Gliscor evaporates to the sight of, such as Choice Specs Enamorus or any Weavile
 . Furthermore, it only has 16 PP. You need to manage your Protects effectively in order to make the most out of Gliscor.
 - Tera Ghost permits switching off trapping moves like the dangerous Magma Storm in addition to shitting on Great Tusk's
 front porch by denying the spin.
 - 30 Speed IVs are used to be slower than 31 IV Gliscor with U-turn, guaranteeing that you Knock or Toxic what comes in next once you know that's the set. You don't want to lower it too much as to not get outsped by uninvested mons or slow invested ones.
Usage Tips
- There is almost NO ENEMY TEAM where you don't lead with Gliscor. This is up to your discretion, of course, but the turn 1 Protect is fairly risk-free, considering the other Pokémon included in my team. Getting the self induced Toxic from your Toxic Orb is the only reason Gliscor is usable to begin with. Which brings me to...
- You want to (almost) ALWAYS PROTECT TURN 1. Again, up to discretion, but if you get Knocked Off without having procced your Toxic Orb, it's over: Gliscor is then relegated to being little more than a suicide spikes lead and a likely sacrifice. It's very rare for the opponent NOT to lead with something that threatens out or abuses Gliscor's presence directly. If they decide to use Swords Dance on their Ogerpon
 or Dragon Dance on their Dragonite
  , you'd still go into your Chesnaught or Dondozo respectively. If they use Substitute on Enamorus or Iron Moth
  , you can fall back on Skeledirge and Blissey respectively (for Enamorus, you may also decide to go into Blissey and using Stealth Rock depending on the opposing roster). Don't fear giving the enemy what feels like an initiative, because, again, without Poison Heal active Gliscor is near useless. And as i've also said, Gliscor is what holds your team together when put up against a lot of Hyper Offense and Balance teams. My point is: don't throw. Protect.
 - ALWAYS PROTECT AGAINST ENEMY GLISCOR , CLEFABLE
 AND RILLABOOM ON TURN 1. They may carry Knock Off, and you don't want to stand around and find out yourself. Rillaboom almost always has it.
 - ALWAYS PROTECT AGAINST ENEMY CINDERACE
 AND WEEZING-GALAR
  ON TURN 1. These carry Will-O-Wisp and will attempt to burn you to negate Poison Heal damage.
 - ALWAYS PROTECT AGAINST ENEMY TYRANITAR
 , DRAGONITE , SLOWKING-GALAR , TOXAPEX
  , BOTH GOODRAS
 , SANDY SHOCKS
  , LANDORUS-THERIAN
  AND THUNDURUS-THERIAN
  REGARDLESS OF THE TURN. This might sound a bit schizophrenic, but both of the first two may carry Ice Beam (yes, mixed ttar is real and it ate my ass) and can surprise OHKO your Gliscor. The next 4, Slowking-Galar , Toxapex and the Goodras also do. Sandy Shocks , Landorus-T and Thundurus-Therian often carry Tera Blast with Tera Ice. Thundurus in particular, if using Choice Specs instead of Boots (often on Ribombee webs teams) also runs Tera Blast Tera Flying which OHKOs Gliscor as well. Landorus-T and Thundurus-T can also have Knock Off. Don't fall for it. Don't be greedy. Play it safe, play it smart. Protect.
 - ALWAYS PROTECT AGAINST ENEMY TORKOAL
 ON TURN 1. Some carry lava plume, which has a 30% chance to burn. You don't want to risk it unless the enemy does not have Great Tusk or some other physical attacker that Gliscor handles very well. It's also good to scout what choice-locked Walking Wake
  will do via Protect.
 - ALWAYS PROTECT AGAINST ENEMY RIBOMBEE
 ON TURN 1. All of them run Stun Spore, which can deny your Poison Heal. Your team doesn't care about webs. Go into Blissey and set up rocks after protecting.
- ALWAYS PROTECT AGAINST ENEMY GLISCOR
- If Ogerpon-Wellspring switches outside of Turn 1 in while you're at near full HP, go for Toxic, followed by Protect, followed by switching to Chesnaught. Ivy Cudgel does not OHKO physdef Gliscor without a crit. This is up to your discretion, again, because of Ivy Cudgel's high crit rate. Unfortunately, it's a gamble, but i find it one to be worth the risk. Badly poisoning this nuclear bomb of a Pokémon greatly improves your chances at winning against teams that include it, since it gets worn down significantly faster. This is, otherwise, one of the biggest threats to any stall team if paired with Rillaboom , so keep it in mind. You don't want to hard switch into Dondozo either way, since it gets 2HKO'd by Power Whip regardless of whether you Tera after switching in.
- If the enemy Great Tusk is not Protosynthesis: Attack or Choice Band, always go for Toxic. This is, realistically, the only good hazard removal option in the entirety of OU. It only threatens the OHKO if it uses 252+ Atk Proto or Band, so you've got a relatively safe window to Toxic. Getting Tusk poisoned is a condition for winning, as it otherwise may be able to endlessly spin away your hazards. Against Tera Steel/Poison, Knock Off. Removing Heavy-Duty-Boots or Leftovers is the best you can do at this point for chipping it.
- Playing against Glimmora: Glimmora can be annoying. Power Gem 2/3HKOs Gliscor and it can use Mortal Spin to remove your spikes, all while your Knock Off does a measly ~16-19%. Alternate between Knock Off and Spikes to force it to waste a turn spinning, and protect when possible to heal off as much as you can. When it's going to Power Gem, you can switch to Blissey and Shadow Ball it for more damage. You'll get poisoned, but it'll go away thanks to Natural cure. Cycle between these 2 until it's dead.
- Playing against Hatterene: Hatterene is a very simple matchup. It sucks that it may bounce back Spikes, but it does not like being Knocked Off. You can switch into Skeledirge to null it.
- Don't stay in on Corviknight
 . Pressure depletes your PP much faster, and combined with Bulk Up Brave Bird's damage it'll brun through Protect very fast. Skeledirge is a safe switch, rely on it instead.
 - Don't be greedy vs Alolan Ninetales
 . Don't be greedy, if that's their lead just Protect for the Poison Heal and go Blissey, who doesn't really care for Hypnosis/Freeze, and Stealth Rock. Both Blizzard and Freeze Dry will OHKO you.
 - Be careful against Valiant
 . You never really know what set it runs, and mixed's Moonblast does an uncomfortable amount. Toxic it if you can, and go into Skeledirge. Encore doesn't matter much.
 - Staying in on Rillaboom can be risky. You always get 2HKO'd by banded Wood Hammer, but it can be advantageous to use Knock Off on it to make it hurt less the next time it comes in or to easen the pressure on your dedicated monkey check, Chesnaught. Beware, however, that knocking their Band can result in them knocking your Chesnaught's Heavy-Duty-Boots in return. Do note that some Rillaboom opt for Terrain Extender and Swords Dance, in which case you should go for a Toxic.
- Watch out for Weezing-G . Weezing-Galar 's Neutralizing gas can turn your healing into nasty heavy damage, damage you with Strange Steam and Defog your hazards away. You shouldn't overextend your stay when your opponent has Weezing, so as to not stack turns of Toxic, even if it's not on the field. It relies on Heavy-Duty-Boots or Leftovers to do anything long term, so Knocking it is the way to go.
- Watch out for Zapdos
 . Hurricane 2HKOs you, and it may run Tera Blast Ice or the more common Weather Ball on Rain or on teams with Alolan Ninetales .
 - Try to Knock Off if Clefable comes in, then switch to Skeledirge. Some players like to bluff Magic Guard via Boots. Knocking off Clefable lets you assess it's set or annoy it by taking away it's leftovers. I haven't ever seen any of the old Life Orb ones, but it doesn't hurt to go for the knock anyway since it's a 2HKO regardless. Swap to Dirge, don't let yourself be take the great damage from Calm Mind variants after grabbing a boost. Don't try to come in and knock.
- Don't risk it against Pelipper
 . This guy OHKOs you with surf.
 - Playing vs Hisuian Samurott
 : Samurott's strong Water STABS may threaten Gliscor out after a hit, all while threatening to Spike and Knock Off the switchins. The way i deal with it is to Protect as usual for turn 1, since there aren't many who run Swords Dance, followed by a Toxic, followed by another Protect. By this point you'll be able to gauge their interest: do they prioritize setting Spikes or do they prioritize killing Gliscor? Based on what you think your opponent intends to do and what moves you think they're employing, make a judgement whether to switch into Chesnaught (since it has Spiky Shield, it can stall out some turns for the Toxic damage unlike Dondozo) or start setting up Spikes of your own. Be careful of Aqua Cutter's high crit rate, as it has the potential to leave Gliscor near death if it crits from full.
-----TYRANITAR -----
116 SpA Tyranitar Ice Beam vs. 252 HP / 4 SpD Gliscor: 356-420 (100.5 - 118.6%) -- guaranteed OHKO
-----DRAGONITE-----
76 SpA Dragonite Ice Beam vs. 252 HP / 4 SpD Gliscor: 356-420 (100.5 - 118.6%) -- guaranteed OHKO
-----SLOWKING GALAR-----
0 SpA Slowking-Galar Ice Beam vs. 252 HP / 4 SpD Gliscor: 356-420 (100.5 - 118.6%) -- guaranteed OHKO
-----TOXAPEX-----
252+ SpA Toxapex Ice Beam vs. 252 HP / 4 SpD Gliscor: 312-368 (88.1 - 103.9%) -- 25% chance to OHKO
-----GOODRAS-----
0 SpA Goodra Ice Beam vs. 252 HP / 4 SpD Gliscor: 356-420 (100.5 - 118.6%) -- guaranteed OHKO
0 SpA Goodra-Hisui Ice Beam vs. 252 HP / 4 SpD Gliscor: 356-420 (100.5 - 118.6%) -- guaranteed OHKO
-----SANDY SHOCKS-----
252 SpA Tera Ice Sandy Shocks Tera Blast vs. 252 HP / 4 SpD Gliscor: 628-744 (177.4 - 210.1%) -- guaranteed OHKO
-----LANDORUS THERIAN-----
252 Atk Tera Ice Landorus-Therian Tera Blast vs. 252 HP / 252+ Def Gliscor: 352-420 (99.4 - 118.6%) -- 93.8% chance to OHK
-----THUNDURUS THERIAN -----
252 SpA Choice Specs Tera Flying Thundurus-Therian Tera Blast vs. 252 HP / 4 SpD Gliscor: 358-422 (101.1 - 119.2%) -- guaranteed OHKO
252 SpA Tera Ice Thundurus-Therian Tera Blast vs. 252 HP / 4 SpD Gliscor: 712-844 (201.1 - 238.4%) -- guaranteed OHKO
-----OGERPON WELLSPRING-----
252 Atk Wellspring Mask Ogerpon-Wellspring Ivy Cudgel vs. 252 HP / 252+ Def Gliscor: 230-272 (64.9 - 76.8%) -- guaranteed 2HKO after Poison Heal
-----GREAT TUSK-----
4 Atk Great Tusk Ice Spinner vs. 252 HP / 252+ Def Gliscor: 180-216 (50.8 - 61%) -- 43.8% chance to 2HKO after Poison Heal
252 Atk Great Tusk Ice Spinner vs. 252 HP / 252+ Def Gliscor: 220-260 (62.1 - 73.4%) -- guaranteed 2HKO after Poison Heal
252 Atk Protosynthesis Great Tusk Ice Spinner vs. 252 HP / 252+ Def Gliscor: 284-336 (80.2 - 94.9%) -- guaranteed 2HKO after Poison Heal
-----GLIMMORA-----
0 Atk Gliscor Knock Off (97.5 BP) vs. 0 HP / 4 Def Glimmora: 73-86 (23.7 - 28%) -- 87.9% chance to 4HKO
0 Atk Gliscor Knock Off vs. 0 HP / 4 Def Glimmora: 49-58 (15.9 - 18.8%) -- possible 6HKO
252 SpA Glimmora Power Gem vs. 252 HP / 4 SpD Gliscor: 166-196 (46.8 - 55.3%) -- guaranteed 3HKO after Poison Heal
-----NINETALES ALOLA-----
0 SpA Ninetales-Alola Freeze-Dry vs. 252 HP / 4 SpD Gliscor: 324-384 (91.5 - 108.4%) -- 43.8% chance to OHKO
88 SpA Ninetales-Alola Freeze-Dry vs. 252 HP / 4 SpD Gliscor: 360-424 (101.6 - 119.7%) -- guaranteed OHKO
0 SpA Ninetales-Alola Blizzard vs. 252 HP / 4 SpD Gliscor: 504-592 (142.3 - 167.2%) -- guaranteed OHKO
-----IRON VALIANT-----
252 SpA Iron Valiant Moonblast vs. 252 HP / 4 SpD Gliscor: 186-219 (52.5 - 61.8%) -- 64.5% chance to 2HKO after Poison Heal
-----RILLABOOM-----
252+ Atk Rillaboom Wood Hammer vs. 252 HP / 252+ Def Gliscor in Grassy Terrain: 169-199 (47.7 - 56.2%) -- 0.4% chance to 2HKO after Poison Heal
252+ Atk Tera Grass Rillaboom Wood Hammer vs. 252 HP / 252+ Def Gliscor in Grassy Terrain: 226-266 (63.8 - 75.1%) -- guaranteed 2HKO after Poison Heal
+2 252+ Atk Rillaboom Wood Hammer vs. 252 HP / 252+ Def Gliscor in Grassy Terrain: 336-396 (94.9 - 111.8%) -- 68.8% chance to OHKO
+2 252+ Atk Tera Grass Rillaboom Grassy Glide vs. 252 HP / 252+ Def Gliscor in Grassy Terrain: 206-244 (58.1 - 68.9%) -- guaranteed 2HKO after Poison Heal
252+ Atk Choice Band Rillaboom Wood Hammer vs. 252 HP / 252+ Def Gliscor in Grassy Terrain: 252-297 (71.1 - 83.8%) -- guaranteed 2HKO after Poison Heal
252+ Atk Choice Band Tera Grass Rillaboom Wood Hammer vs. 252 HP / 252+ Def Gliscor in Grassy Terrain: 336-396 (94.9 - 111.8%) -- 68.8% chance to OHKO
-----ZAPDOS-----
252 SpA Tera Ice Zapdos Tera Blast vs. 252 HP / 4 SpD Gliscor: 640-760 (180.7 - 214.6%) -- guaranteed OHKO
252 SpA Zapdos Weather Ball (100 BP Ice) vs. 252 HP / 4 SpD Gliscor in Snow: 536-632 (151.4 - 178.5%) -- guaranteed OHKO
252 SpA Zapdos Weather Ball (100 BP Water) vs. 252 HP / 4 SpD Gliscor in Rain: 402-474 (113.5 - 133.8%) -- guaranteed OHKO
252 SpA Zapdos Hurricane vs. 252 HP / 4 SpD Gliscor: 220-261 (62.1 - 73.7%) -- guaranteed 2HKO after Poison Heal
-----CLEFABLE-----
+1 0 SpA Clefable Moonblast vs. 252 HP / 4 SpD Gliscor: 186-219 (52.5 - 61.8%) -- 64.5% chance to 2HKO after Poison Heal
-----PELIPPER-----
8 SpA Pelipper Surf vs. 252 HP / 4 SpD Gliscor in Rain: 356-422 (100.5 - 119.2%) -- guaranteed OHKO
-----SAMUROTT HISUI-----
252 Atk Sharpness Samurott-Hisui Aqua Cutter vs. 252 HP / 252+ Def Gliscor: 186-222 (52.5 - 62.7%) -- 75% chance to 2HKO after Poison Heal
252 Atk Sharpness Samurott-Hisui Aqua Cutter vs. 252 HP / 252+ Def Gliscor on a critical hit: 282-332 (79.6 - 93.7%) -- guaranteed 2HKO after Poison Heal
252 Atk Sharpness Samurott-Hisui Razor Shell vs. 252 HP / 252+ Def Gliscor: 200-236 (56.4 - 66.6%) -- guaranteed 2HKO after Poison Heal
252 Atk Sharpness Samurott-Hisui Ceaseless Edge vs. 252 HP / 252+ Def Gliscor: 87-103 (24.5 - 29%) -- possible 6HKO after Poison Heal
-----116 SpA Tyranitar Ice Beam vs. 252 HP / 4 SpD Gliscor: 356-420 (100.5 - 118.6%) -- guaranteed OHKO
-----DRAGONITE
-----76 SpA Dragonite Ice Beam vs. 252 HP / 4 SpD Gliscor: 356-420 (100.5 - 118.6%) -- guaranteed OHKO
-----SLOWKING GALAR
-----0 SpA Slowking-Galar Ice Beam vs. 252 HP / 4 SpD Gliscor: 356-420 (100.5 - 118.6%) -- guaranteed OHKO
-----TOXAPEX
-----252+ SpA Toxapex Ice Beam vs. 252 HP / 4 SpD Gliscor: 312-368 (88.1 - 103.9%) -- 25% chance to OHKO
-----GOODRAS
-----0 SpA Goodra Ice Beam vs. 252 HP / 4 SpD Gliscor: 356-420 (100.5 - 118.6%) -- guaranteed OHKO
0 SpA Goodra-Hisui Ice Beam vs. 252 HP / 4 SpD Gliscor: 356-420 (100.5 - 118.6%) -- guaranteed OHKO
-----SANDY SHOCKS
-----252 SpA Tera Ice Sandy Shocks Tera Blast vs. 252 HP / 4 SpD Gliscor: 628-744 (177.4 - 210.1%) -- guaranteed OHKO
-----LANDORUS THERIAN
-----252 Atk Tera Ice Landorus-Therian Tera Blast vs. 252 HP / 252+ Def Gliscor: 352-420 (99.4 - 118.6%) -- 93.8% chance to OHK
-----THUNDURUS THERIAN
-----252 SpA Choice Specs Tera Flying Thundurus-Therian Tera Blast vs. 252 HP / 4 SpD Gliscor: 358-422 (101.1 - 119.2%) -- guaranteed OHKO
252 SpA Tera Ice Thundurus-Therian Tera Blast vs. 252 HP / 4 SpD Gliscor: 712-844 (201.1 - 238.4%) -- guaranteed OHKO
-----OGERPON WELLSPRING
-----252 Atk Wellspring Mask Ogerpon-Wellspring Ivy Cudgel vs. 252 HP / 252+ Def Gliscor: 230-272 (64.9 - 76.8%) -- guaranteed 2HKO after Poison Heal
-----GREAT TUSK
-----4 Atk Great Tusk Ice Spinner vs. 252 HP / 252+ Def Gliscor: 180-216 (50.8 - 61%) -- 43.8% chance to 2HKO after Poison Heal
252 Atk Great Tusk Ice Spinner vs. 252 HP / 252+ Def Gliscor: 220-260 (62.1 - 73.4%) -- guaranteed 2HKO after Poison Heal
252 Atk Protosynthesis Great Tusk Ice Spinner vs. 252 HP / 252+ Def Gliscor: 284-336 (80.2 - 94.9%) -- guaranteed 2HKO after Poison Heal
-----GLIMMORA
-----0 Atk Gliscor Knock Off (97.5 BP) vs. 0 HP / 4 Def Glimmora: 73-86 (23.7 - 28%) -- 87.9% chance to 4HKO
0 Atk Gliscor Knock Off vs. 0 HP / 4 Def Glimmora: 49-58 (15.9 - 18.8%) -- possible 6HKO
252 SpA Glimmora Power Gem vs. 252 HP / 4 SpD Gliscor: 166-196 (46.8 - 55.3%) -- guaranteed 3HKO after Poison Heal
-----NINETALES ALOLA
-----0 SpA Ninetales-Alola Freeze-Dry vs. 252 HP / 4 SpD Gliscor: 324-384 (91.5 - 108.4%) -- 43.8% chance to OHKO
88 SpA Ninetales-Alola Freeze-Dry vs. 252 HP / 4 SpD Gliscor: 360-424 (101.6 - 119.7%) -- guaranteed OHKO
0 SpA Ninetales-Alola Blizzard vs. 252 HP / 4 SpD Gliscor: 504-592 (142.3 - 167.2%) -- guaranteed OHKO
-----IRON VALIANT
-----252 SpA Iron Valiant Moonblast vs. 252 HP / 4 SpD Gliscor: 186-219 (52.5 - 61.8%) -- 64.5% chance to 2HKO after Poison Heal
-----RILLABOOM
-----252+ Atk Rillaboom Wood Hammer vs. 252 HP / 252+ Def Gliscor in Grassy Terrain: 169-199 (47.7 - 56.2%) -- 0.4% chance to 2HKO after Poison Heal
252+ Atk Tera Grass Rillaboom Wood Hammer vs. 252 HP / 252+ Def Gliscor in Grassy Terrain: 226-266 (63.8 - 75.1%) -- guaranteed 2HKO after Poison Heal
+2 252+ Atk Rillaboom Wood Hammer vs. 252 HP / 252+ Def Gliscor in Grassy Terrain: 336-396 (94.9 - 111.8%) -- 68.8% chance to OHKO
+2 252+ Atk Tera Grass Rillaboom Grassy Glide vs. 252 HP / 252+ Def Gliscor in Grassy Terrain: 206-244 (58.1 - 68.9%) -- guaranteed 2HKO after Poison Heal
252+ Atk Choice Band Rillaboom Wood Hammer vs. 252 HP / 252+ Def Gliscor in Grassy Terrain: 252-297 (71.1 - 83.8%) -- guaranteed 2HKO after Poison Heal
252+ Atk Choice Band Tera Grass Rillaboom Wood Hammer vs. 252 HP / 252+ Def Gliscor in Grassy Terrain: 336-396 (94.9 - 111.8%) -- 68.8% chance to OHKO
-----ZAPDOS
-----252 SpA Tera Ice Zapdos Tera Blast vs. 252 HP / 4 SpD Gliscor: 640-760 (180.7 - 214.6%) -- guaranteed OHKO
252 SpA Zapdos Weather Ball (100 BP Ice) vs. 252 HP / 4 SpD Gliscor in Snow: 536-632 (151.4 - 178.5%) -- guaranteed OHKO
252 SpA Zapdos Weather Ball (100 BP Water) vs. 252 HP / 4 SpD Gliscor in Rain: 402-474 (113.5 - 133.8%) -- guaranteed OHKO
252 SpA Zapdos Hurricane vs. 252 HP / 4 SpD Gliscor: 220-261 (62.1 - 73.7%) -- guaranteed 2HKO after Poison Heal
-----CLEFABLE
-----+1 0 SpA Clefable Moonblast vs. 252 HP / 4 SpD Gliscor: 186-219 (52.5 - 61.8%) -- 64.5% chance to 2HKO after Poison Heal
-----PELIPPER
-----8 SpA Pelipper Surf vs. 252 HP / 4 SpD Gliscor in Rain: 356-422 (100.5 - 119.2%) -- guaranteed OHKO
-----SAMUROTT HISUI
-----252 Atk Sharpness Samurott-Hisui Aqua Cutter vs. 252 HP / 252+ Def Gliscor: 186-222 (52.5 - 62.7%) -- 75% chance to 2HKO after Poison Heal
252 Atk Sharpness Samurott-Hisui Aqua Cutter vs. 252 HP / 252+ Def Gliscor on a critical hit: 282-332 (79.6 - 93.7%) -- guaranteed 2HKO after Poison Heal
252 Atk Sharpness Samurott-Hisui Razor Shell vs. 252 HP / 252+ Def Gliscor: 200-236 (56.4 - 66.6%) -- guaranteed 2HKO after Poison Heal
252 Atk Sharpness Samurott-Hisui Ceaseless Edge vs. 252 HP / 252+ Def Gliscor: 87-103 (24.5 - 29%) -- possible 6HKO after Poison Heal
 Dondozo, the mortal immortal fatass
 Dondozo @ Heavy-Duty Boots
Ability: Unaware
Tera Type: Fighting
EVs: 252 HP / 252 Def / 4 SpD
Impish Nature
- Body Press
- Rest
- Sleep Talk
- Liquidation
What do I need to know?
Dondozo's role is nothing more and nothing less than what you'd expect it to do. It's a bulky Unaware Pokémon that is night impossible for (most) physical attackers to break (((((((big emphasis on most))))))). It's somewhat of a bread and butter for stall teams for what will probably be the entirety of SV OU, together with Blissey for a simple both-sides wall core. Although hard to break, it's exploitable and very slow, so you can't both switch into it and play with it mindlessly.
- Heavy Duty Boots are a must have to not get chipped down by entry hazards. Knock Off is awful to take, avoid it at all costs by going into your Clefable instead when faced with things such as Weavile .
- Unaware is necessary to null setup sweepers like Dragonite and Sneasler
 . They will almost never break Dondozo otherwise: Dragonite gets PP stalled no matter what, and Sneasler gets 2HKO'd by Liquidation.
 - Tera Fighting is used because it's neutral to Grass, resistant to Dark and boosts your Body Press. A Grass weakness is Dondozo's version of Achiles' Heel in current OU: Ogerpon-W and Rillaboom are offensive staples that completely destroy it via their Grass STAB. Through using your Tera you can 1v1 Ogerpon-Wellspring (Body Press 2HKOs), but not Rillacoom , so I strongly reccomend switching in Chesnaught into these 2 instead. Tera Fighting also resists Dark, which can come in key against 5 Fallen and/or Black Glasses/Dread Plate Kingambit
 . Fairy/Psychic weaknesses are unfortunate however, since you're less able to check mixed Iron Valiant and take Future Sights. Try to avoid going onto Dondozo immediately if these are present since Chesnaught can also take the hits Dozo takes decently well, in some cases even better, such as vs Kingambit and Ogerpon/Rillaboom.
 - Rest + Sleep Talk allow you to not be passive and actually do damage while asleep. It can be very unreliable at times, because Sleep Talk calls a move at random, including Rest, which will fail. Newer players should remember that you only sleep 2 full turns, so on the third you should use the move you want.
- Liquidation is preferred over Avalanche to do much more damage on switches.
- Body Press is a great compliement to Liquidation that threatens to OHKO fast Kingambit and always 2HKOs bulky ones.
Usage tips
- Become familiar with how Unaware works. Unaware ignores ALL of the opponent's stat changes, good or bad. Liquidation's Defense drops are worthless for Dondozo, but them getting drops on you makes a difference. Unaware does not ignore YOUR stat changes, so you should try to clear Defense drops by going into Gliscor/Chesnaught before coming back in.
- Avoid being hit with Knock Off. Losing your Boots can be the end of you if the opponent stacks Spikes with Samurott-Hisui or Gliscor . Have Clefable or your own Gliscor take these Knock Off instead. In the case of Great Tusk , going Clefable is your best bet since it threatens to OHKO fast Tusk and always 2HKOs bulky ones.
- You don't always have to Sleep Talk! Sometimes it's preferable to conserve PP by selecting a move that isn't Sleep Talk, since PP isn't consumed when you spend a turn asleep.
- Conserve your Tera. You don't want to leave yourself unable to check Swords Dance Acrobatics Tera Flying Sneasler or be be denied your check thanks to Slowking-Galar's Future Sight because you spent your Tera unwisely. Only use it when absolutely necessary.
- Don't go Dondozo into Rillaboom or Ogerpon

 . Like i already said, Rillaboom completely demolishes Dondozo with Wood Hammer, and all Ogerpon formes threaten a guaranteed 2HKO with Power Whip or a 3HKO with Horn Leech, outhealing your damage with Body Press. If Grassy Terrain is up, Ogerpon-W and Ogerpon-C can OHKO with Power Whip. Regular Ogerpon can hold items, namely Choice Band.
 - Avoid taking chip if you can, distribute it between Dondozo, Gliscor and Chesnaught when possible. Chip on Dozo may sometimes be your downfall, so distributing it between these 3 helps immensely.
- Use your PP wisely, don't stay in on Corviknight. Dondozo's total PP is only 46. 32 attacking moves, 8 for rest, 16 for Sleep Talk. You don't have a lot of room to wiggle around, so conserve your PP. Go Skeledirge on Corviknight, since it threatens it out while gaining a Spa boost.
- Don't use Rest mindlessly, make sure to always stay healthy. Some Pokémon, like Protosynthesis Attack Great Tusk threaten a 3HKO while you 2/3HKO them back. Make sure you'll be healthy after the interaction while minimizing PP loss.
- Don't stay in on special attackers. This should come off as obvious, but Dondozo specialises in the physical side. Don't take unnecessary risks and/or damage.
- Leave Iron Defense Zamazenta
 to Skeledirge when you can. Yes, Dondozo completely sits on it, but more often than not you'd rather conserve both your Rest and Liquidation PP for the other physical threats.
 - Don't be afraid to PP stall Roost Dragonite . Dragonite with Roost will take a thousand more years to kill than what it already usually does, while keeping it's Tera Normal Extreme Speed damage respectable. It's better to PP stall it than potentially waste precious Liquidation, Sleep Talk or Body press PP to no avail.
- Kingambit can break through Dondozo. Despite it's massive physically defensive profile, Kingambit's Supreme Overlord paired with Black Glasses and/or Tera Dark, or Low Kick + Tera Fighting can break it. Play it smart against Gambit.
-----GREAT TUSK -----
0 Atk Dondozo Liquidation vs. 0 HP / 0 Def Great Tusk: 146-174 (39.3 - 46.9%) -- guaranteed 3HKO
252 Atk Protosynthesis Great Tusk Headlong Rush vs. 252 HP / 252+ Def Dondozo: 168-198 (33.3 - 39.2%) -- guaranteed 3HKO
252 Atk Protosynthesis Great Tusk Close Combat vs. 252 HP / 252+ Def Dondozo: 168-198 (33.3 - 39.2%) -- guaranteed 3HKO
-----SNEASLER :snseasler:-----
0 Atk Tera Fighting Dondozo Liquidation vs. 0 HP / 4 Def Sneasler: 138-163 (45.8 - 54.1%) -- 50.8% chance to 2HKO
252+ Atk Sneasler Acrobatics (110 BP) vs. 252 HP / 252+ Def Tera Fighting Dondozo: 172-204 (34.1 - 40.4%) -- guaranteed 3HKO
252+ Atk Tera Flying Sneasler Acrobatics (110 BP) vs. 252 HP / 252+ Def Tera Fighting Dondozo: 258-306 (51.1 - 60.7%) -- guaranteed 2HKO
-----SLOWKING GALAR-----
0 SpA Slowking-Galar Future Sight vs. 252 HP / 4 SpD Tera Fighting Dondozo: 396-468 (78.5 - 92.8%) -- guaranteed 2HKO
-----RILLABOOM-----
252+ Def Dondozo Body Press vs. 0 HP / 4 Def Tera Grass Rillaboom: 96-113 (28.1 - 33.1%) -- 88.8% chance to 4HKO after Grassy Terrain recovery
252+ Def Tera Fighting Dondozo Body Press vs. 0 HP / 4 Def Tera Grass Rillaboom: 144-169 (42.2 - 49.5%) -- guaranteed 3HKO after Grassy Terrain recovery
252 Atk Rillaboom Wood Hammer vs. 252 HP / 252+ Def Dondozo in Grassy Terrain: 324-384 (64.2 - 76.1%) -- guaranteed 2HKO after Grassy Terrain recovery
252+ Atk Rillaboom Wood Hammer vs. 252 HP / 252+ Def Dondozo in Grassy Terrain: 356-422 (70.6 - 83.7%) -- guaranteed 2HKO after Grassy Terrain recovery
252+ Atk Choice Band Rillaboom Wood Hammer vs. 252 HP / 252+ Def Dondozo in Grassy Terrain: 534-630 (105.9 - 125%) -- guaranteed OHKO
252+ Atk Choice Band Rillaboom Wood Hammer vs. 252 HP / 252+ Def Tera Fighting Dondozo in Grassy Terrain: 267-315 (52.9 - 62.5%) -- 99.6% chance to 2HKO after Grassy Terrain recovery
252+ Atk Choice Band Tera Grass Rillaboom Wood Hammer vs. 252 HP / 252+ Def Tera Fighting Dondozo in Grassy Terrain: 356-420 (70.6 - 83.3%) -- guaranteed 2HKO after Grassy Terrain recovery
-----ALL OGERPON-----
252+ Def Dondozo Body Press vs. 0 HP / 0 Def Ogerpon-Wellspring: 102-120 (33.8 - 39.8%) -- guaranteed 3HKO
252+ Def Tera Fighting Dondozo Body Press vs. 0 HP / 0 Def Ogerpon-Wellspring: 153-180 (50.8 - 59.8%) -- guaranteed 2HKO
252+ Def Dondozo Body Press vs. 0 HP / 0 Def Ogerpon-Wellspring: 102-120 (33.8 - 39.8%) -- 32.2% chance to 3HKO after Grassy Terrain recovery
252+ Def Tera Fighting Dondozo Body Press vs. 0 HP / 0 Def Ogerpon-Wellspring: 153-180 (50.8 - 59.8%) -- 85.5% chance to 2HKO after Grassy Terrain recovery
252 Atk Choice Band Ogerpon Ivy Cudgel vs. 252 HP / 252+ Def Dondozo: 306-360 (60.7 - 71.4%) -- guaranteed 2HKO
252 Atk Wellspring Mask Ogerpon-Wellspring Power Whip vs. 252 HP / 252+ Def Dondozo: 290-344 (57.5 - 68.2%) -- guaranteed 2HKO
252 Atk Wellspring Mask Ogerpon-Wellspring Power Whip vs. 252 HP / 252+ Def Tera Fighting Dondozo: 145-172 (28.7 - 34.1%) -- 1.8% chance to 3HKO (always 2hkos)
252 Atk Wellspring Mask Ogerpon-Wellspring Power Whip vs. 252 HP / 252+ Def Dondozo in Grassy Terrain: 378-446 (75 - 88.4%) -- guaranteed 2HKO after Grassy Terrain recovery
252 Atk Wellspring Mask Ogerpon-Wellspring Horn Leech vs. 252 HP / 252+ Def Dondozo: 182-216 (36.1 - 42.8%) -- guaranteed 3HKO
252 Atk Wellspring Mask Ogerpon-Wellspring Horn Leech vs. 252 HP / 252+ Def Dondozo in Grassy Terrain: 236-282 (46.8 - 55.9%) -- 21.5% chance to 2HKO after Grassy Terrain recovery
Same deal for cornerstone
-----DRAGONITE-----
252+ Atk Tera Normal Dragonite Extreme Speed vs. 252 HP / 252+ Def Dondozo: 97-115 (19.2 - 22.8%) -- possible 5HKO
-----KINGAMBIT-----
252+ Def Dondozo Body Press vs. 252 HP / 4 Def Kingambit: 300-356 (74.2 - 88.1%) -- guaranteed 2HKO
252+ Def Dondozo Body Press vs. 0 HP / 4 Def Kingambit: 300-356 (87.9 - 104.3%) -- 25% chance to OHKO
252+ Atk Kingambit Kowtow Cleave vs. 252 HP / 252+ Def Dondozo: 103-123 (20.4 - 24.4%) -- guaranteed 5HKO
252+ Atk Tera Dark Kingambit Kowtow Cleave vs. 252 HP / 252+ Def Dondozo: 138-164 (27.3 - 32.5%) -- guaranteed 4HKO
252+ Atk Supreme Overlord 5 allies fainted Kingambit Kowtow Cleave vs. 252 HP / 252+ Def Dondozo: 153-181 (30.3 - 35.9%) -- 42.7% chance to 3HKO
252+ Atk Supreme Overlord 5 allies fainted Tera Dark Kingambit Kowtow Cleave vs. 252 HP / 252+ Def Dondozo: 204-242 (40.4 - 48%) -- guaranteed 3HKO
252+ Atk Black Glasses Tera Dark Kingambit Kowtow Cleave vs. 252 HP / 252+ Def Dondozo: 166-196 (32.9 - 38.8%) -- 99.8% chance to 3HKO
252+ Atk Black Glasses Supreme Overlord 5 allies fainted Tera Dark Kingambit Kowtow Cleave vs. 252 HP / 252+ Def Dondozo: 248-292 (49.2 - 57.9%) -- 97.7% chance to 2HKO
252+ Atk Kingambit Low Kick (120 BP) vs. 252 HP / 252+ Def Dondozo: 97-115 (19.2 - 22.8%) -- possible 5HKO
252+ Atk Supreme Overlord 5 allies fainted Kingambit Low Kick (120 BP) vs. 252 HP / 252+ Def Dondozo: 145-171 (28.7 - 33.9%) -- 1.1% chance to 3HKO
252+ Atk Tera Fighting Kingambit Low Kick (120 BP) vs. 252 HP / 252+ Def Dondozo: 145-172 (28.7 - 34.1%) -- 1.8% chance to 3HKO
252+ Atk Supreme Overlord 5 allies fainted Tera Fighting Kingambit Low Kick (120 BP) vs. 252 HP / 252+ Def Dondozo: 217-256 (43 - 50.7%) -- 2.3% chance to 2HKO
-----0 Atk Dondozo Liquidation vs. 0 HP / 0 Def Great Tusk: 146-174 (39.3 - 46.9%) -- guaranteed 3HKO
252 Atk Protosynthesis Great Tusk Headlong Rush vs. 252 HP / 252+ Def Dondozo: 168-198 (33.3 - 39.2%) -- guaranteed 3HKO
252 Atk Protosynthesis Great Tusk Close Combat vs. 252 HP / 252+ Def Dondozo: 168-198 (33.3 - 39.2%) -- guaranteed 3HKO
-----SNEASLER :snseasler:-----
0 Atk Tera Fighting Dondozo Liquidation vs. 0 HP / 4 Def Sneasler: 138-163 (45.8 - 54.1%) -- 50.8% chance to 2HKO
252+ Atk Sneasler Acrobatics (110 BP) vs. 252 HP / 252+ Def Tera Fighting Dondozo: 172-204 (34.1 - 40.4%) -- guaranteed 3HKO
252+ Atk Tera Flying Sneasler Acrobatics (110 BP) vs. 252 HP / 252+ Def Tera Fighting Dondozo: 258-306 (51.1 - 60.7%) -- guaranteed 2HKO
-----SLOWKING GALAR
-----0 SpA Slowking-Galar Future Sight vs. 252 HP / 4 SpD Tera Fighting Dondozo: 396-468 (78.5 - 92.8%) -- guaranteed 2HKO
-----RILLABOOM
-----252+ Def Dondozo Body Press vs. 0 HP / 4 Def Tera Grass Rillaboom: 96-113 (28.1 - 33.1%) -- 88.8% chance to 4HKO after Grassy Terrain recovery
252+ Def Tera Fighting Dondozo Body Press vs. 0 HP / 4 Def Tera Grass Rillaboom: 144-169 (42.2 - 49.5%) -- guaranteed 3HKO after Grassy Terrain recovery
252 Atk Rillaboom Wood Hammer vs. 252 HP / 252+ Def Dondozo in Grassy Terrain: 324-384 (64.2 - 76.1%) -- guaranteed 2HKO after Grassy Terrain recovery
252+ Atk Rillaboom Wood Hammer vs. 252 HP / 252+ Def Dondozo in Grassy Terrain: 356-422 (70.6 - 83.7%) -- guaranteed 2HKO after Grassy Terrain recovery
252+ Atk Choice Band Rillaboom Wood Hammer vs. 252 HP / 252+ Def Dondozo in Grassy Terrain: 534-630 (105.9 - 125%) -- guaranteed OHKO
252+ Atk Choice Band Rillaboom Wood Hammer vs. 252 HP / 252+ Def Tera Fighting Dondozo in Grassy Terrain: 267-315 (52.9 - 62.5%) -- 99.6% chance to 2HKO after Grassy Terrain recovery
252+ Atk Choice Band Tera Grass Rillaboom Wood Hammer vs. 252 HP / 252+ Def Tera Fighting Dondozo in Grassy Terrain: 356-420 (70.6 - 83.3%) -- guaranteed 2HKO after Grassy Terrain recovery
-----ALL OGERPON
-----252+ Def Dondozo Body Press vs. 0 HP / 0 Def Ogerpon-Wellspring: 102-120 (33.8 - 39.8%) -- guaranteed 3HKO
252+ Def Tera Fighting Dondozo Body Press vs. 0 HP / 0 Def Ogerpon-Wellspring: 153-180 (50.8 - 59.8%) -- guaranteed 2HKO
252+ Def Dondozo Body Press vs. 0 HP / 0 Def Ogerpon-Wellspring: 102-120 (33.8 - 39.8%) -- 32.2% chance to 3HKO after Grassy Terrain recovery
252+ Def Tera Fighting Dondozo Body Press vs. 0 HP / 0 Def Ogerpon-Wellspring: 153-180 (50.8 - 59.8%) -- 85.5% chance to 2HKO after Grassy Terrain recovery
252 Atk Choice Band Ogerpon Ivy Cudgel vs. 252 HP / 252+ Def Dondozo: 306-360 (60.7 - 71.4%) -- guaranteed 2HKO
252 Atk Wellspring Mask Ogerpon-Wellspring Power Whip vs. 252 HP / 252+ Def Dondozo: 290-344 (57.5 - 68.2%) -- guaranteed 2HKO
252 Atk Wellspring Mask Ogerpon-Wellspring Power Whip vs. 252 HP / 252+ Def Tera Fighting Dondozo: 145-172 (28.7 - 34.1%) -- 1.8% chance to 3HKO (always 2hkos)
252 Atk Wellspring Mask Ogerpon-Wellspring Power Whip vs. 252 HP / 252+ Def Dondozo in Grassy Terrain: 378-446 (75 - 88.4%) -- guaranteed 2HKO after Grassy Terrain recovery
252 Atk Wellspring Mask Ogerpon-Wellspring Horn Leech vs. 252 HP / 252+ Def Dondozo: 182-216 (36.1 - 42.8%) -- guaranteed 3HKO
252 Atk Wellspring Mask Ogerpon-Wellspring Horn Leech vs. 252 HP / 252+ Def Dondozo in Grassy Terrain: 236-282 (46.8 - 55.9%) -- 21.5% chance to 2HKO after Grassy Terrain recovery
Same deal for cornerstone
-----DRAGONITE
-----252+ Atk Tera Normal Dragonite Extreme Speed vs. 252 HP / 252+ Def Dondozo: 97-115 (19.2 - 22.8%) -- possible 5HKO
-----KINGAMBIT
-----252+ Def Dondozo Body Press vs. 252 HP / 4 Def Kingambit: 300-356 (74.2 - 88.1%) -- guaranteed 2HKO
252+ Def Dondozo Body Press vs. 0 HP / 4 Def Kingambit: 300-356 (87.9 - 104.3%) -- 25% chance to OHKO
252+ Atk Kingambit Kowtow Cleave vs. 252 HP / 252+ Def Dondozo: 103-123 (20.4 - 24.4%) -- guaranteed 5HKO
252+ Atk Tera Dark Kingambit Kowtow Cleave vs. 252 HP / 252+ Def Dondozo: 138-164 (27.3 - 32.5%) -- guaranteed 4HKO
252+ Atk Supreme Overlord 5 allies fainted Kingambit Kowtow Cleave vs. 252 HP / 252+ Def Dondozo: 153-181 (30.3 - 35.9%) -- 42.7% chance to 3HKO
252+ Atk Supreme Overlord 5 allies fainted Tera Dark Kingambit Kowtow Cleave vs. 252 HP / 252+ Def Dondozo: 204-242 (40.4 - 48%) -- guaranteed 3HKO
252+ Atk Black Glasses Tera Dark Kingambit Kowtow Cleave vs. 252 HP / 252+ Def Dondozo: 166-196 (32.9 - 38.8%) -- 99.8% chance to 3HKO
252+ Atk Black Glasses Supreme Overlord 5 allies fainted Tera Dark Kingambit Kowtow Cleave vs. 252 HP / 252+ Def Dondozo: 248-292 (49.2 - 57.9%) -- 97.7% chance to 2HKO
252+ Atk Kingambit Low Kick (120 BP) vs. 252 HP / 252+ Def Dondozo: 97-115 (19.2 - 22.8%) -- possible 5HKO
252+ Atk Supreme Overlord 5 allies fainted Kingambit Low Kick (120 BP) vs. 252 HP / 252+ Def Dondozo: 145-171 (28.7 - 33.9%) -- 1.1% chance to 3HKO
252+ Atk Tera Fighting Kingambit Low Kick (120 BP) vs. 252 HP / 252+ Def Dondozo: 145-172 (28.7 - 34.1%) -- 1.8% chance to 3HKO
252+ Atk Supreme Overlord 5 allies fainted Tera Fighting Kingambit Low Kick (120 BP) vs. 252 HP / 252+ Def Dondozo: 217-256 (43 - 50.7%) -- 2.3% chance to 2HKO
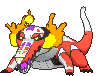
 Blissey, the 2nd mortal immortal fatass
 Blissey @ Heavy-Duty Boots
Ability: Natural Cure
Tera Type: Dark
EVs: 4 HP / 252 Def / 252 SpD
Calm Nature
IVs: 0 Atk
- Soft-Boiled
- Calm Mind
- Stealth Rock
- Shadow Ball
What do you need to know?
- Heavy Duty Boots are a must have to not get chipped down by entry hazards. Knock Off is awful to take, but sometimes there's no choice when faced with Boots Thundurus-Therian .
- Natural Cure allows you to remove status upon switching out. This means you can more comfortable switch into some mons such as Glimmora .
- Stealth Rock is a good compliement to Gliscor's Spikes that not only stacks more passive damage but especially hits Iron Moth , Enamorus Choice Specs Thundurus-T and others.
- Calm Mind is a MUST HAVE to reliably counter Iron Moth 's Fiery Dance and Gholdengo 's Nasty Plot.
- Shadow Ball hits almost everything neutrally and hits Gholdengo for super effective damage, so it's our attack of choice.
- Tera Dark is the only thing standing between you and Psyshock Nasty Plot Gholdengo on the long term, since Skeledirge isn't fond of switching into Shadow Ball.
- 252 Def is, once more, for Gholdengo with Psyshock, since investing into defense gives better returns than HP.
- Soft Boiled is your reliable recovery.
- Scout Gholdego 's set and keep in mind the damage it can do. Check the calcs section, it'll be the first ones there.
- Did it take entry hazard damage? If it did not, it's Boots. These don't usually run Psyshock as they prefer Hex or Recover sets, but you'll be able to tell after one Calm Mind + Shadow Ball thrown off depending on their reaction. They won't stay in if they can't break you.
- If it did not, check if it's leftovers. Same deal as with boots if it is.
- Check for Air Balloon. Players who love clicking the Skip Turn button might want to mentally take in this one.
- If there are no hazards up or if it took damage and is not Leftovers or Balloon... we have a problem. Gholdengo can often be Choice Specs or Choice Scarf. Usually, i like to go Gliscor to minimize the damage Trick might do. In case it's Scarf it's alright, since Gliscor can live Make It Rain, but not if it's Specs. Having Blissey tricked can be an immediate loss since there are some cores (+ Tera Psychic Iron Moth , Choice Specs Enamorus , Nasty Plot Thundurus-T , to name a few) you will not be able to play around with just Skeledirge. You NEED Calm Mind + Soft Boiled to beat them. At this point, judge what your team needs the least, switch it in and pray you didn't make a huge misplay to any gods that might hear your pleas, because Gholdengo sure won't.
- It can also be Covert Cloak sometimes, which is effectively no item with this team. But that's a rather rare pick.
- Only use Tera Dark when you absolutely need to.
- Boosted Make It Rain can still put a dent on you. Don't underestimate it.
- Always go for the 2HKO on offensive Gholdengo at +1. Getting it out of the way ASAP reduces Soft Boiled usage greatly and damages switch-ins. This is the most likely one to carry Psyshock.
- If it uses it's Tera, go for the 3HKO.
- Be mindful of Soft Boiled's 8 PP. It's very little PP, and you may face multiple special threats that your team will greatly rely on Blissey to beat. Don't use more than you absolutely have to. A good way to mitigate Soft Boliled usage is to stack Calm Minds, even when you don't need them. Your opponents might be in a situation where switching out would be detrimental. Like i said with Dondozo, you can also try to fall back on Skeledirge to check things such as Iron Moth if you're afraid of consuming too much PP. Tera Fairy Specs Enamorus will pose a massive problem that you'll need both Blissey and Dirge to deal with, so keeping your PP up is necessary.
- Knock Off can be ruinous. If faced with a multitude of hazard immune special threats (mainly boots users), being slapped with a Knock Off directly to the nutsack may immediately decide who wins. Avoid being knocked at all costs. Against HDB Thundurus-T your best bet is to stack Calm Minds with Clefable and sweep, given the opportunity.
- Don't use Blissey to check Manaphy long term. Use Skeledirge instead. This eats your Tera, but Blissey can't actually check it well (runs out of PP before knocking Take Heart out) and loses to a crit. You can and should, however, try to set up Stealth Rock in case it's a Take Heart set. Tail glow can rapidly spiral out of control and you don't want to take more damage than you need to.
- Volt Switch users are very annoying if you let them do their thing. When both Zapdos and Thundurus-T threaten to 2HKO or OHKO Gliscor, you relly don't want to let them get a chance to nail it in. However, it's necessary to be agressive and predict their Volt Switch to not only waste PP but deny some momentum. At times, i find that the best play may even be to risk it all and go for the Toxic/Knock Off. Otherwise, your 8 PP on Soft Boiled will be drained fast.
-----GHOLDENGO -----
+1 0 SpA Blissey Shadow Ball vs. 0 HP / 4 SpD Gholdengo: 146-174 (46.3 - 55.2%) -- 65.6% chance to 2HKO
+1 0 SpA Blissey Shadow Ball vs. 0 HP / 4 SpD Tera Fighting Gholdengo: 73-87 (23.1 - 27.6%) -- 73.8% chance to 4HKO
+3 0 SpA Blissey Shadow Ball vs. 0 HP / 4 SpD Tera Fighting Gholdengo: 122-144 (38.7 - 45.7%) -- guaranteed 3HKO
0 SpA Blissey Shadow Ball vs. 252 HP / 4 SpD Gholdengo: 100-118 (26.4 - 31.2%) -- guaranteed 4HKO
+1 0 SpA Blissey Shadow Ball vs. 252 HP / 4 SpD Gholdengo: 146-174 (38.6 - 46%) -- guaranteed 3HKO
+2 252 SpA Gholdengo Make It Rain vs. 4 HP / 252+ SpD Blissey: 232-274 (35.5 - 42%) -- guaranteed 3HKO
+2 252 SpA Gholdengo Make It Rain over 2 turns vs. 4 HP / 252+ SpD Blissey: 386-457 (59.2 - 70%) -- not a KO
+4 252 SpA Gholdengo Make It Rain vs. 4 HP / 252+ SpD Blissey: 348-411 (53.3 - 63%) -- guaranteed 2HKO
+4 252 SpA Gholdengo Make It Rain over 2 turns vs. 4 HP / 252+ SpD Blissey: 580-685 (88.9 - 105%) -- 31.3% chance to 2HKO
+6 252 SpA Gholdengo Make It Rain over 2 turns vs. 4 HP / 252+ SpD Blissey: 775-913 (118.8 - 140%) -- guaranteed KO in 2 turns
+4 252 SpA Gholdengo Make It Rain over 2 turns vs. +1 4 HP / 252+ SpD Blissey: 388-458 (59.5 - 70.2%) -- not a KO
+4 252 SpA Gholdengo Make It Rain over 2 turns vs. +2 4 HP / 252+ SpD Blissey: 292-345 (44.7 - 52.9%) -- not a KO
252 SpA Gholdengo Psyshock vs. 4 HP / 252 Def Blissey: 176-208 (26.9 - 31.9%) -- guaranteed 4HKO
+2 252 SpA Gholdengo Psyshock vs. 4 HP / 252 Def Blissey: 351-414 (53.8 - 63.4%) -- guaranteed 2HKO
+4 252 SpA Gholdengo Psyshock vs. 4 HP / 252 Def Blissey: 527-620 (80.8 - 95%) -- guaranteed 2HKO
---ENAMORUS-----
252 SpA Choice Specs Tera Fairy Enamorus Moonblast vs. 4 HP / 252+ SpD Blissey: 186-220 (28.5 - 33.7%) -- 0.3% chance to 3HKO
-----IRON MOTH-----
0 SpA Blissey Shadow Ball vs. 0 HP / 0 SpD Iron Moth: 42-50 (13.9 - 16.6%) -- possible 7HKO
+1 0 SpA Blissey Shadow Ball vs. 0 HP / 0 SpD Iron Moth: 63-75 (20.9 - 24.9%) -- guaranteed 5HKO
+2 0 SpA Blissey Shadow Ball vs. 0 HP / 0 SpD Iron Moth: 84-99 (27.9 - 32.8%) -- guaranteed 4HKO
+3 0 SpA Blissey Shadow Ball vs. 0 HP / 0 SpD Iron Moth: 105-124 (34.8 - 41.1%) -- guaranteed 3HKO
+4 0 SpA Blissey Shadow Ball vs. 0 HP / 0 SpD Iron Moth: 125-148 (41.5 - 49.1%) -- guaranteed 3HKO
+5 0 SpA Blissey Shadow Ball vs. 0 HP / 0 SpD Iron Moth: 146-172 (48.5 - 57.1%) -- 91.8% chance to 2HKO
252 SpA Iron Moth Fiery Dance vs. 4 HP / 252+ SpD Blissey: 81-96 (12.4 - 14.7%) -- possible 7HKO
+1 252 SpA Iron Moth Fiery Dance vs. 4 HP / 252+ SpD Blissey: 121-144 (18.5 - 22%) -- possible 5HKO
+2 252 SpA Iron Moth Fiery Dance vs. 4 HP / 252+ SpD Blissey: 160-190 (24.5 - 29.1%) -- 99.9% chance to 4HKO
Don't let them boost more than 2 stages above you.
-----MANAPHY-----
+3 252 SpA Manaphy Surf vs. 4 HP / 252+ SpD Blissey: 178-211 (27.3 - 32.3%) -- guaranteed 4HKO
+6 252 SpA Manaphy Surf vs. 4 HP / 252+ SpD Blissey: 286-337 (43.8 - 51.6%) -- 10.9% chance to 2HKO
+6 252 SpA Manaphy Surf vs. +1 4 HP / 252+ SpD Blissey: 190-225 (29.1 - 34.5%) -- 5.8% chance to 3HKO
+3 252 SpA Manaphy Scald vs. 4 HP / 252+ SpD Blissey: 159-187 (24.3 - 28.6%) -- 99.1% chance to 4HKO
+6 252 SpA Manaphy Scald vs. 4 HP / 252+ SpD Blissey: 255-300 (39.1 - 46%) -- guaranteed 3HKO
+6 252 SpA Manaphy Scald vs. +1 4 HP / 252+ SpD Blissey: 169-201 (25.9 - 30.8%) -- guaranteed 4HKO
+6 252 SpA Manaphy Scald vs. 4 HP / 252+ SpD Blissey on a critical hit: 382-450 (58.5 - 69%) -- guaranteed 2HKO
+6 252 SpA Manaphy Surf vs. 4 HP / 252+ SpD Blissey on a critical hit: 429-505 (65.7 - 77.4%) -- guaranteed 2HKO
You don't have the PP to take it on. You're also setting yourself up for a crit.
-----+1 0 SpA Blissey Shadow Ball vs. 0 HP / 4 SpD Gholdengo: 146-174 (46.3 - 55.2%) -- 65.6% chance to 2HKO
+1 0 SpA Blissey Shadow Ball vs. 0 HP / 4 SpD Tera Fighting Gholdengo: 73-87 (23.1 - 27.6%) -- 73.8% chance to 4HKO
+3 0 SpA Blissey Shadow Ball vs. 0 HP / 4 SpD Tera Fighting Gholdengo: 122-144 (38.7 - 45.7%) -- guaranteed 3HKO
0 SpA Blissey Shadow Ball vs. 252 HP / 4 SpD Gholdengo: 100-118 (26.4 - 31.2%) -- guaranteed 4HKO
+1 0 SpA Blissey Shadow Ball vs. 252 HP / 4 SpD Gholdengo: 146-174 (38.6 - 46%) -- guaranteed 3HKO
+2 252 SpA Gholdengo Make It Rain vs. 4 HP / 252+ SpD Blissey: 232-274 (35.5 - 42%) -- guaranteed 3HKO
+2 252 SpA Gholdengo Make It Rain over 2 turns vs. 4 HP / 252+ SpD Blissey: 386-457 (59.2 - 70%) -- not a KO
+4 252 SpA Gholdengo Make It Rain vs. 4 HP / 252+ SpD Blissey: 348-411 (53.3 - 63%) -- guaranteed 2HKO
+4 252 SpA Gholdengo Make It Rain over 2 turns vs. 4 HP / 252+ SpD Blissey: 580-685 (88.9 - 105%) -- 31.3% chance to 2HKO
+6 252 SpA Gholdengo Make It Rain over 2 turns vs. 4 HP / 252+ SpD Blissey: 775-913 (118.8 - 140%) -- guaranteed KO in 2 turns
+4 252 SpA Gholdengo Make It Rain over 2 turns vs. +1 4 HP / 252+ SpD Blissey: 388-458 (59.5 - 70.2%) -- not a KO
+4 252 SpA Gholdengo Make It Rain over 2 turns vs. +2 4 HP / 252+ SpD Blissey: 292-345 (44.7 - 52.9%) -- not a KO
252 SpA Gholdengo Psyshock vs. 4 HP / 252 Def Blissey: 176-208 (26.9 - 31.9%) -- guaranteed 4HKO
+2 252 SpA Gholdengo Psyshock vs. 4 HP / 252 Def Blissey: 351-414 (53.8 - 63.4%) -- guaranteed 2HKO
+4 252 SpA Gholdengo Psyshock vs. 4 HP / 252 Def Blissey: 527-620 (80.8 - 95%) -- guaranteed 2HKO
---ENAMORUS
-----252 SpA Choice Specs Tera Fairy Enamorus Moonblast vs. 4 HP / 252+ SpD Blissey: 186-220 (28.5 - 33.7%) -- 0.3% chance to 3HKO
-----IRON MOTH
-----0 SpA Blissey Shadow Ball vs. 0 HP / 0 SpD Iron Moth: 42-50 (13.9 - 16.6%) -- possible 7HKO
+1 0 SpA Blissey Shadow Ball vs. 0 HP / 0 SpD Iron Moth: 63-75 (20.9 - 24.9%) -- guaranteed 5HKO
+2 0 SpA Blissey Shadow Ball vs. 0 HP / 0 SpD Iron Moth: 84-99 (27.9 - 32.8%) -- guaranteed 4HKO
+3 0 SpA Blissey Shadow Ball vs. 0 HP / 0 SpD Iron Moth: 105-124 (34.8 - 41.1%) -- guaranteed 3HKO
+4 0 SpA Blissey Shadow Ball vs. 0 HP / 0 SpD Iron Moth: 125-148 (41.5 - 49.1%) -- guaranteed 3HKO
+5 0 SpA Blissey Shadow Ball vs. 0 HP / 0 SpD Iron Moth: 146-172 (48.5 - 57.1%) -- 91.8% chance to 2HKO
252 SpA Iron Moth Fiery Dance vs. 4 HP / 252+ SpD Blissey: 81-96 (12.4 - 14.7%) -- possible 7HKO
+1 252 SpA Iron Moth Fiery Dance vs. 4 HP / 252+ SpD Blissey: 121-144 (18.5 - 22%) -- possible 5HKO
+2 252 SpA Iron Moth Fiery Dance vs. 4 HP / 252+ SpD Blissey: 160-190 (24.5 - 29.1%) -- 99.9% chance to 4HKO
Don't let them boost more than 2 stages above you.
-----MANAPHY
-----+3 252 SpA Manaphy Surf vs. 4 HP / 252+ SpD Blissey: 178-211 (27.3 - 32.3%) -- guaranteed 4HKO
+6 252 SpA Manaphy Surf vs. 4 HP / 252+ SpD Blissey: 286-337 (43.8 - 51.6%) -- 10.9% chance to 2HKO
+6 252 SpA Manaphy Surf vs. +1 4 HP / 252+ SpD Blissey: 190-225 (29.1 - 34.5%) -- 5.8% chance to 3HKO
+3 252 SpA Manaphy Scald vs. 4 HP / 252+ SpD Blissey: 159-187 (24.3 - 28.6%) -- 99.1% chance to 4HKO
+6 252 SpA Manaphy Scald vs. 4 HP / 252+ SpD Blissey: 255-300 (39.1 - 46%) -- guaranteed 3HKO
+6 252 SpA Manaphy Scald vs. +1 4 HP / 252+ SpD Blissey: 169-201 (25.9 - 30.8%) -- guaranteed 4HKO
+6 252 SpA Manaphy Scald vs. 4 HP / 252+ SpD Blissey on a critical hit: 382-450 (58.5 - 69%) -- guaranteed 2HKO
+6 252 SpA Manaphy Surf vs. 4 HP / 252+ SpD Blissey on a critical hit: 429-505 (65.7 - 77.4%) -- guaranteed 2HKO
You don't have the PP to take it on. You're also setting yourself up for a crit.
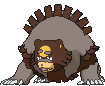
 Chesnaught, the Toucher of Grass
 Chesnaught @ Heavy-Duty Boots
Ability: Bulletproof
Tera Type: Fighting
EVs: 252 HP / 252 Def / 4 SpD
Impish Nature
- Knock Off
- Synthesis
- Body Press
- Spiky Shield
What do you need to know?
- Heavy Duty Boots prevents hazards from damaging you.
- Bulletproof blocks Shadow Ball, Pyro Ball, Sludge Bomb & Acid Spray. Highly useful.
- Tera Fighting boosts Body Press and removes your Ice weakness while retaining some of it's defensive utility. It's kinda hard to choose a Tera for this guy, since you'll almost never use it.
- Knock Off complements Gliscor's own to form a knock spam core and guarantee hazard damage. If you aren't knocking off their boots you're forcing in something that takes the knock better into hazards, which is a win no matter what.
- Synthesis is your best reliable recovery option, boosted by sun if you happen to play against it.
- STAB Body Press coming off of Chesnaught's 377 Defense will hit hard even through resists.
- Spiky Shield is a useful tool to scout common Choice users such as Walking Wake , Dragapult
 and Gholdengo , among others. It also punishes the many common contact moves like U-turn, Drain Punch, Knock Off, Ice Spinner, Bitter Blade and Infestation. Every % matters.
 - The EVs are arranged to maximize physical defensive prowess, seeing how Chesnaught's main targets are Rillaboom and Ogerpon formes
Usage Tips
- Be aggressive with your plays. Chesnaught's Body Press has a very high raw damage output, all things considered, able to 2HKO Ogerpon-W and Cinderace , 3/2HKO Rillaboom after slight chip damage. You should make the most out of it against offensive teams through switch-in punishing. If the opponent isn't using many Pokémon capable of staying for long over the course of the game or resisting Fighting, going straight for a KO might be a better idea rather than chipping them slowly with hazards. Knock Off is also a no-risk high reward move against fatter teams that you shouldn't have much trouble spamming. Predicting the Gholdengo or Dragapult thinking they can come in safely is huge.
- Don't stay in against Cinderace. Will-O-Wisp permanently hinders your good grasses and switch-in punish potential and forces you to use Synthesis more often. If you feel like it's a worthwhile trade however, feel free to go for a Knock.
- Potential bonus funny points if your opponent doesn't know Bulletproof blocks Pyro Ball.
- Always come in on Ogerpon and Rillaboom . This is the main reason Chesnaught is in the team to begin with; it's a stellar answer to these guys who Dondozo would not dare touch with a pole. Band Ogerpon does a measly maximum of 22.6% with Ivy Cudgel, and it's only option is Play Rough, who can be punished by Spiky Shield before going into Dondozo and punishing their next switch-in. Afterward you can resort to mindgames and such to mess with your opponent and keep everyone healthy, alternating between Gliscor and Chesnaught. Masked forms do a pitiful maximum of 36% at +2 Attack with their Cudgel. Rillaboom's Wood Hammer does more, but it's Grassy Terrain helps offset some of the damage dealt for more breathing room. Spiky Shield mindgames are great against Swords Dance variants, but your focus should still be going for the 2/3HKO with Body Press. Knock Off sucks to take however, and against Balance is a huge handicap. Assess first if the opposing Ogerpon or Rillaboom is running it, but often times you'll still be forced to use Chesnaught to check it, so put effort into managing it.
- Tusk can still do good damage with Ice Spinner. Don't overdo it against that guy. Proto Atk is still something you should leave to Dondozo to handle.
- Don't be afraid of taking on Kingambit . Chesnaught checks non late game Gambit better thanks to it's innate Dark Resist, fighting STAB which will OHKO any and all Kingambit that dare stay in against this guy, and lesser weight (Low Kick is only 80 BP whereas vs Dondozo it's 120). The (somewhat) uncommon Tera Blast Fairy/Flying/Fire/etc pose a problem, so my suggestion is to be conservative and use Spiky Shield instead of going for the kill/switch-in punish if the enemy team also includes Rillaboom and/or Ogerpon-Wellspring . Keep in mind that Chesnaught does not possess Unaware and as such Dondozo is better to switch into it if it tries to Swords Dance. In the particular case of Tera Fairy, just switch into Dozo since you'll be turned into setup fodder. In the case of Tera Dark, your OHKO is turned into a 2HKO, which may make a difference, so keep it in mind. As is with everything, Supreme Overlord makes Gambit harder to check in the long term but you'll probably do just fine anyway. Trust.
- Leave Dragonite for Dondozo to handle. Chesnaught can't deal with it.
-----OGERPON -----
252+ Def Chesnaught Body Press vs. 0 HP / 0 Def Ogerpon-Wellspring: 160-189 (53.1 - 62.7%) -- guaranteed 2HKO
252 Atk Choice Band Ogerpon Ivy Cudgel vs. 252 HP / 252+ Def Chesnaught: 72-86 (18.9 - 22.6%) -- possible 5HKO
252 Atk Choice Band Ogerpon Play Rough vs. 252 HP / 252+ Def Chesnaught: 174-206 (45.7 - 54.2%) -- 47.7% chance to 2HKO
252 Atk Wellspring Mask Ogerpon-Wellspring Power Whip vs. 252 HP / 252+ Def Chesnaught: 69-82 (18.1 - 21.5%) -- possible 5HKO
252 Atk Wellspring Mask Ogerpon-Wellspring Ivy Cudgel vs. 252 HP / 252+ Def Chesnaught: 58-69 (15.2 - 18.1%) -- possible 6HKO
+2 252 Atk Wellspring Mask Ogerpon-Wellspring Ivy Cudgel vs. 252 HP / 252+ Def Chesnaught: 116-137 (30.5 - 36%) -- 47.4% chance to 3HKO
+2 252 Atk Wellspring Mask Ogerpon-Wellspring Power Whip vs. 252 HP / 252+ Def Chesnaught: 139-164 (36.5 - 43.1%) -- guaranteed 3HKO
252 Atk Cornerstone Mask Ogerpon-Cornerstone Ivy Cudgel vs. 252 HP / 252+ Def Chesnaught: 58-69 (15.2 - 18.1%) -- possible 6HKO
252 Atk Cornerstone Mask Ogerpon-Cornerstone Power Whip vs. 252 HP / 252+ Def Chesnaught: 69-82 (18.1 - 21.5%) -- possible 5HKO
+2 252 Atk Cornerstone Mask Ogerpon-Cornerstone Ivy Cudgel vs. 252 HP / 252+ Def Chesnaught: 116-137 (30.5 - 36%) -- 47.4% chance to 3HKO
+2 252 Atk Cornerstone Mask Ogerpon-Cornerstone Power Whip vs. 252 HP / 252+ Def Chesnaught: 139-164 (36.5 - 43.1%) -- guaranteed 3HKO
-----RILLABOOM-----
252+ Def Chesnaught Body Press vs. 0 HP / 4 Def Rillaboom: 150-177 (43.9 - 51.9%) -- 95.3% chance to 2HKO after 2 layers of Spikes and Grassy Terrain recovery
252+ Def Chesnaught Body Press vs. 252 HP / 0 Def Rillaboom: 151-178 (37.3 - 44%) -- 100% chance to 3HKO after Grassy Terrain recovery
252+ Atk Choice Band Rillaboom Wood Hammer vs. 252 HP / 252+ Def Chesnaught in Grassy Terrain: 127-150 (33.4 - 39.4%) -- 20.9% chance to 3HKO after Grassy Terrain recovery
252+ Atk Choice Band Rillaboom Drain Punch vs. 252 HP / 252+ Def Chesnaught: 82-97 (21.5 - 25.5%) -- possible 5HKO after Grassy Terrain recovery
252+ Atk Rillaboom Wood Hammer vs. 252 HP / 252+ Def Chesnaught in Grassy Terrain: 85-101 (22.3 - 26.5%) -- possible 5HKO after Grassy Terrain recovery
+2 252+ Atk Rillaboom Wood Hammer vs. 252 HP / 252+ Def Chesnaught in Grassy Terrain: 170-201 (44.7 - 52.8%) -- guaranteed 3HKO after Grassy Terrain recovery
-----CINDERACE-----
252+ Def Chesnaught Body Press vs. 0 HP / 0 Def Cinderace: 175-207 (58.1 - 68.7%) -- guaranteed 2HKO
-----GREAT TUSK-----
252+ Def Chesnaught Body Press vs. 252 HP / 0 Def Great Tusk: 109-130 (25.1 - 29.9%) -- guaranteed 4HKO
4 Atk Protosynthesis Great Tusk Ice Spinner vs. 252 HP / 252+ Def Chesnaught: 120-142 (31.5 - 37.3%) -- 85.6% chance to 3HKO
4 Atk Protosynthesis Great Tusk Close Combat vs. 252 HP / 252+ Def Chesnaught: 135-159 (35.5 - 41.8%) -- guaranteed 3HKO
252 Atk Great Tusk Close Combat vs. 252 HP / 252+ Def Chesnaught: 124-147 (32.6 - 38.6%) -- 99.1% chance to 3HKO
252 Atk Great Tusk Ice Spinner vs. 252 HP / 252+ Def Chesnaught: 112-132 (29.4 - 34.7%) -- 8.8% chance to 3HKO
+1 252 Atk Great Tusk Close Combat vs. 252 HP / 252+ Def Chesnaught: 186-219 (48.9 - 57.6%) -- 94.5% chance to 2HKO
+1 252 Atk Great Tusk Ice Spinner vs. 252 HP / 252+ Def Chesnaught: 166-196 (43.6 - 51.5%) -- 10.9% chance to 2HKO
+1 4 Atk Great Tusk Close Combat vs. 252 HP / 252+ Def Chesnaught: 153-181 (40.2 - 47.6%) -- guaranteed 3HKO
+1 4 Atk Great Tusk Ice Spinner vs. 252 HP / 252+ Def Chesnaught: 136-162 (35.7 - 42.6%) -- guaranteed 3HKO
-----KINGAMBIT-----
252+ Def Chesnaught Body Press vs. 0 HP / 4 Def Kingambit: 472-556 (138.4 - 163%) -- guaranteed OHKO
252+ Def Chesnaught Body Press vs. 252 HP / 4 Def Kingambit: 472-556 (116.8 - 137.6%) -- guaranteed OHKO
252+ Def Chesnaught Body Press vs. 0 HP / 4 Def Tera Dark Kingambit: 236-278 (69.2 - 81.5%) -- guaranteed 2HKO
252+ Def Chesnaught Body Press vs. 252 HP / 4 Def Tera Dark Kingambit: 236-278 (58.4 - 68.8%) -- guaranteed 2HKO
252+ Atk Kingambit Iron Head vs. 252 HP / 252+ Def Chesnaught: 93-111 (24.4 - 29.2%) -- 99.7% chance to 4HKO
252+ Atk Kingambit Low Kick (80 BP) vs. 252 HP / 252+ Def Chesnaught: 62-74 (16.3 - 19.4%) -- possible 6HKO
252+ Atk Tera Fighting Kingambit Low Kick (80 BP) vs. 252 HP / 252+ Def Chesnaught: 93-111 (24.4 - 29.2%) -- 99.7% chance to 4HKO
252+ Atk Supreme Overlord 5 allies fainted Kingambit Kowtow Cleave vs. 252 HP / 252+ Def Chesnaught: 73-87 (19.2 - 22.8%) -- possible 5HKO
252+ Atk Supreme Overlord 5 allies fainted Kingambit Iron Head vs. 252 HP / 252+ Def Chesnaught: 139-165 (36.5 - 43.4%) -- guaranteed 3HKO
252+ Atk Supreme Overlord 5 allies fainted Tera Fighting Kingambit Low Kick (80 BP) vs. 252 HP / 252+ Def Chesnaught: 139-165 (36.5 - 43.4%) -- guaranteed 3HKO
252+ Atk Black Glasses Supreme Overlord 5 allies fainted Tera Dark Kingambit Kowtow Cleave vs. 252 HP / 252+ Def Chesnaught: 119-140 (31.3 - 36.8%) -- 75% chance to 3HKO
252+ Atk Black Glasses Kingambit Kowtow Cleave vs. 252 HP / 252+ Def Chesnaught: 59-70 (15.5 - 18.4%) -- possible 6HKO
-----252+ Def Chesnaught Body Press vs. 0 HP / 0 Def Ogerpon-Wellspring: 160-189 (53.1 - 62.7%) -- guaranteed 2HKO
252 Atk Choice Band Ogerpon Ivy Cudgel vs. 252 HP / 252+ Def Chesnaught: 72-86 (18.9 - 22.6%) -- possible 5HKO
252 Atk Choice Band Ogerpon Play Rough vs. 252 HP / 252+ Def Chesnaught: 174-206 (45.7 - 54.2%) -- 47.7% chance to 2HKO
252 Atk Wellspring Mask Ogerpon-Wellspring Power Whip vs. 252 HP / 252+ Def Chesnaught: 69-82 (18.1 - 21.5%) -- possible 5HKO
252 Atk Wellspring Mask Ogerpon-Wellspring Ivy Cudgel vs. 252 HP / 252+ Def Chesnaught: 58-69 (15.2 - 18.1%) -- possible 6HKO
+2 252 Atk Wellspring Mask Ogerpon-Wellspring Ivy Cudgel vs. 252 HP / 252+ Def Chesnaught: 116-137 (30.5 - 36%) -- 47.4% chance to 3HKO
+2 252 Atk Wellspring Mask Ogerpon-Wellspring Power Whip vs. 252 HP / 252+ Def Chesnaught: 139-164 (36.5 - 43.1%) -- guaranteed 3HKO
252 Atk Cornerstone Mask Ogerpon-Cornerstone Ivy Cudgel vs. 252 HP / 252+ Def Chesnaught: 58-69 (15.2 - 18.1%) -- possible 6HKO
252 Atk Cornerstone Mask Ogerpon-Cornerstone Power Whip vs. 252 HP / 252+ Def Chesnaught: 69-82 (18.1 - 21.5%) -- possible 5HKO
+2 252 Atk Cornerstone Mask Ogerpon-Cornerstone Ivy Cudgel vs. 252 HP / 252+ Def Chesnaught: 116-137 (30.5 - 36%) -- 47.4% chance to 3HKO
+2 252 Atk Cornerstone Mask Ogerpon-Cornerstone Power Whip vs. 252 HP / 252+ Def Chesnaught: 139-164 (36.5 - 43.1%) -- guaranteed 3HKO
-----RILLABOOM
-----252+ Def Chesnaught Body Press vs. 0 HP / 4 Def Rillaboom: 150-177 (43.9 - 51.9%) -- 95.3% chance to 2HKO after 2 layers of Spikes and Grassy Terrain recovery
252+ Def Chesnaught Body Press vs. 252 HP / 0 Def Rillaboom: 151-178 (37.3 - 44%) -- 100% chance to 3HKO after Grassy Terrain recovery
252+ Atk Choice Band Rillaboom Wood Hammer vs. 252 HP / 252+ Def Chesnaught in Grassy Terrain: 127-150 (33.4 - 39.4%) -- 20.9% chance to 3HKO after Grassy Terrain recovery
252+ Atk Choice Band Rillaboom Drain Punch vs. 252 HP / 252+ Def Chesnaught: 82-97 (21.5 - 25.5%) -- possible 5HKO after Grassy Terrain recovery
252+ Atk Rillaboom Wood Hammer vs. 252 HP / 252+ Def Chesnaught in Grassy Terrain: 85-101 (22.3 - 26.5%) -- possible 5HKO after Grassy Terrain recovery
+2 252+ Atk Rillaboom Wood Hammer vs. 252 HP / 252+ Def Chesnaught in Grassy Terrain: 170-201 (44.7 - 52.8%) -- guaranteed 3HKO after Grassy Terrain recovery
-----CINDERACE
-----252+ Def Chesnaught Body Press vs. 0 HP / 0 Def Cinderace: 175-207 (58.1 - 68.7%) -- guaranteed 2HKO
-----GREAT TUSK
-----252+ Def Chesnaught Body Press vs. 252 HP / 0 Def Great Tusk: 109-130 (25.1 - 29.9%) -- guaranteed 4HKO
4 Atk Protosynthesis Great Tusk Ice Spinner vs. 252 HP / 252+ Def Chesnaught: 120-142 (31.5 - 37.3%) -- 85.6% chance to 3HKO
4 Atk Protosynthesis Great Tusk Close Combat vs. 252 HP / 252+ Def Chesnaught: 135-159 (35.5 - 41.8%) -- guaranteed 3HKO
252 Atk Great Tusk Close Combat vs. 252 HP / 252+ Def Chesnaught: 124-147 (32.6 - 38.6%) -- 99.1% chance to 3HKO
252 Atk Great Tusk Ice Spinner vs. 252 HP / 252+ Def Chesnaught: 112-132 (29.4 - 34.7%) -- 8.8% chance to 3HKO
+1 252 Atk Great Tusk Close Combat vs. 252 HP / 252+ Def Chesnaught: 186-219 (48.9 - 57.6%) -- 94.5% chance to 2HKO
+1 252 Atk Great Tusk Ice Spinner vs. 252 HP / 252+ Def Chesnaught: 166-196 (43.6 - 51.5%) -- 10.9% chance to 2HKO
+1 4 Atk Great Tusk Close Combat vs. 252 HP / 252+ Def Chesnaught: 153-181 (40.2 - 47.6%) -- guaranteed 3HKO
+1 4 Atk Great Tusk Ice Spinner vs. 252 HP / 252+ Def Chesnaught: 136-162 (35.7 - 42.6%) -- guaranteed 3HKO
-----KINGAMBIT
-----252+ Def Chesnaught Body Press vs. 0 HP / 4 Def Kingambit: 472-556 (138.4 - 163%) -- guaranteed OHKO
252+ Def Chesnaught Body Press vs. 252 HP / 4 Def Kingambit: 472-556 (116.8 - 137.6%) -- guaranteed OHKO
252+ Def Chesnaught Body Press vs. 0 HP / 4 Def Tera Dark Kingambit: 236-278 (69.2 - 81.5%) -- guaranteed 2HKO
252+ Def Chesnaught Body Press vs. 252 HP / 4 Def Tera Dark Kingambit: 236-278 (58.4 - 68.8%) -- guaranteed 2HKO
252+ Atk Kingambit Iron Head vs. 252 HP / 252+ Def Chesnaught: 93-111 (24.4 - 29.2%) -- 99.7% chance to 4HKO
252+ Atk Kingambit Low Kick (80 BP) vs. 252 HP / 252+ Def Chesnaught: 62-74 (16.3 - 19.4%) -- possible 6HKO
252+ Atk Tera Fighting Kingambit Low Kick (80 BP) vs. 252 HP / 252+ Def Chesnaught: 93-111 (24.4 - 29.2%) -- 99.7% chance to 4HKO
252+ Atk Supreme Overlord 5 allies fainted Kingambit Kowtow Cleave vs. 252 HP / 252+ Def Chesnaught: 73-87 (19.2 - 22.8%) -- possible 5HKO
252+ Atk Supreme Overlord 5 allies fainted Kingambit Iron Head vs. 252 HP / 252+ Def Chesnaught: 139-165 (36.5 - 43.4%) -- guaranteed 3HKO
252+ Atk Supreme Overlord 5 allies fainted Tera Fighting Kingambit Low Kick (80 BP) vs. 252 HP / 252+ Def Chesnaught: 139-165 (36.5 - 43.4%) -- guaranteed 3HKO
252+ Atk Black Glasses Supreme Overlord 5 allies fainted Tera Dark Kingambit Kowtow Cleave vs. 252 HP / 252+ Def Chesnaught: 119-140 (31.3 - 36.8%) -- 75% chance to 3HKO
252+ Atk Black Glasses Kingambit Kowtow Cleave vs. 252 HP / 252+ Def Chesnaught: 59-70 (15.5 - 18.4%) -- possible 6HKO
Last edited:
 and Gliscor
 ?
? , i 100% think that if Wellspring is banned people will simply shift to using Cornerstone instead. Yes, it's theoretically worse, but in the end it's still a hard to wall STAB combination with boosting and the same support options. It's going to be the same story already told twice with a lighter tone. I believe anyway.
 was a prime example of this: Proto Atk gives you an immediate 30% increase, greatly increasing your OHKO capacity; or if they're worried about outspeeding already boosted mons like Quark Speed Moth and Iron Valiant they can run Proto Speed instead, though this was less common.

