... I don't get it.ZA HANDO

-
Welcome to Smogon! Take a moment to read the Introduction to Smogon for a run-down on everything Smogon, and make sure you take some time to read the global rules.
-
Congrats to the winners of the 2023 Smog Awards!
July 7* Tera Raid Event Part 2: Rillaboom (Normal Tera)
- Thread starter Vengeance417
- Start date


... I don't get it.


We obviously don't know the set up yet but...
Is it possible the lowly Gogoat can survive? Please roast these ideas.
Gogoat @ Leftovers
Ability: Sap Sipper
Tera Type: Ghost / Steel / Ground
EVs: 252 HP / 4 Atk / 252 Def
Impish Nature
- Milk Drink / Synthesis
- Horn Leech
- Mud-Slap / Bulk Up
- Helping Hand / Tail Whip
Edit:
0+ Atk Tera Normal Rillaboom Acrobatics (110 BP) vs. 252 HP / 252+ Def Gogoat: 204-240 (45.3 - 53.3%) -- guaranteed 3HKO after Leftovers recovery and Grassy Terrain recovery
Oh. Git rekt goat.
Last edited:
For the Violet players:

Shell Bell
Tera Fighting
252 Atk / 252 Def / 6 HP
Adamant nature
Drain Punch
Force Palm
Belly Drum
Electric Terrain
Shell Bell
Tera Fighting
252 Atk / 252 Def / 6 HP
Adamant nature
Drain Punch
Force Palm
Belly Drum
Electric Terrain
Some supports:

Qwilfish-Hisui @ Eviolite
Ability: Intimidate
Tera Type: Dark
EVs: 252 HP / 252 Def / 4 Spe
Bold Nature
IVs: 0 Atk
- Chilling Water
- Taunt
- Acid Spray
- Minimize / Stockpile
Classic Qwilfish-H should do great here. Intimidate to lower Attack, CW to lower Attack further, Acid Spray for your Special partners. I always use Minimize, but Stockpile could likely be a more consistent option to help you take Boomburst better.

Cresselia (F) @ Clear Amulet / Light Clay
Ability: Levitate
Tera Type: Psychic
EVs: 252 HP / 252 Def / 4 Spe
Bold Nature
IVs: 0 Atk
- Lunar Blessing
- Reflect
- Helping Hand
- Mud-Slap
Since Rillaboom will likely have Body Slam, Cresselia's Lunar Blessing will be an excellent support move for this raid since it's essentially a free Heal Cheer, restoring the HP of allies and curing status conditions such as Paralysis. Cress is also one of the bulkiest Pokemon ever and refuses to die. Light Clay is usually the standard when running Screens, but I want to give Clear Amulet a try since Rillaboom will very likely have Drum Beating, which lowers Speed.

Goodra-Hisui @ Clear Amulet
Ability: Shell Armor
Tera Type: Fighting
EVs: 52 HP / 252 Def / 204 Spe
Bold Nature
IVs: 0 Atk
- Acid Spray
- Shelter
- Body Press
- Life Dew
Sad Snail will be great here, too. Resists Body Slam so Rilla will likely not go for it against you, and Boomburst just tickles with 150 base SpDef. Acid Spray support is always welcome for Special teammates. Shelter boosts Body Press and also lets you withstand physical hits better. Usually you'd opt for something like Sap Sipper as the ability, because why not against a Grass-type boss? Well, you quad-resist Grass, and you're boosting your Defense, so why not Shell Armor + Clear Amulet + Speed investment to get the best of both worlds? Shell Armor will prevent crits which will be crucial when boosting Defense, and Clear Amulet will mean Drum Beating will never lower your Speed. Not being immune to Drum Beating also means Stomping Tantrum won't get its BP boost, either.
0+ Atk Tera Normal Rillaboom Drain Punch vs. +2 52 HP / 252+ Def Goodra-Hisui: 54-64 (17.1 - 20.3%) -- possible 7HKO after Grassy Terrain recovery
Qwilfish-Hisui @ Eviolite
Ability: Intimidate
Tera Type: Dark
EVs: 252 HP / 252 Def / 4 Spe
Bold Nature
IVs: 0 Atk
- Chilling Water
- Taunt
- Acid Spray
- Minimize / Stockpile
Classic Qwilfish-H should do great here. Intimidate to lower Attack, CW to lower Attack further, Acid Spray for your Special partners. I always use Minimize, but Stockpile could likely be a more consistent option to help you take Boomburst better.
Cresselia (F) @ Clear Amulet / Light Clay
Ability: Levitate
Tera Type: Psychic
EVs: 252 HP / 252 Def / 4 Spe
Bold Nature
IVs: 0 Atk
- Lunar Blessing
- Reflect
- Helping Hand
- Mud-Slap
Since Rillaboom will likely have Body Slam, Cresselia's Lunar Blessing will be an excellent support move for this raid since it's essentially a free Heal Cheer, restoring the HP of allies and curing status conditions such as Paralysis. Cress is also one of the bulkiest Pokemon ever and refuses to die. Light Clay is usually the standard when running Screens, but I want to give Clear Amulet a try since Rillaboom will very likely have Drum Beating, which lowers Speed.
Goodra-Hisui @ Clear Amulet
Ability: Shell Armor
Tera Type: Fighting
EVs: 52 HP / 252 Def / 204 Spe
Bold Nature
IVs: 0 Atk
- Acid Spray
- Shelter
- Body Press
- Life Dew
Sad Snail will be great here, too. Resists Body Slam so Rilla will likely not go for it against you, and Boomburst just tickles with 150 base SpDef. Acid Spray support is always welcome for Special teammates. Shelter boosts Body Press and also lets you withstand physical hits better. Usually you'd opt for something like Sap Sipper as the ability, because why not against a Grass-type boss? Well, you quad-resist Grass, and you're boosting your Defense, so why not Shell Armor + Clear Amulet + Speed investment to get the best of both worlds? Shell Armor will prevent crits which will be crucial when boosting Defense, and Clear Amulet will mean Drum Beating will never lower your Speed. Not being immune to Drum Beating also means Stomping Tantrum won't get its BP boost, either.
0+ Atk Tera Normal Rillaboom Drain Punch vs. +2 52 HP / 252+ Def Goodra-Hisui: 54-64 (17.1 - 20.3%) -- possible 7HKO after Grassy Terrain recovery
Bump, Serebii says the raid has started, but details aren't posted yet.
If this one is farmable solo I might actually switch back to playing again.
If this one is farmable solo I might actually switch back to playing again.
Yeah just kidding, don’t use Koraidon LOL


How did he know all this?
Last edited:
You know, It may not make Drain Punch and Collision Course get the full boost when the barrier is up, but I'm thinking on changing Koraidon to Tera Ghost just for that Boomburst.
(edit) Nvm, I didn't know the sun makes Growth stronger.

Shell Bell/Metrenome
Unaware
Tera Fighting
252 HP / 252 Spec Atk / 6 Def or flip Def and HP
Torch Song
Tera Blast
Curse (Make sure you don't use it before Terastallizing)
Slack Off
Just be aware that Acid Spray will be doing nothing for your damage.
(edit) Nvm, I didn't know the sun makes Growth stronger.
Shell Bell/Metrenome
Unaware
Tera Fighting
252 HP / 252 Spec Atk / 6 Def or flip Def and HP
Torch Song
Tera Blast
Curse (Make sure you don't use it before Terastallizing)
Slack Off
Just be aware that Acid Spray will be doing nothing for your damage.
Last edited:
Rapid idea: triple Corviknight swagger into Iron Hands, one Heal cheers while the other two Screech, Close Combat go brr?

Assuming Iron Hands is still good for this, since no Stomping Tantrum. RIP Koraidon, please don't bring a sun setter.
EDIT: it uses Growth right at the beginning, only clears our stat boosts once somewhat early, and resets its drops near the half timer point, and never attempted to set Grassy Terrain again
EDIT: it uses Growth right at the beginning, only clears our stat boosts once somewhat early, and resets its drops near the half timer point, and never attempted to set Grassy Terrain again
Last edited:
Ok, on second thought, don't even think about using Skeledirge. I'm just gonna try Corviknight.
Here is Rillaboom's script from the SV raid lookup, though generally you can feel out most of what he does in terms of timer progression (which is shortened again). It starts with an instant Growth and then an early shield and player reset + Growth + Boomburst to follow up later. About halfway in, it will use Bulk Up and then at 55% HP, it will reset itself and start taking double actions (aka the "second shield" at a 50% rate). The actions are mostly used on moves and light on resets, but still makes it inconvenient to keep debuffs on the boss especially when it starts double attacking at the same time.
Azumarill does it again. For this solo clear, I brought back my trusty Sap Sipper Azumarill from the Chesnaught raids, though things are a lot tighter in this case without the Rock weakness and permanent debuffs. I ideally prefered an Intimidate NPC to survive the post-reset phase and left AI unlocked for the chance to get any Intimidator, though I noted that Synchronizers like Umbreon and Gardevoir can help as well with Body Slam's paralysis. This battle was mostly trial and error by dealing with accuracy hax and animation time as the main bottlenecks, so I will just go over the successful run.
(My closest run right before the winning one. Rillaboom had the gall to use Drum Beating with its final move after time already ran out.)
I start off the battle with Mud-Slap and then try for some Tickles, though in this run I only got off 2 Mud-Slaps and 1 Tickle before the shield went up because of Shell Bell and Grassy Terrain healing. I still got hit by Boomburst anyway, but I had 3 Mud-Slaps hit now, and after heal cheering up I could go for some early Belly Drum Liquidations before he got Bulk Up off. It took about 5 Liquidations to break through the shields and one more to trigger the boss reset phase, and I probably should have used some attack cheers but I was fishing for some defense drops this time. After this I put down 2 Mud-Slap to be safe since I had 2 Intimidate AI to cover me, tried a Liquidation to heal up and then went for a few more Tickles since I wasn't doing enough damage. Rillaboom was fortunately missing more attacks than it landed, but in the last moments I was going for an attack cheer and I accidentally pressed a heal cheer instead. I thought this had doomed my run, but it might saved my AI in hindsight.
At this point all I could do now is click Liquidations as fast as I could. I wasn't sure if it would 2HKO, but I did have mostly physical AI chipping in as well to take advantage of the defense drops. Rillaboom missed one Body Slam without a double action, and with my last move I went for another Liquidation to end it.
Somehow Rillaboom still managed to get a last turn off even after it had died and I thought that the game had cheated me out of my victory, but it did actually end the battle after it finished hitting me and I just didn't get to see a message saying that it fainted. Overall this fight was pretty tight and not as reliable as Chesnaught with a shortened timer and 35x HP to get through and no weakness to exploit, as well as having to reapply debuffs and not having the luxury of time to set up 6 Tickles. It really came down to some luck of Rillaboom's (lack of) animations through accuracy drops which would otherwise waste precious time, as well as Body Slams mostly not landing to paralyze and require a heal cheer. An attack cheer would probably make the shield phase or final phase more efficient as well, but I didn't end up using any in this run because of the misclick.
As one small mercy, Rillaboom doesn't seem to care much about making optimal move choices against Azumarill and doesn't always spam Body Slam, even randomly hitting Drum Beating sometimes even after Sap Sipper is revealed.


As a Corviknight fan, I of course had to try it and jsyk, Body Press Corviknight is incredibly free as a solo.
This is the set I used:
Corviknight (M) @ Shell Bell
IVs: 9 SpA
EVs: 252 HP / 252 Def / 6 SpD
Ability: Mirror Armor
Tera Type: Fighting
Impish Nature
- Body Press
- Screech
- Iron Defense
Sample strategy:
Screech 2 times at the start.
Body Press until it cleanses you.
Iron Defense 3 times.
Body Press, Tera whenever you can until shield goes down.
Screech once or twice after its shield goes down if you want (it will have cleansed itself by now).
Body Press until dead.
It'll prefer to Low Kick you until you Terastallize, then it'll prefer Acrobatics. I originally tried Flying Tera Type which worked even though I lost 3 turns to paralysis (it prefers to Body Slam if you Tera Flying), but it was a lot closer on the timer. You don't need a 4th move; you'll never need to use it.
Last edited:
Shell Bell (Though I won without an item, I forgot to give him one)
Mirror Armor
Tera Fighting
252 Def / 252 Spec Def / 6 HP
Impish
Body Press
Rock Smash
Iron Defense
Roost
Well attempt one did not go very well. Annihilape, Zamazenta (hero), Cinderace and my Iron Hands
Rillaboom just does a lot of damage, huh
I'll try one more time and then see if I can wrangle up a Corviknight. I forgot to refresh my resources between this raid & the last, though...
oh god the second attempt went through with me, another annihilape, a bellibolt (intriguing...) and then a CPU
hough boy
This solo strat worked like a charm, thanks! Also wanted to add that having an NPC Tauros is super helpful due to Intimidate activating every time it gets KO’ed (which will be frequent).As a Corviknight fan, I of course had to try it and jsyk, Body Press Corviknight is incredibly free as a solo.
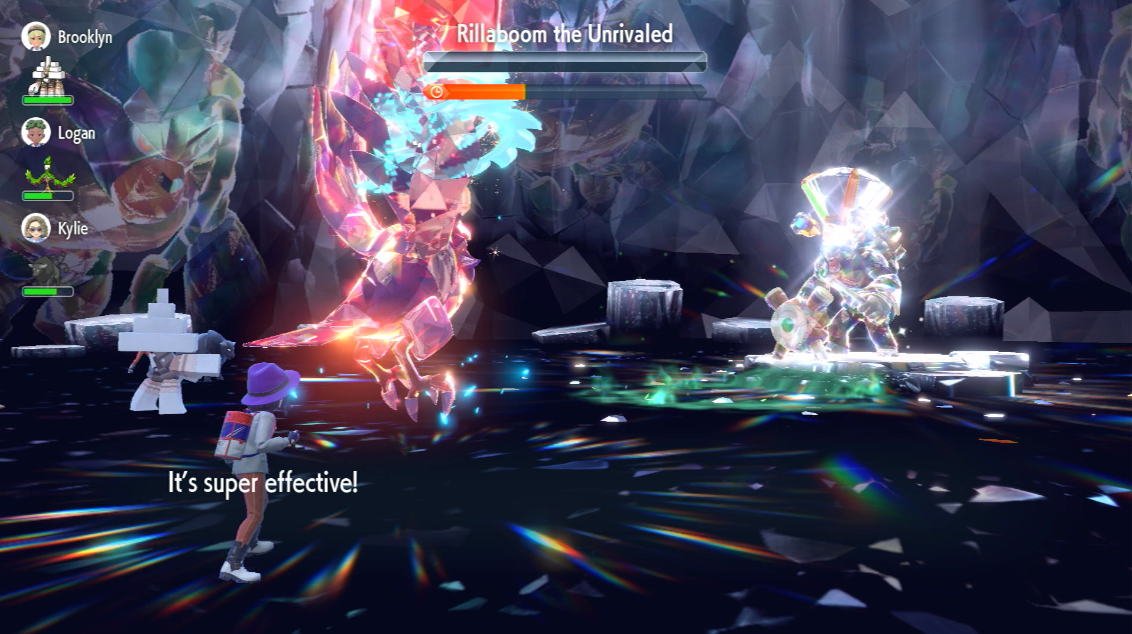
View attachment 538184
This is the set I used:
Corviknight (M) @ Shell Bell
IVs: 9 SpA
EVs: 252 HP / 252 Def / 6 SpD
Ability: Mirror Armor
Tera Type: Fighting
Impish Nature
- Body Press
- Screech
- Iron Defense
Sample strategy:
Screech 2 times at the start.
Body Press until it cleanses you.
Iron Defense 3 times.
Body Press, Tera whenever you can until shield goes down.
Screech once or twice after its shield goes down if you want (it will have cleansed itself by now).
Body Press until dead.
It'll prefer to Low Kick you until you Terastallize, then it'll prefer Acrobatics. I originally tried Flying Tera Type which worked even though I lost 3 turns to paralysis (it prefers to Body Slam if you Tera Flying), but it was a lot closer on the timer. You don't need a 4th move; you'll never need to use it.
I have not had any luck even breaking the shield online, people have been bringing all sorts of weird things as usual. For example:
- Gholdengo but it was using Shadow Ball
- Charizard spamming Flamethrower and Flare Blitz
- non-Imposter Ditto which was instantly getting OHKO’ed every time it came out
- all the Annihilapes that kept getting OHKO’ed by Acrobatics
- all the Iron Hands trying to set up a Belly Drum at the start except the +1 Body Slam/Drum Beating hurts a lot

Rillaboom is Jolly nature, so you'll need 227 speed to go first against it. It takes a bunch of speed investment to hit 227 on Corviknight, but that might just be worth it so you can get the first move and boost up to +2 before tanking the +1 Low Kick so you don't start out on the back foot. There is, however, a bit of a downside to going first in this raid: Rillaboom is only ever going to pick Low Kick anyway (unless you tera), so if you outspeed and use Roost to heal up, that turn's Low Kick will be super effective--not something you want to handle when you're trying to rebuild your defenses after the wipe-Growth #2-Boomburst combo, and it leaves your healing making minimal or no progress. Then again, being slower than 227 in that situation might mean you never get the chance to use Roost at all, if your health is low enough at the start of the turn and don't want to gamble on a heal cheer giving back something more than the pitiful 20% minimum.
For the item slot, I like Rocky Helmet: since Rillaboom isn't picking Body Slam in a Corviknight lane, Covert Cloak is unnecessary. Shell Bell has the healing animation each time, which cuts into the number of turns you get to take within the time limit, but Rocky Helmet is quick and silent except for the sound of a chip being taken out of the health bar (notably, it does not print a text message in raids). Even better, while the Helmet chip damage is only 1/6 of the base health (so 1/210 of the 35x-inflated raid health bar), this is not reduced at all when the shield goes up: each time a Low Kick runs into the helmet, it's still taking 1/210, which adds up to wear down the shield phase that much faster, even without having to use tera and commit to a single type (where the only type that makes Body Press subject to the greater, STAB bonus for tera moves into a shield also necessarily means Rillaboom switches to Acrobatics from then on and scores a weakness with that).
For the item slot, I like Rocky Helmet: since Rillaboom isn't picking Body Slam in a Corviknight lane, Covert Cloak is unnecessary. Shell Bell has the healing animation each time, which cuts into the number of turns you get to take within the time limit, but Rocky Helmet is quick and silent except for the sound of a chip being taken out of the health bar (notably, it does not print a text message in raids). Even better, while the Helmet chip damage is only 1/6 of the base health (so 1/210 of the 35x-inflated raid health bar), this is not reduced at all when the shield goes up: each time a Low Kick runs into the helmet, it's still taking 1/210, which adds up to wear down the shield phase that much faster, even without having to use tera and commit to a single type (where the only type that makes Body Press subject to the greater, STAB bonus for tera moves into a shield also necessarily means Rillaboom switches to Acrobatics from then on and scores a weakness with that).
Here's the set that I used to beat the raid:
Iron Hands @ Punching Glove / Shell Bell
Ability: Quark Drive
Tera Type: Fighting
EVs: 4 HP / 252 Atk / 252 Def
Adamant Nature
- Belly Drum
- Drain Punch / Body Press
- Electric Terrain
- Iron Defense
Since Rillaboom can boost its attack with Bulk Up and Growth, I figured that Iron Defense would help Iron Hands take on its attacks. Electric Terrain will allow Iron Hands to raise its defense/attack thanks to Quark Drive. Use Belly Drum once, then attack with Drain Punch. However, Body Press may be a better move, as it will deal more damage thanks to its defense boosts.
Whilst it does seem a poor mon's version of Body Press Corviknight and Zamazenta, the one thing Iron Hands does have is Electric Terrain. This will override Rillaboom's Grassy Terrain, meaning that Rillaboom's Grass attacks are no longer boosted.

Annihilape @ Coba Berry
Ability: Defiant
Tera Type: Ghost
EVs: 4 HP / 252 Atk / 252 Def
Adamant Nature
- Drain Punch
- Bulk Up
- Protect
- Screech
The ape is back for some more monkey business with Rillaboom. The held Coba Berry ensures that Rillaboom always goes for Drum Beating instead of Acrobatics which means you'll get a Defiant boost every turn.
On Turn 1 you will want to Screech. Then, it's just a matter of spamming Drain Punch for pretty much a full heal on every turn even through shield. Once Rillaboom resets your buffs and ability, you'll want to go for Protect to restore Defiant. Then, on next turn you can go back to Drain Punch spam. Adamant nature and no speed investment ensures that Annihilape goes second (even before Drum Beating debuffs) which is beneficial for getting a Defiant boost right before attacking.
Tera Ghost is chosen since Body Slam and Boomburst are too problematic otherwise with all the boosts involved.
The best partners are obviously the Intimidate AIs.
After getting my ass kicked several times playing Support Iron Moth with Lunge, Screech and a Grassy Seed due to sucky teammates (see: people bringing Koraidon to Growth stuff and Iron Hands that kept getting KOed), I put it upon myself to be the main source of damage for the first time.
I used Zamazenta:
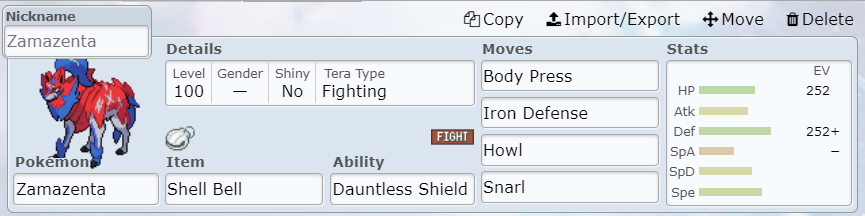
You only really need Iron Defense and Body Press because even with boosts, Rillaboom does nothing to you when your Defense is boosted (and it kept going for Acrobatics!). Howl is there as a support option if other physical damage dealers are present and Snarl if you ever want to debuff Boomburst but I never used these moves lol, I'll admit they are just here bc I built Zama for other mons.
Glad we finally got Rillaboom as a raid Pokémon for new ball combos! It was surprisingly difficult too.
I used Zamazenta:
You only really need Iron Defense and Body Press because even with boosts, Rillaboom does nothing to you when your Defense is boosted (and it kept going for Acrobatics!). Howl is there as a support option if other physical damage dealers are present and Snarl if you ever want to debuff Boomburst but I never used these moves lol, I'll admit they are just here bc I built Zama for other mons.
Glad we finally got Rillaboom as a raid Pokémon for new ball combos! It was surprisingly difficult too.
Last edited:
I was going to catch it in a Friend Ball since I had 2 of them and it matches aesthetically. I bet a number of people will follow suitI need to determine 2 things
1) A good mon for a quick Solo (looking like Corviknight but I'll have to build one) or Online support (I always assume Randos bring DPS)
2) What Balls people are catching with so I can bring some variety with my own catch