Important note: This team is not designed to withstand serious h4x, and it has a few really bad match ups, one of them being, to my understanding, mathematically impossible to win. The team fares well against most of the Battle Tower but you need to strategize the order you send out the mons and do some "unnecesary" sacrifices to keep the 100% win condition ratio. It's a pretty standard team apart from that:
Starmie @ Focus Sash
Ability: Natural Cure
Level: 50
EVs: 4 HP / 252 SpA / 252 Spe
Timid Nature
IVs: X Atk
- Surf
- Ice Beam
- Psychic
- Thunderbolt
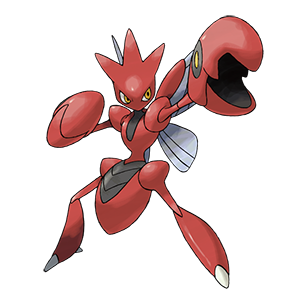
Scizor @ Leftovers
Ability: Technician
Level: 50
EVs: 128 HP / 252 Atk / 128 SpD
Adamant Nature
- Bullet Punch
- Swords Dance
- Roost
- X-Scissor
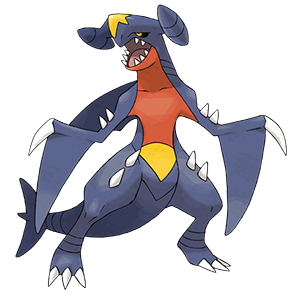
Garchomp @ Lum Berry
Ability: Rough Skin
Level: 50
EVs: 4 HP / 252 Atk / 252 Spe
Jolly Nature
- Swords Dance
- Substitute
- Earthquake
- Outrage
Notes: Attack IVs on Starmie are random. 0 is optimal but it's truly irrelevant. You aren't dying with starmie to Foul Play and you are not dying either to Swagger + confusion hax, because you have two mons to fight against that. Don't waste your time.
Scizor should have 4 EVs on Spe., enough to reach 86 Spe. and be able to outspeed Umbreon and go for the KO with X-Scissor should Garchomp fail (Garchomp deals a ton of damage to that Umbreon anyways with a combination of its high attack + rough skin). Otherwise, you speed tie with him. It isn't really a problem since Subs SD Garchomp should be able (I was able all the time) to beat it with a combination of Subs spamming + Lum Berry, but to each their own.
General function of the team:
I started using Modest Starmie with xbelt, but it wasn't good enough. Here is the thing. Most of the frail shit that dies with Modest SE Belt Boosted attacks, also die with Timid SE attacks, and the shit that doesn't, either OHKOs you back or has enough bulk to stall you anyways. Timid > Modest always, and Focus Sash lead > XBelt, for sure. I found it was also important be able to outspeed latitwins, specially Latios, and have a second check to them (Garchomp, Scizor and Starmie, the 3 are checks to the latitwins depending on what set they are running).
I start with Starmie and try to get a quick 3v2 scenario by killing their first mon and, if possible, damaging the second one.
Beware, against some NPCs, this could be your demise. Don't always let your Starmie die just because you already have the advantage, because your 1 HP Starmie could very well be your only wincon. Slowly analize their team and determine if Starmie should be sacked or not before doing anything. ¿Do you want an example? Ok:
| Heatran-11 | FIR/STL | Focus Sash | Magma Storm | 5 | Flash Cannon | 10 | Earth Power | 10 | Dragon Pulse | 10 | Modest | Flash Fire | 0/4/0/252/0/252 | 31/0/31/31/31/31 | 129 | 166 | 85 | 126 | 200 | 126 |
| Rhyperior-9 | GRD/RCK | Sitrus Berry | Earthquake | 10 | Rock Blast | 10 | Ice Punch | 15 | Horn Drill | 5 | Adamant | Solid Rock | 252/252/4/0/0/0 | 31/31/31/0/31/31 | 60 | 222 | 211 | 151 | 54 | 75 |
| Dragonite-10 | DRG/FLY | Lum Berry | Dragon Dance | 24 | Outrage | 12 | Earthquake | 12 | Thunder Punch | 18 | Jolly | Multiscale | 4/252/0/0/0/252 | 31/31/31/0/31/31 | 145 | 167 | 186 | 115 | 94 | 120 |
You start with Starmie and Heatran gets 2HKO by Surf. You Surf Heatran and Heatran Earth Power you back, then you KO him. Palmer send out Dragonite. Since this is lum nite, it will go for the TPunch, but switching into Garchomp accomplishes nothing unless you are going for the pivoting into Scizor, wich is not a good play because it could trigger Dragon Dance and then you are fucked, so with Heatran ded, you Ice Beam nite, break his multiscale and let Starmie die. Now, sending Garchomp could lose you the entire match (Outrage forces you into Outrage first, then rhyperior kills you with ice punch, avoids the KO with BP and COULD end your streak with Horn Drill), so Scizor is your best bet. You send out Scizor, Nite cant do shit to you (EQ does good damage but not enough), but since you think you've already won, because you have a priority bulky technician BP user + a fucking Garchomp in the back, you inmediatly BP the nite. You kill the Nite, Palmer sends out Rhyperior, BP does shit to it, Rhyperior kills you with Horn Drill and then kills garchomp, since unboosted EQ + unboosted BP is never a KO on that Rhyperior. Conclusion: always go for the Swords Dance against Dragonite in this particular match. Dont forget this, because after many matches against Palmer you'll go nonbrain mode and it could end your career faster than you can think.
| Latias-5 | DRG/PSY | Leftovers | Calm Mind | 32 | Recover | 16 | Stored Power | 16 | Mystical Fire | 16 | Timid | Levitate | 252/0/0/4/0/252 | 31/0/31/31/31/31 | 178 | 187 | 76 | 110 | 131 | 150 |
| Ninetales-6 | FIR | Choice Specs | Flamethrower | 24 | Solar Beam | 16 | Psyshock | 16 | Shadow Ball | 24 | Timid | Drought | 4/0/0/252/0/252 | 31/0/31/31/31/31 | 167 | 149 | 72 | 95 | 199 | 120 |
| Togekiss-5 | FAI/FLY | Scope Lens | Air Slash | 24 | Flamethrower | 24 | Dazzling Gleam | 16 | Thunder Wave | 32 | Timid | Super Luck | 4/0/0/252/0/252 | 31/0/31/31/31/31 | 145 | 161 | 49 | 115 | 172 | 135 |
| Latias-5 | DRG/PSY | Leftovers | Calm Mind | 32 | Recover | 16 | Stored Power | 16 | Mystical Fire | 16 | Timid | Levitate | 252/0/0/4/0/252 | 31/0/31/31/31/31 | 178 | 187 | 76 | 110 | 131 | 150 |
| Latios-6 | DRG/PSY | Choice Specs | Draco Meteor | 8 | Surf | 24 | Thunderbolt | 24 | Psychic | 16 | Timid | Levitate | 4/0/0/252/0/252 | 31/0/31/31/31/31 | 178 | 156 | 85 | 100 | 273 | 130 |
| Togekiss-5 | FAI/FLY | Scope Lens | Air Slash | 24 | Flamethrower | 24 | Dazzling Gleam | 16 | Thunder Wave | 32 | Timid | Super Luck | 4/0/0/252/0/252 | 31/0/31/31/31/31 | 145 | 161 | 49 | 115 | 172 | 135 |
Be very fucking careful with both MUs right here. Never, ever, let your Starmie turn 1 against this Latias.
252+ SpA Starmie Ice Beam vs. 252 HP / 0 SpD Latias: 78-92 (41.7 - 49.1%) -- guaranteed 3HKO after Leftovers recovery (100.00% chance to 3HKO after accuracy)
It's never a 2HKO unless you crit and it can (and will) begin to boost in your face with a combination of CM + Recover + Mystical Fire. Mystical Fire is annoying as shit, and in my experience you don't know what the AI will go for. Sometimes it goes for Calm Mind, sometimes it goes for Mystical Fire. In both cases, Starmie loses the 1v1 and Scizor is not an option. Here's exactly how you play this one:
Turn 1 you go into Garchomp. It doesn't matter what Latias go for, be it Calm Mind or Mystical Fire. This Latias outspeeds you but can't do anything to you. Be careful if it goes Calm Mind, tho, because +1+1 Store Power does damage. Never boost in front of it. Never. Both versions of the team have Togekiss and the AI will always go for it against garchomp. Turn 2 use Outrage and cleanly kill the Latias. Then Togekiss will OHKO you back, then you go into Starmie and go for Ice Beam. Togekiss will always go for Thunder Wave here, you switch into Scizor, tank the Dazzling Gleam, KO back the Togekiss with Bullet Punch, and:
If it sents Latios, these are the damages
Draco Meteor 57.1 - 67.4%
Surf 53.1 - 62.8%
Thunderbolt 53.1 - 62.8%
Psychic 39.4 - 46.8%
Dazzling Gleam from Togekiss does this max on a Critical Hit
Dazzling Gleam 33.7 - 39.4%
After taking 39.4% damage, you recover 6.25%, leaving you at around 67% health. None of those hits should ever kill you, BUT, a second critical could. Since Starmie has 100% health and its running Sash, go for the BP. Should Scizor survive, go for another BP. It doesn't matter if Sash on Starmie is broken or not. BP into Ice Beam always KOs latios. Always.
If it sents Ninetales after BPing the Togekiss, go for another BP. BP into Surf into Surf is always a 3HKO even in Sun. This is a MU you cannot lose, UNLESS:
252 SpA Choice Specs Ninetales Flamethrower vs. 4 HP / 0 SpD Starmie in Sun on a critical hit: 109-129 (80.1 - 94.8%) -- guaranteed 2HKO (100.00% chance to 2HKO after accuracy)
It's extremely improbable, but Ninetales needs a Critical max roll NVE flamethrower on Starmie + BURN on the same turn to KO you. Remember that this Ninetales is Specs, so it'll always go for the sun boosted flamethrower since your last mon was Scizor.
Now, remember when I said to you there is a MU that is mathematically impossible to win?
| Pelipper-2 | WTR/FLY | Choice Scarf | Hydro Pump | 8 | Ice Beam | 16 | Hurricane | 16 | U-turn | 32 | Timid | Drizzle | 4/0/0/252/0/252 | 31/0/31/31/31/31 | 192 | 136 | 49 | 120 | 147 | 90 | |
| Kingdra-3 | WTR/DRG | Life Orb | Hydro Pump | 8 | Dragon Pulse | 16 | Hurricane | 16 | Ice Beam | 16 | Modest | Swift Swim | 4/0/0/252/0/252 | 31/0/31/31/31/31 | 137 | 151 | 90 | 115 | 161 | 115 | |
| Scizor-4 | BUG/STL | Sitrus Berry | Bullet Punch | 48 | Thief | 40 | Roost | 16 | Swords Dance | 32 | Adamant | Technician | 236/124/148/0/0/0 | 31/31/31/0/31/31 | 85 | 175 | 182 | 139 | 54 | 100 | |
| | | | | | | | | | | | | | | | | | | | | |
| Team #5 - Singles Master - Ace Trainer (F) Natalia | | | | | | | | | | | | | | | | | | | | | |
| Set | Type | Item | Move 1 | PP | Move 2 | | Move 3 | | Move 4 | | Nature | Ability | EV – (H/A/B/C/D/S) – IV | Speed | HP | Atk | Def | SpA | SpD | | |
| Pelipper-3 | WTR/FLY | Damp Rock | Hydro Pump | 8 | Ice Beam | 16 | Hurricane | 16 | U-turn | 32 | Bold | Drizzle | 252/0/252/4/0/0 | 31/0/31/31/31/31 | 85 | 167 | 49 | 167 | 116 | 90 | |
| Relicanth-2 | WTR/RCK | Figy Berry | Waterfall | 24 | Head Smash | 8 | Earthquake | 16 | Body Press | 16 | Adamant | Swift Swim | 4/252/0/0/0/252 | 31/31/31/0/31/31 | 107 | 176 | 156 | 150 | 45 | 85 | |
| Zapdos-6 | ELC/FLY | Life Orb | Thunder | 16 | Hurricane | 16 | Heat Wave | 16 | Volt Switch | 32 | Modest | Static | 4/0/0/252/0/252 | 31/0/31/31/31/31 | 152 | 166 | 85 | 105 | 194 | 110 | |
| | | | | | | | | | | | | | | | | | | | | |
First version of this team is a nightmare and hard counters this team.
First. Should you go for Thunderbolt with Starmie, these scenarios could happen:
- Pelipper-2 goes for Hurricane, does a ton of damage to you, you dont get confused and pull out, you OHKO Pelipper-2 back with T-bolt, she switches into Kingdra-3. You lose. Automatically. You've lost the battle. Starmie gets cleaned by Kingdra at that range. Scizor gets clean OHKO by Hydro Pump and Garchomp desintegrates with Ice Beam.
- Pelipper-2 goes for Hurricane, does a ton of damage to you, you get confused and you die without even killing the Pelipper.
- Pelipper-2 goes for U-turn, does a ton of damage to you, it goes into OR Scizor, and it doesn't matter to which it goes to, since this means Pelipper is still alive and will setup rain latter, so Kingdra will demolish your team again.
For you to win this one, there's no other way but to stall rain. Everything falls apart if Kingdra is sent to the battlefield with rain setted.
1. Do Surf. If you attack first, you are fighting version 2 of the team, which is much more maneajable. If Pelipper does Hurricane, you are unfortunately against version 1. Surf will do good damage to Pelipper, but you won't KO it. Let Starmie die. You've now sucessfully stalled 2 out of 5 turns of rain. 3 turns remain. Send out Scizor.
252 SpA Pelipper Hurricane vs. 128 HP / 128 SpD Scizor: 79-94 (49 - 58.3%) -- 63.3% chance to 2HKO after Leftovers recovery (63.30% chance to 2HKO after accuracy)
(79, 81, 81, 82, 84, 84, 85, 85, 87, 88, 88, 90, 91, 91, 93, 94)
Hurricane still does a ton of damage, but with the bulk on SpD. + Lefties + Roost you can probably stall it for a bit. Cross your fingers so you don't get haxed with confusion, there's no other way around this. Try to stall/do as much damage as possible with Scizor as you can, +2 bp into outrage always ko and unboosted bp into outrage kos almost everything too (but its not 100%). Don't you dare switch scizor into garchomp after the rain has ended, garchomp needs to be at 100% to tank. Let Scizor die after you've succesfully damaged the Pelipper to the point garchomp can clean, or, if luck is on your side (hurricane misses, you dont get confused, etc), get to +6 and proceed to do as much damage as you can to all their team. Btw, if you have Thief, put Thief instead of X-Scissor. It achieves the sames KOs on what matters the most and its better against 1v1 against opposing Scizors like this one. Also, this Scizor runs 85 Spe., so this is another great example of why 86 Spe. is benefitial to you, so you avoid the tie in an hypothetical scizor vs scizor scenario and can go for the Thief against him to do a jackton of damage. But the worst case scenario is scizor dying against Pelipper after doing a bit of prior damage with Bullet Punch. Then Garchomp is sent out, rain is gone, you get Hurricaned, it does a ton of damage to you and you KO the Pelipper back with Outrage.
At this point, I don't know what the AI would go for, but after taking a Hurricane, at 50% remaining health, you can't win with Garchomp against Scizor 4. This team is extremely nasty, and the only one that I've encountered in the tower this destructive against the team.
Oh, I forgot


 |
|  |
|  |
|