A Beginner's Guide to Stat Distribution
Table of Contents
Introduction
One day, your Rotom-W was bearing down on an opposing Azumarill. Looking up their stats, you realize that Rotom-W had a superior base Speed stat of 86 to Azumarill's 50. Feeling confident, you click Volt Switch, only to watch in dismay as Azumarill outspeeds and demolishes your Rotom-W. Is it a bug on Pokémon Showdown? Did your opponent hack their way to victory? Little did you know, there's more to Pokémon than simple base stats...
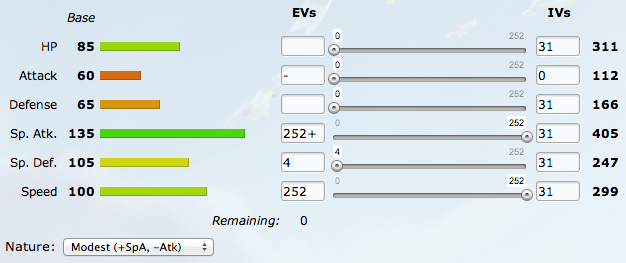
The screenshot from the Pokémon Showdown! teambuilder above shows the stats of the Pokémon Volcarona. The numbers on the left are its base stats, and the ones on the right are its actual stats. For example, Volcarona has base 85 HP, but in this instance, it has an actual HP stat of 311.
As shown in the above picture, base stats are only half the picture of Pokémon stats. In reality, every Pokémon has a unique set of values that determine the actual stat, and the base stats are merely numbers to help calculate the actual stats. If you're feeling lost, read on for an introduction to the most technical part of Pokémon battling: stat distribution.
EVs
What are EVs?
EVs, or Effort Values, are probably one of the most important aspects of Pokémon as they make each Pokémon unique; they are the reason why some Greninja are faster than others, or why some Rotom-W are able to take hits better than others. Those bags that you punch during Super Training can prevent your Pokémon from becoming punching bags, after all!
EVs are numbers that give a certain stat extra points. Every 4 EVs give an extra stat point at Level 100, and the maximum number of EVs for every stat is 252. In addition, you'll only get a total of 508 EVs to give to each Pokémon. As an analogy, distributing EVs is like buying stat points with cash. Every stat point costs 4 EVs, you only have 508 EVs to spend, and you're only allowed to spend a maximum of 252 EVs into any one stat before it runs out of stock.
A general rule of thumb to distributing EVs is to give the EVs to the stats a Pokémon is more likely to use in battle. This allows a certain Pokémon to perform its given role well. The simplest way to distribute EVs is to use a 252 / 252 / 4 spread, meaning you maximize two best stats and put the remaining two somewhere else. For instance, you would want a fast special attacker like Greninja to hit hard and fast, so 252 EVs in Special Attack and Speed are your best bet; on a slow, bulky physical attacker like Azumarill, you would want 252 HP and 252 Attack EVs for it to tank a hit before striking back hard, and so on. The reason why the EVs are not invested in weaker stats is because they are unlikely to aid a Pokémon's role. For instance, investing into Greninja's HP is not advisable because it is too frail to tank powerful hits anyway, and the EVs will be better spent on improving Greninja's role, which is to hit hard and fast. There are some Pokémon that work better with more complicated EV spreads, but for the basics, 252 / 252 / 4 usually works fine.
EV spreads in Little Cup
In Little Cup, the metagame is played at Level 5. This brings about many changes to EV spread making, and 252 / 252 / 4 becomes an extremely inefficient way of distributing them. In Little Cup, a lot more EVs are required to give additional stat points. The even more complicated part is that the number of EVs required to give an additional stat point differs based on the Pokémon's base stat! Of course, an easy way to distribute EVs to Pokémon in Little Cup is to go to the teambuilder and slide the EV slider until the stat point goes up. However, should there be a need to craft EV spreads without the teambuilder, a nifty guide has been written on the Intricacies of Little Cup. If you're interested in learning how to distribute EVs in Little Cup, be sure to check that little guide, written by Ray Jay.
IVs
What are IVs?
If you've ever wondered why so many Trainers keep making trips to the Day Care Centre, only to proceed to release almost every single one of the babies that come out, you've found the reason. They are trying to breed the "perfect Pokémon," determined by a set of values given at birth. IVs, or Individual Values, also determine a Pokémon's actual stats. There are 31 IVs to spend on each stat, and each IV equates to one stat point at Level 100. What this means is that 31 IVs for every stat is usually the best thing to do. This is especially important in the case of Speed IVs, because every Speed stat is vital in determining whether or not the Pokémon outspeeds or is slower than the opponent. As such, it is recommended to have perfect Speed IVs on every Pokémon due to its huge importance in a Pokémon battle.
Another interesting thing about IVs is that they affect your Pokémon's Hidden Power type. The best IV spread for every Hidden Power is automatically set by the teambuilder, but should there be a need to customize Hidden Power type and specific IVs, there is a section below on that. While this is generally not too important, the minor IV differences can sometimes, although rarely, go a long way. For example, a Latias running Hidden Power Fire requires 30 Speed IVs, and hence this means that it would be unable to Speed tie with opposing Latias that do not run the move. Another special case with custom IV spreads would be Ferrothorn running Gyro Ball or Trick Room attackers; they usually run 0 Speed IVs because lowering their Speed is beneficial in this case. All Pokémon not using any physical attacks should optimally have 0 Attack IVs in order to minimize Foul Play and confusion damage. Other than these cases, all IVs should be set to 31 to obtain the highest possible stats.
Should there be a need to customize IVs for Hidden Power, a nifty little chart, created by sparktrain, shows the IVs needed for Hidden Power for almost every scenario. Click here to access the chart.
Natures
That Calm Gyarados or Quiet Exploud that you caught in-game (and most probably laughed at) is not just for flavor purposes. Natures are actually an important aspect of competitive battling as well. Most natures raise one stat by 10% and decrease another by 10%, while some do nothing at all. There are different natures for every different stat increase and decrease; a complete list can be found below. It's always useful to have a nature that adds to a best stat and lowers your most useless stat. Using the above examples, Greninja is likely to run a Timid nature (+Spe, -Atk) because the extra Speed allows it to attack quickly before the opponent, and it does not usually need its Attack stat; Azumarill generally runs Adamant (+Atk, -SpA) to boost its Attack in exchange for its unused Special Attack.
A lot of the natures are useful on more complicated sets, but the most common ones you should take note of are:
- Adamant (+Atk, -SpA): Powerful physical attackers or tanks
- Bold (+Def, -Atk): Physical walls with special moves
- Impish (+Def, -SpA): Physical walls with physical moves
- Modest (+SpA, -Atk): Powerful special attackers or tanks
- Calm (+SpD, -Atk): Special walls with special moves
- Careful (+SpD, -SpA): Special walls with physical moves
- Timid (+Spe, -Atk): Fast special sweepers
- Jolly (+Spe, -SpA): Fast physical sweepers
Complete list of natures:
Attack-boosting natures
- Lonely (-Def)
- Adamant (-SpA)
- Naughty (-SpD)
- Brave (-Spe)
Defense-boosting natures
- Bold (-Atk)
- Impish (-SpA)
- Lax (-SpD)
- Relaxed (-Spe)
Special Attack-boosting natures
- Modest (-Atk)
- Mild (-Def)
- Rash (-SpD)
- Quiet (-Spe)
Special Defense-boosting natures
- Calm (-Atk)
- Gentle (-Def)
- Careful (-SpA)
- Sassy (-Spe
Speed-boosting natures
- Timid (-Atk)
- Hasty (-Def)
- Jolly (-SpA)
- Naive (-SpD)
Natures that do not affect stats
- Bashful
- Docile
- Hardy
- Quirky
- Serious
Jump points
In a few analyses, jump points are mentioned. What exactly are these jump points?
A jump point is a stat point which gives a more efficient use of EVs than usual. This happens to stat points which are divisible by 10 and are then boosted by a nature. This is because the game usually rounds down stat points not divisible by 10 when boosted by a nature. When a stat point is divisible by 10, the game does not need to round down and the stat is boosted by an extra point. This means that a spread with a jump point gets the equivalent of 512 EVs as opposed to 508 EVs.
For example, Mandibuzz has a Defense stat of 299 with 212 EVs. With a Bold nature, its Defense stat is increased by 10%, leaving it with a Defense stat of 328.9. After this number is rounded down, Mandibuzz is left with a Defense stat of 328. However, with 216 EVs, Mandibuzz's Defense stat becomes 300, which is boosted to 330 by a Bold nature. Because 330 is a whole number, the game does not round it down. Hence, giving Mandibuzz 216 Defense EVs is said to hit a jump point in Defense. Keep jump points in mind when EVing to avoid specific KOs with a boosting nature in that stat; if a jump point can be obtained without compromising the effectiveness of the Pokémon in other aspects, it is often best to invest a few more EVs in order to maximize efficiency.
Here is a list of EV investment needed to hit jump points, for reference.
| Last Number in Base Stat | EVs Required |
|---|---|
| 5 or 0 | 16 / 56 / 96 / 136 / 176 / 216 |
| 6 or 1 | 8 / 48 / 88 / 128 / 168 / 208 / 248 |
| 7 or 2 | 40 / 80 / 120 / 160 / 200 / 240 |
| 8 or 3 | 32 / 72 / 112 / 152 / 192 / 232 |
| 9 or 4 | 24 / 64 / 104 / 144 / 184 / 224 |
Differences at Level 50
In official Nintendo-supported VGC metagames, standard play is at Level 50. The things to take note about EVs, IVs, and natures have slight differences, although the principle behind them is still the same; the maximum EVs is still 508, and perfect Speed IVs are just as important, for example. Unlike Level 100, at Level 50, 8 EVs are required for every stat gain instead of 4. 2 IVs are needed for every stat gain instead of 1. Those are the only differences; if you're playing a Level 50 metagame, the tips in this article should still work if you take these differences into account.
Manipulating HP stats
At this point, you might be wondering about some specifics. Does it matter where the 4 extra EVs go? Why do some analyses show 248 HP instead of the regular 252? Surely one stat point can't make that much of a difference?
Sometimes, one stat point does make a difference, especially in the case of HP and Speed (the latter will be covered later in the article). HP EVs matter a lot because a large amount of Pokémon is based around percentages. That 6% Leftovers recovery your Rotom-W gets isn't actually 6%: it's 6.25%, but the game automatically rounds that down to a whole number. This section talks about manipulating your HP EVs to ensure that you can minimize the residual damage your Pokémon takes, maximize its recovery, or gain other additional advantages with an appropriate EV spread.
Stealth Rock and Spikes
Stealth Rock is the move you will encounter most often when battling, so it is definitely a good idea to try and minimize the residual damage on your Pokémon from it. Stealth Rock is an entry hazard that deals damage based on a Pokémon's weakness to the Rock type; it deals 3.125% to 4x resistances such Excadrill, 6.25% to 2x resistances, 12.5% to neutral targets, 25% to 2x weak targets, and a whopping 50% to 4x weak targets. Spikes, another entry hazard, can also be problematic to grounded Pokémon; 1 layer shaves off 1/8 of a Pokémon's HP, 2 layers takes 1/6, and 3 layers takes 1/4. They can be especially problematic in conjunction with Stealth Rock, wearing down your Pokémon very fast. The simplest way to reduce the impact of Stealth Rock and Spikes on your Pokémon is to ensure that its actual HP stat is not a whole number. This is because the game rounds down the damage taken if the HP number is not whole. For example, a Pokémon 2x weak to Stealth Rock will now have 5 switch-ins to it and still have 1 HP remaining.
There are exceptions to this rule involving Regenerator, Leftovers, and Black Sludge. For example, Amoonguss's HP stat with 252 EVs is 432. As this is a whole number, it might seem like a smart idea to reduce the investment to 248 EVs, but a closer look reveals that 432 is divisible by both 3 and 16, meaning it provides optimal Regenerator and Black Sludge recovery numbers. Gaining extra HP from Regenerator and Black Sludge far outweighs losing an extra point from Stealth Rock damage. Therefore, 252 HP EVs should be run on Amoonguss. Another example is on Rotom-W holding Leftovers. Rotom-W's HP stat with 252 EVs is 304, which is divisible by 16 and thus an optimal Leftovers recovery number. This offsets the extra damage taken from Stealth Rock and is better in scenarios where Stealth Rock is not up, making it the optimal investment.
Life Orb
Life Orb is an item that many offensive Pokémon love. It boosts the power of a Pokémon's moves by 30% at the cost of 10%, or 1/10, of its HP every time the move connects. The best way to reduce this residual damage is an HP stat that is one under a stat divisible by 10, meaning the last digit would be 9. Depending on the Pokémon, this can be obtained via HP investment or a reduction in HP IVs based uoon whether the Pokémon cares about missing the power or not.
Generally, reducing residual damage for Pokémon wielding a Life Orb is not so important in the standard Smogon metagames played at Level 100, where the high HP numbers rarely make a difference. However, in Little Cup especially, hitting a suitable HP stat for Life Orb is extremely important because the metagame is played at Level 5, resulting in small HP stats. In this case, ensuring that a Pokémon's HP stat is below 20 would allow it to take only 1 HP damage from Life Orb. In fact, the 19 HP stat is very important in Little Cup, because this number represents the highest HP stat a Pokémon can reach while still taking only 1 HP residual damage after the game rounds it down. An HP stat of 19 in Little Cup is referred to as a Life Orb number.
Sandstorm and Hail
Sandstorm and hail both deal passive damage of 6.25%, or 1/16, of the maximum HP every turn to Pokémon not immune to them. This means that minimizing damage from weather for Pokémon on sand or hail teams is important, especially if they do not have Leftovers or other forms of recovery. An HP stat one under a stat divisible by 16 minimizes the amount of damage taken. At the least, ensure that the Pokémon's HP stat is not divisible by 16, assuming it is not carrying Leftovers.
Leftovers
Leftovers heal the user's health by 6.25%, or 1/16, every turn. This item is common on defensive and sometimes even offensive Pokémon because over a longer battle, the utility of the passive recovery can amount to a lot. However, there is also a way to maximize this recovery. Similarly to residual damage, the game rounds the HP recovered from Leftovers down to a whole number. As such, it is recommended to ensure that your Pokémon's HP EVs are divisible by 16. Such an HP stat is known as a Leftovers number. Note that Leftovers numbers should not be chosen if they compromise overall bulk; for example, if a Pokémon can run 228 HP EVs to hit a Leftovers HP number or 252 HP EVs to maximize bulk, 252 HP EVs is typically the best option.
Sitrus Berry
Sitrus Berry is a more uncommon item in standard singles play. It restores 25% of the user's HP when the latter falls to 50% or below. In single battles, Belly Drum users such as Azumarill and Slurpuff are the only notable users of this Berry as it allows them to set up Belly Drum and immediately restore their HP. As such, their HP should be EVed to be divisible by 2 so that the Sitrus Berry can activate immediately after a Belly Drum.
In double battles, however, play is usually a lot faster, and therefore the amount of HP recovered from Sitrus Berry usually outclasses that of Leftovers. This is why Sitrus Berry is such a common item in Doubles. In this case, similar to Leftovers numbers, HP recovery from Sitrus Berries can also be maximized by ensuring that the HP stat is divisible by 4.
Pinch Berries
Pinch Berries raise a certain stat when a Pokémon is at 25%, or 1/4, HP or lower. In terms of competitive battling, the pinch berries most commonly used are Liechi Berry, Petaya Berry, and Salac Berry; these Berries boost Attack, Special Attack, and Speed, respectively. These Berries are often paired with the move Substitute, which cuts HP by 1/4, thus enabling their users to reach the pinch Berry range more reliably.
As you might have guessed, making the Pokémon's HP stat divisible by 4 is the most efficient way to get down to pinch Berry range, as it allows a Pokémon to reach 25% health after only 3 uses of the move Substitute. However, this case is more complicated because offensive Pokémon that run these berries generally do not invest EVs into HP and often cannot afford to sacrifice EVs from their attacking or Speed stat to place into HP. Getting their HP to be divisible by 4 sounds a lot harder in this case. What now?
If you've read the earlier sections, you would have realized that every IV gives one stat point. Thus, to get a HP stat divisible by four, simply remove the appropriate number of IVs and you're done! It is also notable that pinch Berry numbers also work with Stealth Rock; having an HP stat divisible by four on a Stealth Rock-neutral Pokémon, for instance, allows its Berry to activate with exactly six switch-ins instead of seven.
Custom EV spreads
So, you've been using 252 / 252 / 4 spreads for eternity, but soon you realize that some of the Smogon analyses use more complicated EVs, IVs, and natures. Reading on, you see that their purposes are rather specific: Rotom-W runs a spread of 248 HP / 216 Def / 44 Spe, allowing it to outrun Azumarill while maximizing physical bulk; Mega Scizor runs 248 HP / 136 Def / 104 SpD / 20 Spe, allowing it to survive attacks from Excadrill and Aegislash while outspeeding Heatran. Maybe the on-site EV spreads aren't optimal for you; perhaps they outspeed threats that your team can already deal with, or you feel that running a little extra power would help a little after watching your Kyurem-B barely miss out on a 2HKO. How do you make custom EV spreads?
Firstly, set a goal. What do you want your set to beat, and what threat can you afford to miss out on? What does your Pokémon need to outspeed, KO, or survive in order to beat out a certain threat? The following is a breakdown on the main pointers to note when creating a custom spread.
Achieving a KO
When offensive sets are created, usually the most important thing to keep in mind is whether or not it is capable of KOing some key threats. This is especially so for mixed sets when there is a fine line between physical and special EVs. Another use for this is on walls or tanks with attacking moves; these Pokémon like to be able to KO certain threats while maintaining their bulk and hitting a certain Speed benchmark.
Usually, checking if your Pokémon nets key KOs is not that difficult. Using damage calculators, it is easy to figure out how many EVs and which nature is needed to KO specific threats. By simply experimenting with the EVs to get a damage output capable of 2HKOing an opponent at least most of the time, a decent spread can be achieved. When making damage calculations, don't forget to factor in the team support you can provide. Does your team have a reliable way to keep Stealth Rock on the opponent's side? Does your team have Spikes support or a Sand Stream user that could add residual damage to help nab the KO? If so, while residual damage shouldn't be relied on all the time due to their respective nerfs, it is good to factor them in so that you can reserve the extra EVs for the other offensive stat should you require it.
At this point, you might be asking, "why is a 2HKO important?" 2HKOs are generally the benchmark for offensive Pokémon because they are usually faster than defensive threats. Hence, being able to KO a defensive threat as it switches in can prevent it from potentially using a recovery or status move.
Avoiding a KO
When making custom spreads for tanks and mixed walls, HP and defenses are often a difficult task. Many tanks do not need to run full attacking or Speed EVs, and it is useful to place some EVs in bulk to allow them to take hits better while outspeeding whatever they need to. Similarly, walls with good mixed defensive stats and typing can be used as mixed walls. Examples include Mega Venusaur, which has a typing that allows it to check all kinds of Pokémon, as well as Mandibuzz.
As with offensive EV spreads, damage calculations are the most effective way of telling if your Pokémon can live a hit from another. However, when building EV spreads, you have to take into account that you have much less control over the residual damage your Pokémon are affected by. For instance, there is absolutely no way to ensure that your opponent does not keep Stealth Rock up on your side, and even if you do have Defog support, it is nigh impossible to ensure that your opponent would not have their offensive threat on the field before you get to clear it. Hence, it is vital to take note of Stealth Rock damage, especially if your team does not have Defog support. Other minor but also important factors include sandstorm and Spikes.
While you cannot control residual damage on your Pokémon, what you can keep in mind is passive recovery. Leftovers is a common defensive item and actually takes a huge burden off defensive Pokémon. Should your Pokémon have the move Protect, it is possible to negate Stealth Rock damage completely if the HP EVs are appropriate. In addition, while a 2HKO should be avoided, you must also ensure that your Pokémon has a reliable recovery move to back it up so that it can stay alive after avoiding a 2HKO. After all, what is the point if your wall has no reliable recovery and gets permanently crippled?
When making defensive EV spreads, the most difficult part is maximizing your Pokémon's defenses. Every Pokémon has three defensive stats: HP, Defense, and Special Defense. Placing EVs in HP increases a Pokémon's overall bulk slightly, while placing them into either defense improves that defense by quite a lot more. Most offensive tanks run maximum HP because they like taking hits from both sides and rarely need to take extremely hard hits from any one side. However, there are some exceptions. For instance, Assault Vest Conkeldurr uses its bulk much more effectively by investing its EVs in Special Defense. This is a more efficient use of EVs because it enables Conkeldurr to avoid a slew of KOs on the special side than if it were to place the EVs into HP. For more about maximizing your Pokémon's defenses, check out this guide. An applet created by the author of that guide, X-Act, can be found here.
Threat Lists
Using a threat list is a fantastic way to figure out which threats your Pokémon should aim to KO or avoid a KO from. These guides are an overview of both offensive and defensive threats in a certain metagame, even if they are in tiers below. The list of threat lists are:
Tiers with threatlists:
Tiers without threatlists:
- Overused
- Ubers
- Neverused
- Little Cup
- Doubles
Outspeeding important benchmarks
For offensive and defensive Pokémon alike, Speed is one of the most important parts of creating EV spreads; as such, every Speed EV is significant. There are many scenarios where Speed is a key factor; offensive Pokémon prefer to outrun opponents before getting outsped and 2HKOed themselves, and defensive Pokémon prefer the Speed to get off extra recovery or a status effect before the opponent can threaten them. This section will talk about EVing Pokémon to outspeed important benchmarks and more.
When choosing a target to outspeed, you must ensure a few things. Firstly, can your Pokémon do enough to the opponent so that outspeeding it is worth it? Outspeeding an opponent may be cool and all, but if the opponent hard counters your Pokémon, there isn't really a point, is there? Ideally, your Pokémon should be able to do something of value to the opponent. This can include getting off a Toxic onto the opponent's Mandibuzz before it can Taunt your Pokémon, or KOing that pesky wall before it uses a recovery move. Secondly, is the target a common benchmark? Common benchmarks refer to Speed tiers that many other Pokémon aim for. This is advantageous because it allows your Pokémon to get the jump on a slew of other threats should your Speed creep be correct. Of course, aiming for a single Pokémon can be beneficial, but if adding a few extra EVs give you an edge over a whole bunch of other threats, why not give it a go? Finally, it is important to ensure that outspeeding an opponent does not come at the cost of too much power or bulk. If your Pokémon can outrun important threats but gets 2HKOed by everything else, you might want to consider if that is the better option after all.
Formula
There are two ways to determine the number of Speed EVs required to outspeed a certain threat. One method would be to enter the Pokémon Showdown! teambuilder and slide the EV meter until you reach the correct stat point to outspeed your opponent in terms of Speed. While this is much simpler to understand, it is also rather time-consuming.
Fortunately, there is a method using a formula to calculate ideal Speed numbers at Level 100. The formula is:
e = 252 - ((p - o - 1) * 4)
If your Pokémon has a positive Speed nature, is holding a Choice Scarf, or both, divide variable "o" by 1.1, 1.5, or 1.65, respectively. For example, if your Pokémon has a positive Speed nature, the formula becomes:
e = 252 - ((p - (o / 1.1) - 1) * 4)
In the formulae above, variable "p" is your Pokémon's maximum Speed, variable "o" is the the Speed of the opponent you intend to outspeed, and variable "e" is the amount of Speed EVs you should invest to reach the desired Speed. If that sounded confusing, this means that you first subtract the Speed stat of your desired opponent from your Pokémon's maximum Speed stat for that nature. Subtract 1 from that value and multiply that number by 4. Subtracting the product from 252 would give you the minimum Speed EVs required to outspeed a certain threat.
If you're still confused, here's an example. Let's say I have a defensive Rotom-W and I want Rotom-W to outspeed Jolly maximum Speed Azumarill so that Rotom-W can burn it before it uses Play Rough, while retaining as much bulk as possible. Rotom-W's maximum Speed with a Bold nature is 271, while Azumarill's maximum Speed with a Jolly nature is 218. Using the formula above, I would first subtract 218 from 271:
271 - 218 = 53
Then, I would subtract 1:
53 - 1 = 52
Afterwards, multiply 52 by 4:
52 * 4 = 208
Finally, subtract 208 from 252:
252 - 208 = 44
With a calculator and the formula at hand, it isn't very difficult to determine that Rotom-W needs 44 Speed EVs to outrun Jolly maximum Speed Azumarill. Of course, should I have my Rotom-W run a Choice Scarf or a Timid nature, I would divide 218 by 1.1 or 1.5, respectively, before proceeding with the calculations.
Speed Tiers
Speed tiers are also fantastic resources when developing EV spreads. These Speed tiers show the most common Speed EVs that every Pokémon in a certain tier run, also being a quick overview of which threats are in range of being outsped by others. Speed tiers are definitely useful resources as well, because they also provide actual Speed stats which you can use to customize your own EV spreads. The links to various Speed tiers are below:
Tiers with speed tiers:
Tiers without speed tiers:
- Ubers
- Underused
- Neverused
Positive Speed natures
If you've noticed a trend in the Smogon analyses, it's that many of the fast offensive Pokémon run positive Speed natures, such as Jolly or Timid. Why is Speed so important instead of boosting, say, Attack or Special Attack?
Because positive Speed natures increase the Speed stat by 10%, in the upper Speed tiers (around 100 and above), ensuring that outspeeding opponents is extremely important, especially considering that these Pokémon would prefer to not get hit. Using a nature that boosts offense instead of Speed can help boost offensive power, but missing out on a host of threats, including slower ones, is generally not worth the while.
Speed creep
Speed creeping is a strategy used in higher levels of competitive play, and it is a very useful but simple tool that you can make use of.
Speed creeping refers to adding extra Speed EVs in an attempt to outspeed other Pokémon around that Speed tier. For instance, Azumarill has a base 50 Speed stat and generally invests 252 HP EVs and the rest in Attack, often leaving out the less important Speed EVs. In order to outspeed and KO other Azumarill before they can do the same to yours, you could give Azumarill 8 Speed EVs to outrun other Azumarill that have no Speed EVs, or those that place the extra 4 Speed EVs into Speed. The 8 EVs are known as Speed creep. The same is true for walls, tanks, and anything that does not run maximum Speed EVs already; Speed creeping is thus an amazing way to gain an advantage over other Pokémon. There is no rule to how many Speed EVs are optimal, because it is usually a matter of luck if the Speed creep is more than the opponent's. The only thing to watch out for is to ensure that in Speed creeping, you do not lose too much bulk or power in exchange for Speed.
Speed creep is especially useful if the Pokémon resides in an extremely crowded Speed tier with many important Pokémon around the same Speed range. For example, defensive Heatran sits in a Speed tier with many other defensive threats, including Mandibuzz, Skarmory, and Mega Scizor. Thus, it is extremely useful to give Heatran slightly more Speed and outrun all of these threats at one go.
There are a few subtle ways to figure out if your opponent is Speed creeping without having to actually risk it. For example, in a one-on-one situation where both Pokémon switch, the faster one will always switch first. Similarly, when taking residual damage or passive recovery, the faster one will take damage from, say, sandstorm and heal from, for instance, Leftovers first.
Other Useful Resources
EV Spread References
EV Training
Manipulating IVs
- Breeding the Perfect Pokémon in X and Y
- Sixth Generation Pokémon Breeding Guide
- Hidden Power Formula
Conclusion
That concludes the basic guide to stat distribution. While distributing stats might seem daunting, with a little experience, they become rather easy. Before you get out there, remember that there is no such thing as a "wrong" EV spread or nature, because they can be easily tailored to fit your team. So, get out there and start distributing stats to your Pokémon!