The Guide to Chaining
IntroductionHave you ever wanted to catch mass amounts of shinies, EV train anywhere with ease, or repeatedly slaughter Bidoof for no reason at all? Well, thanks to the advent of "chaining" in DPP, now you can. What is Chaining?Chaining is the act of essentially encountering a certain Pokémon many times in a row using an item called the Poké Radar. When the Poké Radar is activated, several patches of grass shake and/or flash, which means Pokémon are hiding there that can be encountered by entering the patch. Chaining can be done in any field of grass in Sinnoh large enough to sustain a successful chain, which turns out to be about a 9 by 9 square of patches. Conveniently, there is a chaining-ready field of grass on nearly every route in the region, allowing for a great variety of Pokémon to encounter, allowing you to chain a great variety of Pokémon. EV TrainingHaving the ability to chain makes every route an EV hotspot. This is beneficial for a number of reasons. First, let's say you want to EV train a level 50 legendary and have it stay at level 50. Well, you can't just train at any old location, since some Pokémon may give you too much experience. Thanks to chaining, you can now battle against a lower level Pokémon and have a 100% appearance rate. Conversely, if you want to fight high level Pokémon so your Pokémon grows quickly, you can chain against stronger Pokémon in the later routes. Second, you can battle against a vast number of Pokémon, including those that give two or three EVs per battle. Typically these Pokémon are rare, so trying to encounter them with any consistency is nearly impossible without the Poké Radar in your hands. If you plan to use chaining exclusively to EV train, the majority of this guide can be skimmed or ignored entirely. The key points to focus on are chaining basics, chaining supplies, the grid, and patch formations. Shiny PokémonThis guide is primarily dedicated to catching shiny Pokémon which is a far more difficult process than EV training. If you hope to successfully catch shiny Pokémon, it is important to study and master the concepts in this guide. Although the guide is long, the process of chaining is not as complex as the length might suggest. Most of the guide is dedicated to proper preparation and the important details of chaining. Chaining Terminology
Chaining BasicsRegular Patches vs. Flashing PatchesUnlike regular patches, there are multiple variants of flashing patches. Their differences are subtle, and may not even be noticeable to a new chainer. The traits to look out for are color: some are white, while others are orange; and size of the the colored area: some occupy most of the patch, while other occupy under half. It is important to recognize which variant you started your chain with because you will want to enter this type of flashing patch during your chain, which means you will have to keep a sharp eye out for impostors. In most cases it will not matter if you enter the wrong type of flashing patch, but it can be a cause of your chain breaking, so you may want to err on the side of caution. Because of this, it is easier to chain in regular patches whenever possible, as there is only one kind. However, it may not be possible to do this if you are after a Poké Radar Pokémon or you are chaining in a type of weather that requires you to use flashing patches for the sake of visibility. Reset PatchUpon entering the field of grass you plan to chain in, the first thing to do (after using a Repel) is to find the square of grass that will serve as your "reset patch." The purpose of this patch is to give you maximum possible number of 4-aways (refer to THE GRID to find out what these are) that are completely surrounded by other patches of grass, meaning they are not adjacent or directly diagonal to a tree, cliff, patch of short grass, or any other obstacle. The best way to find the proper reset patch is to go to the dead center of the field, count the number of valid 4-aways, and adjust your position as necessary. In some fields it may be obvious, while in others, especially smaller ones, it may take a few tries to get the best result. If you have reached 40 on your chain and are resetting for shinies, you may want to change your reset patch to the patch that accommodates the most total patches, as shinies will be appearing everywhere. Resetting the Poké RadarTo "reset" or "activate" the Poké Radar, you must walk 50 steps, similar to the Vs. Seeker. Pretty simple, right? Not exactly. One of the most common ways to break chains, especially those over 40, is to accidentally walk into a patch that was activated by the previous Poké Radar reset. This most often occurs when attentiveness is lacking. Therefore, it is imperative that you make a mental note of where the four patches shake every time you reset the Poké Radar. It would be wise to minimize the number visual distractions around you when chaining, so as to ensure maximum attentiveness. If it happens that you do not see what patches you have just activated, and need to reset the Poké Radar, the best strategy is to walk one step in a given direction then back to the square you reset from 25 times. You will avoid entering an activated patch 7 out of 8 times using this method. When resetting the Poké Radar normally, it may be convenient to choose a direction, walk 5 steps in that direction, walk back to where you started, and repeat this process 4 more times. This will ensure you walk exactly 50 steps, which saves Repels over the long run. When resetting the Poké Radar, make sure that you keep all the patches that have been activated most recently within view. Otherwise, your chain will break. 40: The Magic NumberWhen your chain reaches 40, your chances of encountering shiny patches are maximized at 1 in 200 patches, or 1 in 50 resets (this number is not affected by Static, Magnet Pull, or any other ability). After this point, they will remain constant no matter how high your chain goes. Therefore, if you are looking to catch shiny Pokémon, the goal of your chain is to reach 40, then begin resetting only for shinies. The formula for encountering shiny patches is as follows: 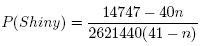 This formula does not work for number exceeding 40. As this formula shows, the probability of encountering a shiny goes down rapidly the farther below 40 the chain is. Chaining SuppliesThe Poké RadarGood luck chaining without it. You receive this from Professor Rowan in Sandgem Town after seeing all 150 Pokémon in the Sinnoh Pokedex in Diamond and Pearl and all 210 Pokémon in Platinum. You do not need to have beaten the Elite Four. The Poké Radar CheckerThis is an extremely useful Pokétch application that keeps a running tally on how many Pokémon you have encountered on your current chain. It also keeps a record of the length of your three longest chains. You receive this application from Professor Oak at the Pal Park when you have the National Dex. MoneyChaining can be expensive, so unless you're rolling in Nuggets, you will have to replenish your bankroll every few times you go on a chaining excursion. The most efficient way to do this is to repeatedly battle the elderly Socialites outside the Trophy Garden on Route 212. If you are using an Amulet Coin, the Socialites will shell out a combined $24,000 (slightly more in Platinum), but for some reason you have to capture or defeat Heatran before they will give you this much money. Prior to that event, they will give you a little over half as much. Be sure to use the Vs. Seeker to milk them for all they're worth. Super RepelsNo, not Max Repels. Super Repels are much more economical, as Max Repels will cost you an extra $250 for just 50 more steps. How many you choose to buy should depend on how many Pokémon you wish to chain and how many shinies you wish to catch. If you just want a handful of shinies, then a few hundred Super Repels should easily suffice. However, if you plan on chaining until your thumbs bleed, then it is recommended that you max out your repels, or come close to doing so. Keep in mind that breaking chains will cost you repels, so always prepare for the worst. Poké BallsAll Poké Balls can be found at the Pokémon League with the exception of Dive Balls, which can only purchased at Mossdeep City in RSE. In order to obtain Dive Balls in DPP, you must either Pal Park them from Advance games, or complete the Daily Newspaper Sidequest in Solaceon Town, for which you will eventually receive three of them. One Premier Ball is obtained when you purchase ten Poké Balls, which must be done repeatedly to gather the necessary amount of them (purchasing 700 Poké Balls at once still only gives you one Premier Ball). Be sure to take into account your Pokémon's catch rate when estimating the number of Balls you will need. Ethers, Elixirs, and Leppa BerriesThe last thing you want to end your chain is a lack of PP. Pokémon that are difficult to catch can drain the PP of moves like Spore at an alarming rate. Unfortunately, there are a finite number of Ethers and Elixirs in the game. Luckily, Leppa Berries restore 10 PP of a move, and are a completely renewable resource. If you don't have any to plant, they are held by a number of wild Pokémon. Growth Mulch can be used to increase the rate of Berry growth by 25%. Pokémon: Clefairy, Clefable, Mime Jr., Mr. Mime, Smoochum, Jynx, Skitty, and Delcatty. ScoutingOne of the most important tasks to do before chaining is to "scout" the target Pokémon to gain important knowledge of what you are up against. This can be done in a few short minutes on the Internet, and will be more than worth the time. The following are a few key pieces of information about a Pokémon that are imperative to have before embarking on your quest for shinies. LevelKnowing the target Pokémon's exact level is relatively unimportant, as its possible range of levels can be easily predicted if you are familiar with the route on which it inhabits. Its approximate level should give you an idea of how hard it will be to OHKO, as well as if its Speed will be an issue. MovesUnless you are using Poké Balls that catch 100% of the time when the target Pokémon is at full health, knowing its exact move set may prove critical to your success. There are certain types of moves a Pokémon can carry that must be accounted for when preparing to chain it. Roar and Whirlwind are, without question, the most dangerous moves your target Pokémon can carry, as they are the only two moves that can break your chain. However, there are still more types of moves that can be nuisances while trying to capture shinies. Self-KO moves obviously make a Pokémon impossible to catch if they are used. Similarly, self-damaging moves such as Double-Edge will cause the Pokémon to kill itself if you have used False Swipe on it. In both cases, these Pokémon should be put to sleep immediately if they cannot be caught on the first turn. AbilityTypically the target Pokémon's ability is a non-issue, but there are a few that can prove troublesome, and therefore warrant mention. Pressure, for instance, can drain PP quickly, so be sure to pack a method of PP restoration. Early Bird and Insomnia make sleep-inducing moves unreliable and unusable, respectively, while Limber does the same for paralysis. Static, Poison Point, Flame Body, and Synchronize can all induce status and might require you to bring a supply of Full Heals depending on your own moves. Appearance RateA Pokémon's appearance rate not only dictates how difficult it is to encounter, but also how difficult it is to chain. A Pokémon with a high appearance rate, such as a swarm Pokémon, is somewhat likely to appear in a given patch once the chain has started. By comparison, a Pokémon with a low appearance rate is less likely to appear in a given patch once the chain has started. The ramifications of this will be discussed in the patch formations and chaining strategy sections. Capture RateAs you might expect, catch rate measures the difficulty of catching a Pokémon. The higher the rate, the easier the Pokémon is to catch. See the capturing Pokémon section below for a closer look at the math behind catch rates. After doing so, be sure you have Poké Balls that are able to catch your Pokémon, preferably a high percentage of the time. Capturing PokémonX-Act's Capture Rate Formula(( 1 + ( MaxHP * 3 - CurrentHP * 2 ) * CatchRate * BallRate * Status# ) / ( MaxHP * 3 )) / 256 Ball Rates
Status #s
Clearly sleep is the way to go here, but paralysis is an acceptable substitute if a sleep-inducing move is somehow unavailable. This list has been abbreviated, as burn and poison can easily kill the wild Pokémon, and should never be used over paralysis or sleep. Good luck finding a reliable and worthwhile method of freezing. Sample Calculations
For these calculations, 50 was substituted for MaxHP when CurrentHP was 1. For Pokémon with a greater maximum HP, these percentage will be slightly higher, and for those with a lower maximum HP, they will drop slightly. Note that some of these calculations are significant for Pokémon with higher catch rates. For example, if a Pokémon with a 75 catch rate can be caught at 1 HP with a Ball that has a rating of 4, then everything with a higher catch rate will also be caught in the same under the same conditions. Forming Your PartyWhen assembling your chaining team, there are a couple of key Pokémon that should always be included. These Pokémon help to make chaining as easy and efficient as possible. BrawlerDepending on the strength of the Pokémon being chained, a party slot may need to be dedicated to a "brawler." This Pokémon should be at a high level in relation to the wild Pokémon, and should ideally be able to OHKO everything in sight. Put it in the first slot (or second, as the case may be) until you successfully reach 40, at which point it should no longer be needed. Be sure to take PP into account. Utility PokémonPokémon that can use False Swipe, put opponents to sleep, Taunt to prevent Roar/Whirlwind, or have an advantageous ability are extremely helpful, and should always be used. If possible, False Swipe should be powerful enough to take the wild Pokémon's HP from full to one in a single hit. Below are some of the Pokémon that fill two or three of these roles at once.
SynchronizersHaving a Pokémon with Synchronize in the first slot of your party makes a wild Pokémon's nature the same as the Synchronizer's 50% of the time. This Pokémon can be fainted. Pokémon: Abra, Kadabra, Alakazam, Mew, Natu, Xatu, Espeon, Umbreon, Ralts, Kirlia, Gardevoir. StaticHaving a Pokémon with Static in the first slot of your party increases the appearance rate of Electric-type Pokémon by 30%. This Pokémon can be fainted. Pokémon: Pichu, Pikachu, Raichu, Voltorb, Electrode, Elekid, Electabuzz, Mareep, Flaaffy, Ampharos, Electrike, Manectric. Magnet PullHaving a Pokémon with Magnet Pull in the first slot of your party increases the appearance rate of Steel-type Pokémon by 30%. This Pokémon can be fainted. Pokémon: Magnemite, Magneton, Magnezone, Nosepass, Probopass. Soundproof/Suction CupsAlthough Taunt is usually more convenient, Soundproof prevents wild Pokémon from using Roar on you, and Suction Cups nullifies both Roar and Whirlwind. Pokémon: Voltorb, Electrode, Mime Jr., Mr. Mime, Whismur, Loudred, Exploud, Lileep, Cradily. Utilizing Both Synchronize and Static / Magnet PullSince Synchronize and Static/Magnet Pull both require the first party slot to take effect, they cannot be used simultaneously. However, they can be used together and produce the same results as if they both shared the first slot. From the start of a chain until 40, the Pokémon with Static/Magnet Pull should be in the first slot. If a shiny patch appears before the chain reaches 40, switch to the Synchronizer before entering it. Once the battle is over, switch back to the Pokémon with Static/Magnet Pull. Once you have reached 40, only the Synchronizer should be in the first slot, since Static/Magnet Pull does not increase the chance of encountering a shiny patch. The Grid4 4 4 4 4 4 4 4 4 4 3 3 3 3 3 3 3 4 4 3 2 2 2 2 2 3 4 4 3 2 1 1 1 2 3 4 4 3 2 1 P 1 2 3 4 4 3 2 1 1 1 2 3 4 4 3 2 2 2 2 2 3 4 4 3 3 3 3 3 3 3 4 4 4 4 4 4 4 4 4 4 The grid is essentially area around your character (denoted by P) in a field of grass. The field being chained in will not have these exact dimensions, and there may be obstacles or grassless squares inside the grid, but most fields of grass should facilitate a nearly complete grid of tall grass. The numbers on the grid represent a patch of grass, and their value represents how far away each patch is from the character. From here on out these will be referred to as one-aways, two-aways, three-aways, and four-aways. Each time the Poké Radar is activated, four patches will shake, one of each number. That is to say one one-away, one two-away, one three-away, and one four-away will shake every time. Never will you see two of any number shake. It is possible that the Poké Radar will activate a square that does not contain grass, in which case you will not see it shake. It is of the utmost importance to be able to envision this grid around your character, so that when the patches shake, you can always tell the coordinates of each one, and therefore assess the quality of the formation of the patches, which will be introduced later. QuadrantsLike a coordinate graph, the grid can be split into quadrants. Zeroes denote patches that do not fall into a quadrant (comparable to axes). In the next section these quadrants will become relevant. 2 2 2 2 0 1 1 1 1 2 2 2 2 0 1 1 1 1 2 2 2 2 0 1 1 1 1 2 2 2 2 0 1 1 1 1 0 0 0 0 P 0 0 0 0 3 3 3 3 0 4 4 4 4 3 3 3 3 0 4 4 4 4 3 3 3 3 0 4 4 4 4 3 3 3 3 0 4 4 4 4 Patch FormationsThe secret to successful and efficient chaining is in the patch formations generated by the Poké Radar. A "formation" is the arrangement of the shaking patches each time the Poké Radar is reset. If one can recognize which formations are safe to rely on, success is sure to follow. The Best FormationsAfter extensive testing, the following have been determined to be the safest formations in the game. Results may vary with the appearance rate of the target Pokémon, but all of these formations should have a success rate of at least 90%. They are also ranked from most successful to least successful, with the first formation having a phenomenal success rate of at least 98%.
4 4 4 4 4 4 4 4 4
4 3 3 3 3 3 3 3 4
4 3 2 2 2 2 * 3 *
4 3 2 1 1 1 2 3 4
4 3 2 1 P 1 2 3 4
4 3 2 1 1 1 2 3 4
4 3 2 2 2 2 2 3 4
4 3 3 3 3 3 3 3 4
4 4 4 4 4 4 4 4 4
4 4 4 4 4 4 4 4 4 4 3 3 3 3 3 * 3 4 4 3 2 2 2 2 2 3 * 4 3 2 1 1 1 2 3 4 4 3 2 1 P 1 2 3 4 4 3 2 1 1 1 2 3 4 4 3 2 2 2 2 2 3 4 4 3 3 3 3 3 3 3 4 4 4 4 4 4 4 4 4 4 4 4 4 4 4 4 4 4 4 4 3 3 3 3 3 3 3 * 4 3 2 2 2 2 * 3 4 4 3 2 1 1 1 2 3 4 4 3 2 1 P 1 2 3 4 4 3 2 1 1 1 2 3 4 4 3 2 2 2 2 2 3 4 4 3 3 3 3 3 3 3 4 4 4 4 4 4 4 4 4 4 4 4 4 4 4 4 4 4 4 4 3 3 3 3 3 * 3 * 4 3 2 2 2 2 2 3 4 4 3 2 1 1 1 2 3 4 4 3 2 1 P 1 2 3 4 4 3 2 1 1 1 2 3 4 4 3 2 2 2 2 2 3 4 4 3 3 3 3 3 3 3 4 4 4 4 4 4 4 4 4 4 4 4 4 4 4 4 4 * 4 4 3 3 3 3 * 3 3 4 4 3 2 2 2 2 2 3 4 4 3 2 1 1 1 2 3 4 4 3 2 1 P 1 2 3 4 4 3 2 1 1 1 2 3 4 4 3 2 2 2 2 2 3 4 4 3 3 3 3 3 3 3 4 4 4 4 4 4 4 4 4 4 The Bad FormationsWhen considering the number of good formations above versus the amount of possible formations that can occur, it is clear that the bad formations greatly outnumber the good. This means that for every good patch entered, the Poké Radar will likely have to be reset numerous times. Although bad formations should always be avoided, entering them is not necessarily a death sentence for your chain. These formations typically have over a 50% success rate, meaning that entering them once might not break a chain, but doing so repeatedly certainly will. In other words, if you get lucky when entering a bad formation, don't think it will be so kind to you the next time around. Again, results can be highly variable with the appearance rate of the target Pokémon. There are several telltale signs that a formation is unsafe to enter. Bunching: Bunching occurs when three or four of the patches are in very close proximity. Shown below is an example of bunching. Normally, this arrangement of the 2-away and 4-away would result in a safe formation. However, the 1-away and 3-away are in the same quadrant as the other two, so bunching has occurred, rendering the formation unsafe. 4 4 4 4 4 4 4 4 4 4 3 3 3 3 * 3 3 4 4 3 2 2 2 2 * 3 * 4 3 2 1 1 * 2 3 4 4 3 2 1 P 1 2 3 4 4 3 2 1 1 1 2 3 4 4 3 2 2 2 2 2 3 4 4 3 3 3 3 3 3 3 4 4 4 4 4 4 4 4 4 4 Isolation: Isolation is typically more easily identifiable than bunching. Essentially, if there is no activated patch within a few squares of the 4-away, isolation has occurred. Also, if the 4-away is in a quadrant all by its lonesome, isolation has occurred. 4 4 * 4 4 4 4 4 4 4 3 3 3 3 3 3 3 4 4 3 2 2 2 2 2 3 4 4 3 2 1 1 1 2 * 4 4 3 * 1 P 1 2 3 4 4 3 2 1 * 1 2 3 4 4 3 2 2 2 2 2 3 4 4 3 3 3 3 3 3 3 4 4 4 4 4 4 4 4 4 4 Rare Occurrences and Their Explanations"The Patch of Grass Stayed Quiet." If this message comes up when you reset the Poké Radar, it means you reset on the edge of the field, and the squares that were activated were not in the field. It also means your chain is broken, which will hopefully teach you never to reset on an edge patch. Changing Patch Types Mid-ChainNormally, if you walk into a flashing patch when chaining for regular patches, and vice versa, your chain will break. However, every once in a while you will encounter your target Pokémon, meaning your chain will continue on, but your target patch type will change to the type you just entered. Unfortunately, if you walked into the wrong type of patch, chances are you didn't actually see the patch to begin with, so your patch type has changed without you being any the wiser. The solution to this is relatively simple: if you walk into a patch you didn't see and your chain continues, reset the Poké Radar a few times to make sure you are still seeing about the same ratio of patch types you normally see. If things appear normal, you're almost certainly fine to continue entering the same patch type. If your ratio appears to have reversed, then you may have switched path types, but it is safest to reset another handful of times to confirm the switch. Encountering Shinies in Non-Shiny PatchesIt is possible to encounter a shiny while chaining without entering a shiny patch. The odds of this happening are 1 in 8192, the standard probability of encountering a random shiny. Review: List of Ways to Break Your Chain.
SwarmsSwarms are Pokémon that only appear on a certain route on a random day. Each day you will have a different swarm. To find out what your swarm is, ask Dawn/Lucas's sister in Sandgem Town, and she will tell you what and where your swarm is. Swarm Pokémon can be found in both regular and flashing patches, and have an excellent appearance rate of 40%. Unfortunately, there is a finite time in which to chain them. However, if you have a chain going, your swarm will not change at the end of the day (23:59)! This means you can keep your chain going as long as you can, but once it's broken, the swarm is gone. Also, if you have a desirable swarm, but do not have time to chain it, you can start a chain of 1, so that it can be continued (very cautiously) the next day. Changing Your Swarm
List of Swarms by Location
Poké Radar ExclusivesAs alluded to in earlier sections, Poké Radar Exclusives are Pokémon that only appear using the Poké Radar, and only appear in flashing patches. List of Poké Radar Pokémon
Easiest Pokémon to ChainIt is recommended that when you begin chaining, you go after a Pokémon with a very high appearance rate. As with many processes, it is best to start small and work your way up, and chaining is certainly no exception. Many of the following Pokémon require Static or Magnet Pull to achieve the listed appearance rate. D/P/Pt
D/P Only
Platinum Only
|