|
PPRNG Guide - The Basics of RNG Abuse
I. Prerequisites
II. Important TerminologyThere are a lot of terms and acronyms used throughout this guide which one would do good to remember.
III. Calibration (The Old Fashion Way)Note: If you are planning RNG abuse on Pokemon Black 2 or White 2, it is highly recommended to skip over to IV. Unova Link Calibration as it is a much speedier method to attaining your parameters. In order to do anything with this program, one must first find their DS Parameters. First, you can fill in the basic information of your profile by clicking "DS / Game Config" in the main window of PPRNG. The common information that should be filled in is DS type, version, whether you have the Shiny Charm and if you've done Memory Link (these two refer to Black 2 and White 2 only), your Trainer ID and Secret ID (should you have them), and your MAC address. Your MAC address can be found from the main menu if you you have a DS Phat or Lite. 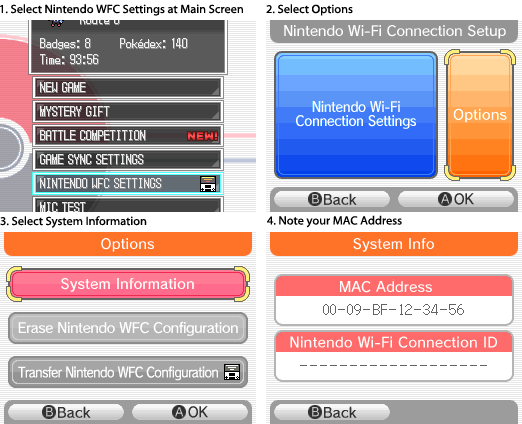
*If you have a DSi or 3DS, you must find it through the System Settings. 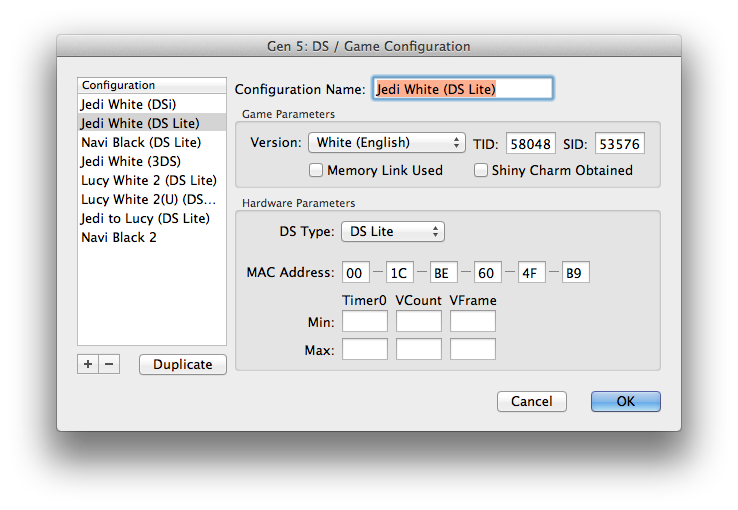
Once that info is filled in, save the profile by clicking OK. Then, back in the main menu of PPRNG, click on DS Parameter Searcher to open a new window. 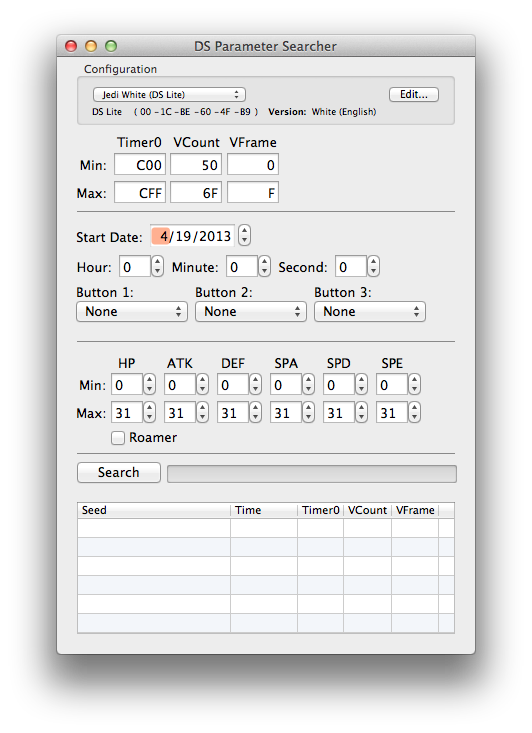
The default values at the top can be left alone; the program should recognize the average ranges of the search based on the DS type and game you listed in the DS Game / Config, so be sure your profile is listed in the upper portion of the window. In both the program and your DS, make sure you put in the same date and time. The most crucial of these values to note is seconds. It is also largely unnecessary to use keypresses for calibration, but if you do, make sure you use the same one(s) in both the program and your handheld. 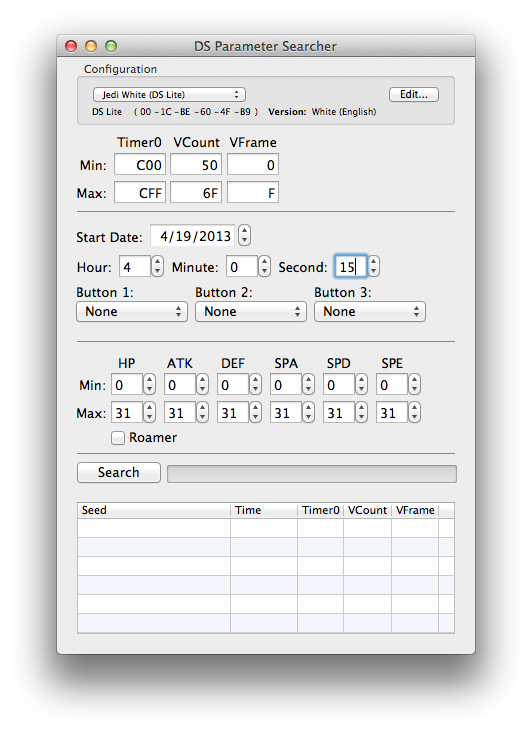
Finally, you'll want to prepare for the next part in-game. You should save in an area where you can easily capture a high level Pokemon (like Victory Road) or interact with one (like Kyurem). In your party, make sure to carry a Pokemon that knows the move Sweet Scent if you are capturing a wild Pokemon. You'll want to engage a battle with a wild Pokemon immediately when you regain control of your character. A Master Ball is handy if you wish to expedite the catching, though not necessary; don't worry, you're not saving. The Process1. Start your game, taking note of the time on the DS to the exact second. 2. Enter the game and immediately capture a Pokemon Be sure not to turn on the C-Gear at all, as it is unnecessary and will give you faulty or no results. When you regain control of your character, simply use Sweet Scent or talk to the Pokemon and capture it. This is where the Master Ball comes in handy. Don't worry, you will not be saving the game, so once you complete step 3, just shut off your system. 3. Check the IVs and plug them into the DS Parameter Searcher window to find your parameters. After capturing the Pokemon, find out the IVs of it; you do not need to find the exact IVs but precise IVs result in an exact result. An IV calculator such as Metalkid's can help you out with this. Once you find the IV range, plug in the min and max values into the Searcher and hit the Search button. 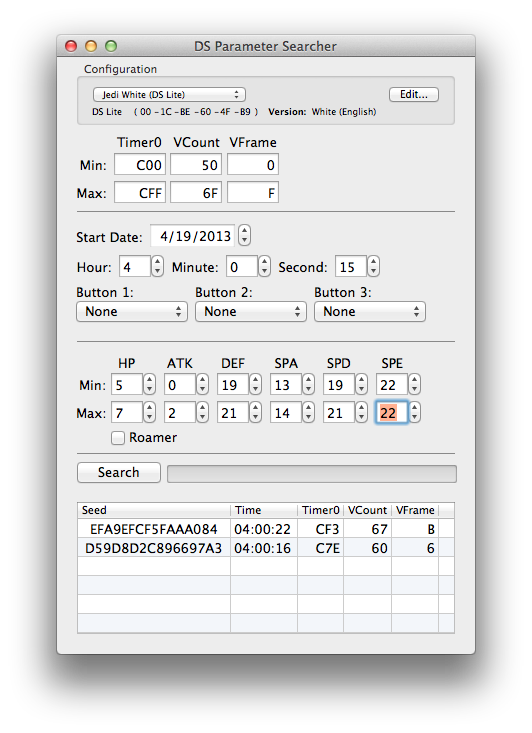
You'll want to repeat these steps a few times to discover your range of Timer0s. As this result illustrates, we have two varying results. With more precise IVs, thanks to the use of some Rare Candies, we ended up with the following result: 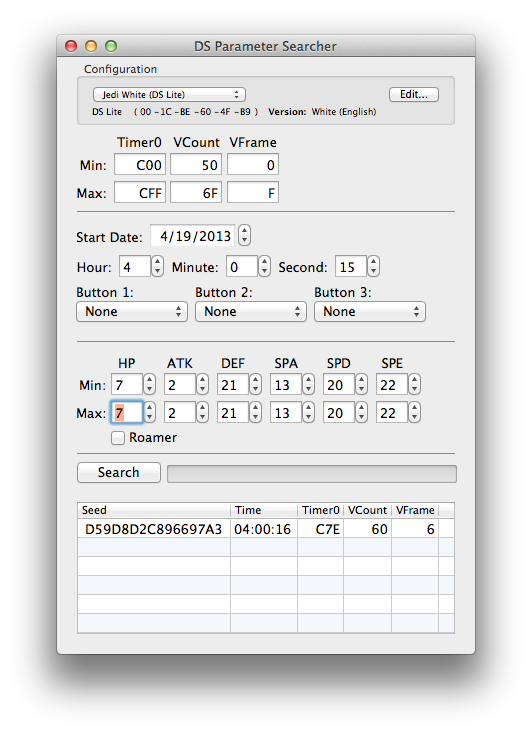
Vcount, Vframe, and seconds are usually consistent so you can rely on new Timer0s that yield the same Vcount, Vframe, and seconds as previous results. It should be noted that 3DS and DSi users have noted an adjacent Vcount in their results. On a general note, you should memorize the seconds offset shown by the results. In this case, we chose to start the game from the DS menu at 15 seconds; the results reveal that the game seeds one second later. The usual seconds offset is as follows:
Once you are sure of your parameters, go back to the DS Game / Config window and put in the min/max values for your Timer0, Vcount, and Vframe. Remember that Vcount and Vframe are always consistent (aside from the aforementioned scenario with 3DS and DSi users). IV. Unova Link CalibrationIn Black 2 and White 2 there is a much quicker and easier way to determine your RNG parameters (Timer0, VCount, etc.) that you can use as soon as you begin your game. At the moment, this process requires you to have started the game and saved at least once (i.e. created a save file), however, this may be revised in the future. In the meantime, if you are planning to RNG abuse your Trainer ID on your first play through, you would need to start the game once and save as soon as possible (as soon as you are given control of your character) to create a save file. Then begin the process described below to determine your parameters, and finally clear your save file and restart your game to RNG abuse your Trainer ID. Also note also that you can still calibrate using the same method used for Black 1 and White 1 (capture a Pokemon and check its IVs). See the Calibration section above for details. Initial Config SetupOpen the DS / Game Config window. Enter the game version, DS Type, and MAC address of the system. If you have done Memory Link and/or have the Shiny Charm in your save, be sure to check those boxes too. If you have started your game already and you know your Trainer ID and Secret ID, enter them as well. You will need these in order to find shiny seeds. You can find your Trainer ID on the back of your Trainer Card in-game. You can find your secret ID through various methods which will not be detailed here, but are easily found by Googling. Parameter Searching Using the Unova LinkOpen the B2/W2 Parameter Searcher in the Black 2 / White 2 Only section of the PPRNG main menu. 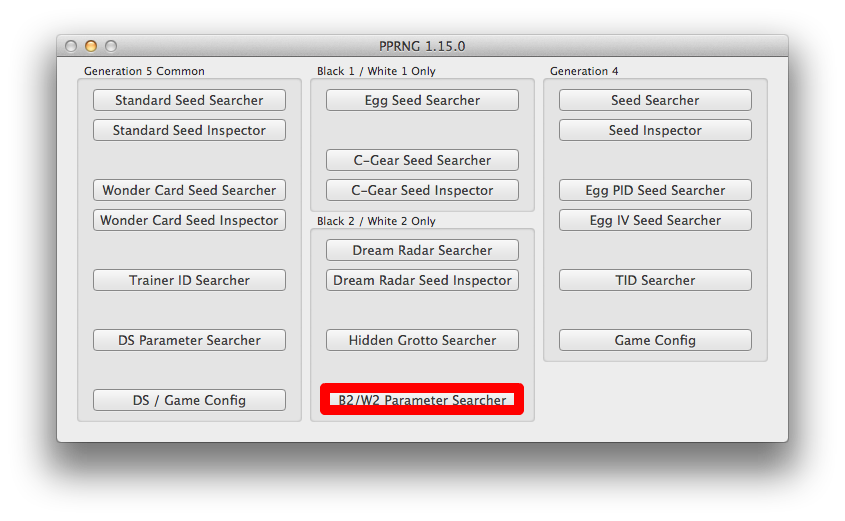
Start your game from the DS menu without holding any buttons, and note the date and time down to the second (synchronizing your DS clock with an external clock such as the one on your computer may be helpful for this). Enter this time into the B2/W2 Parameter Searcher. 
Select Unova Link from the game's top-level menu and then select Key System from the Unova Link main menu. You will now begin a process of repeatedly activating the 'Send and Receive Keys' function and inputting the starting position of the spinning icon that appears there (more details below). Select 'Send and Receive Keys' from the Key System menu. The game will ask you to confirm that you wish to begin IR transmission. 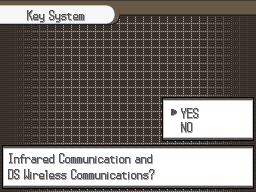
At this point, you need to focus your attention on the bottom right corner of the top screen of your DS, because as soon as you select 'Yes,' the game will display a spinning icon there (the same spinning icon as shown when you are saving your game) and you need to take note of the starting position of the spinner. The icon spins fairly quickly, so you should be looking at the bottom right corner of the screen before selecting 'Yes' in order to be sure that you are able to see the icon's initial position. 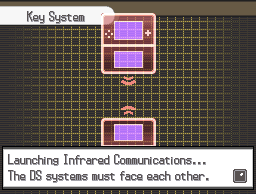
In the B2/W2 Parameter Searcher, select the arrow which corresponds to the spinner's initial position. In the example screenshot above, the spinner was initially pointing to the upper right corner, so you click the arrow which is pointing to the upper right. 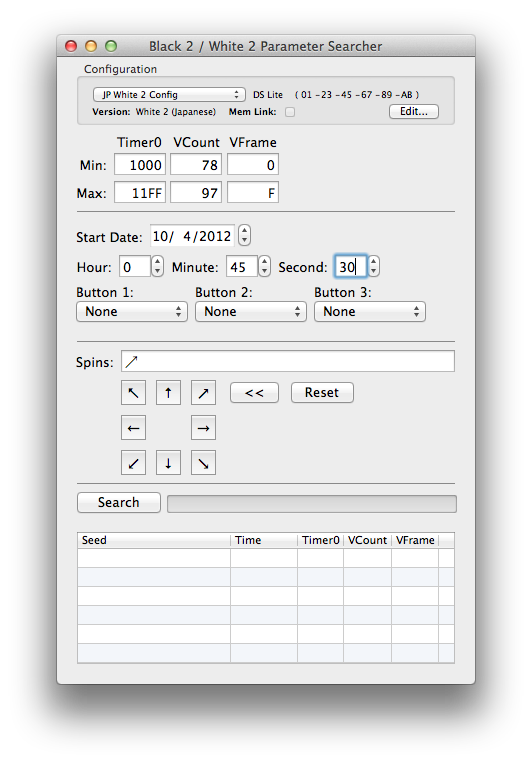
Cancel the key transmission and repeat the process again from the point of selecting 'Send and Receive Keys' from the Key System menu, taking note of the initial spinner position each time and entering that position into the B2/W2 Parameter Searcher. You must not exit the Unova Link menu during this process, or the calibration will fail. Once you have done this a minimum of 7 times (the actual minimum depends on the ranges chosen for the various RNG parameters; however, with the default values the minimum is 7), you can click the search button. 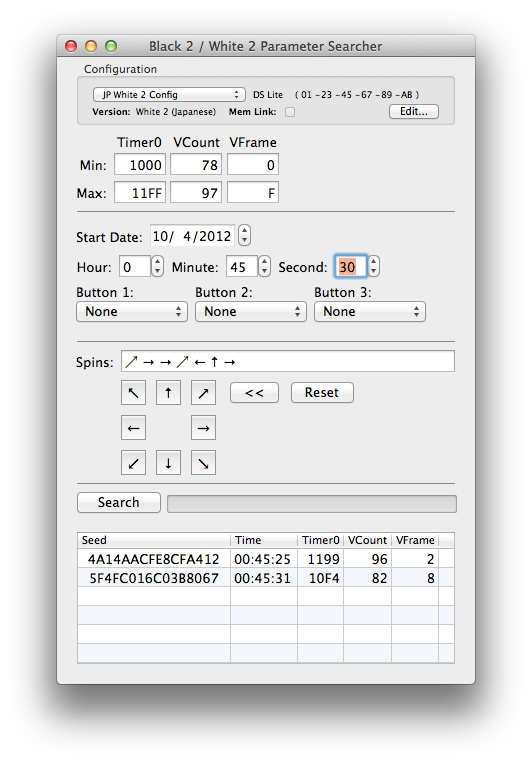
The result should appear within a few seconds. As in the example above, it is possible that you will get more than one result. The more times you check the spinner, the more accurate the process is, so if you find that you have multiple results you should perform more spinner checks until you are left with only 1 result. 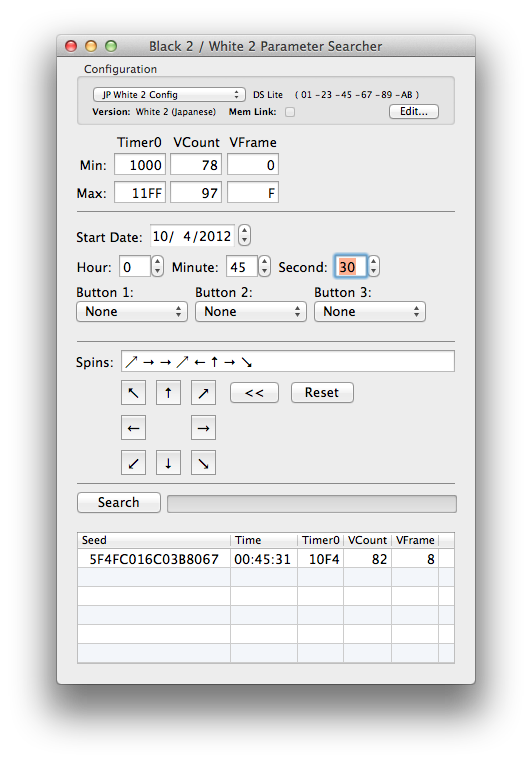
Add the parameters to your DS / Game configuration. 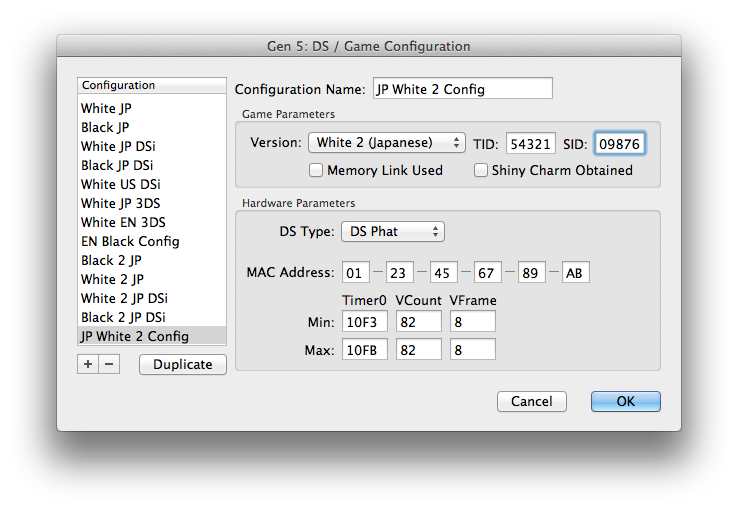
Repeat the process again until you find several more values for Timer0. When using a retail cart on an actual DS system, it is normal to have up to 6 or 7 values for Timer0 (though you will most commonly hit 3 or 4 of them only), while Vcount and Vframe should always be the same. |