Receiving Perfect Dream Radar Pokémon
The Pokémon Dream Radar is a purchasable 3DS application that ties in with Pokémon Black 2 and White 2. Pokémon captured in the Dream Radar will have their hidden abilities when transferred to these games, providing access to Pokémon (including legendaries) that may be unobtainable with their hidden abilities otherwise. Since the Wi-Fi services were shut down for Generations 4 and 5, it is also the only active source of Pokémon in Dream Balls. Thanks to manipulating the RNG, we're able to acquire these rare Pokémon with perfect IVs and desirable natures!
The methods required to RNG the Dream Radar rely on those for Standard seeds, so refer to the earlier portions of this guide if you need a refresher. With that said, there are some important distinctions unique to manipulating the Dream Radar.
- Legendaries captured in the Dream Radar can only be sent once per Dream Radar and Black 2/White 2 save. That means you can only capture the legendaries once in the Dream Radar, and only send them to one copy of the games. Regular (non-legendary) Pokémon can be recaptured to be sent to the same save file. As a result, there is little room for error when trying to RNG the Dream Radar. It is strongly recommended that you practice on regular Pokémon before attempting to RNG a legendary Pokémon.
- These restrictions can be circumvented by backing up the contents of your SD card before transferring the Pokémon (or more specifically, the folder "SD:/Nintendo 3DS/*/*/title/00040000/000ae100/data", where * is a folder named a random string of hex. If you have multiple * folders in the Nintendo 3DS folder, you'll need to hunt around for the one with the proper subdirectories.) By restoring the contents in the case of a mistake, you can try again. Note that this will not allow you to resend a legendary to your save file, since they can only be received once. Restoring the contents of your SD card also may reset other apps and games, so be careful if you choose to do so. Out of courtesy to others, you should mention during trades that you use this technique.
- When transferring Pokémon from the Dream Radar to your Pokémon Black 2 or White 2 game, all Pokémon and items are sent at once (items don't affect the RNG process). It is recommended (and really only feasible) to RNG one Pokémon out of the group you send. Similarly, you should only send one legendary at a time, and separately from any other Pokémon. This guide assumes this configuration.
- Because searching for Dream Radar seeds was only partially implemented into the RNG Reporter, the process to RNG the Dream Radar requires a bit more work than other targets. Not to worry, though; that's what this guide is for!
- Since the process for using the RNG Reporter is a bit involved, you may want to stick with PPRNG if you have a Mac. The associated guide can be found here.
- Shiny Pokémon cannot be found in the Dream Radar (trust me, I've looked), so don't search for shiny PIDs (attempting to use one may throw off your results).
- Although a 3DS (or 2DS) is required to download and play the Dream Radar, you can RNG the Pokémon on any DS model you wish. Since original DS and DS Lite systems tend to have more stable parameters (and an easier clock to work with), it is advisable to perform the RNG on one of those. However, you can use whichever model you are accustomed to.
The following are required for this process:
- RNG Reporter
- A copy of Pokémon Black 2 or White 2
- The Pokémon Dream Radar
- A basic understanding of searching for and hitting Standard seeds (see Part 1 and Part 2 of this guide. Note that the earlier portions of the guide were written for Pokémon Black and White, but the same procedure applies for the sequels). This includes already performing the calibration process to find your parameters.
Before we can get to the RNG process, we should understand how it's going to work. There are many factors we need to account for when even choosing a seed, so let's begin:
Unlike Wild Pokémon encounters, there are no encounter slots that we need to worry about. Instead, the Pokémon occupy different slots when you transfer them to your Black 2/White 2 game. This guide classifies the different Pokémon you can send based on following:
- "Regular Pokémon": These Pokémon are any of the non-legendaries you capture from the Dream Radar. In other words, anything not named Thundurus, Tornadus, Landorus, Dialga, Palkia, Giratina, Ho-Oh, or Lugia.
- "Therians": This category contains Thundurus, Tornadus, and Landorus.
- "Gen 4 Legend": The remaining category is dedicated to the mascots for the Gen 4 games (Dialga, Palkia, Giratina, Ho-Oh, Lugia).
Which category your target Pokémon is in will determine your search parameters, which will be discussed below. The rest of this guide will also use this terminology.
The Dream Radar can send up to six Regular Pokémon at a time to your Pokémon Black 2 or White 2 game, meaning there are six possible slots. The Therians and Gen 4 Legends occupy their own special slots, but they work the same as slots 1 and 2 of the Regular Pokémon. Slot 1 has a starting IV frame of 8, but when transferred, each occupied slot advances the IV frame by 13. That means a slot 2 Pokémon will have a starting IV frame of 8+13 = 21.
The usage of the Memory Link causes the PID to experience a frame offset of -1. As we'll see later, you'll need to subtract 1 from your starting PID frame if you have used the Memory Link (or 0 if you haven't). You may find that your game behaves as if you have used the Memory Link, even though you never have. The reason for this is unknown, but it's not hard to accommodate. Simply perform the process as if you have used the Memory Link.
The gender of the Pokémon you are sending from the Dream Radar will also affect the RNG advancements. That means you'll need to account for the gender of your target Pokémon, as well as the gender of the Pokémon that occupy the slots before your target. When calculating the PID advancements, Pokemon with variable or fixed gender cause an offset of 2, while genderless Pokemon have an offset of 1.
Unfortunately, there is no way to control the gender of the Pokémon you receive from the Dream Radar. This is less of an issue now that males and females can pass down their ball and hidden ability as of Gen 7. The Dream Radar does tend to favor females, however.
Perhaps the trickiest part of Dream Radar RNG is determining the number of frame advancements you need to perform to receive your desired Pokémon. Because you only get one chance to RNG the Pokémon, you want to make sure your math is right! Otherwise, you could end up with a Relaxed Thundurus with perfect IVs (definitely not coming from experience…). When confirming which seed you hit and advancing the frame, both the IV and PID frames are advanced at the same time.
Because of the coupling of the IV and PID frame advancements, the number of advancements is determined by your target IV frame. The PID frame you land on has to be checked for each seed based on how many advancements you performed. Here are the formulae, categorized based on your target Pokémon:
| Target |
Formula |
| Regular Pokémon |
[Number of advances] = 0.5*{[Desired IV frame] – 8 - 13*([Slot of target] – 1)} |
| Therians |
[Number of advances] = 0.5*([Desired IV frame] – 21) |
| Gen 4 Legend |
[Number of advances] = 0.5*([Desired IV frame] – 8) |
| Target |
Formula |
| Regular Pokémon |
[Final frame] = [Starting PID frame] + [Gender offset] + 2*[Number of advances] + 5*([Slot of target]-1) – [Number of genderless Pokémon before target] – [Memory Link offset] |
| Therians |
[Final frame] = [Starting PID frame] + 7 + 2*[Number of advances] – [Memory Link offset] |
| Gen 4 Legend |
[Final frame] = [Starting PID frame] + 2 + 2*[Number of advances] – [Memory Link offset] |
Where:
- Number of advances: How many times you must advance your frame to get the desired IVs.
- Desired IV frame: The IV frame for your seed that has the IVs you are looking for.
- Slot of target: Which slot the Pokémon you want to RNG occupies (i.e. 1-6).
- Final frame: The PID frame you'll land on after advancing for your IVs. This is the frame the nature will come from.
- Starting PID frame: The frame obtained by clicking the “Calculate Initial PIDRNG Frame” button in the main window of the RNG Reporter.
- Gender offset: The offset for your target Pokémon (i.e. 2 if variable/mono-gendered, 1 if genderless).
- Number of genderless Pokémon before target: How many genderless Pokémon occupy the slots before your target Pokémon.
- Memory Link offset: The PID frame offset because of using the Memory Link. This value is 1 if you've used it, 0 otherwise.
The equations are pretty involved, but they're not too bad if you take it slowly. Ultimately, we'll first calculate how many advancements we need to do to reach our desired IV frame, then determine which PID frame we land on using the second set of equations. If we get a good nature, we can proceed with the RNG. Otherwise we'll need to find a new seed and recalculate as necessary.
To advance the frames and verify if we hit our seed, we'll be relying on the key system within the Black 2/White 2 submenus. Normally these keys unlock features in the games, such as access to the White Forest in Pokémon Black 2, but the menus can also be used to RNG. From the title screen and with your wireless enabled, go to "Unova Link" > "Key System" > "Send and Receive Keys". Advance through the menus until it prompts you for a "Yes" or "No". As soon as you select Yes, note the starting position of the spinner in the lower right corner of the top screen, then back out of the menu with B. You have a very short amount of time before the spinner moves, so be ready. If you can't distinguish the starting position in time, consider filming the process for playback or reset your game and re-hit your seed. Each time you enter the menu, the frames advance by 2.
Word of warning: Do no completely back out of the Unova Link menu and return to the title screen before receiving your Pokémon from the Dream Radar. Doing so causes the game to re-seed, meaning you have to re-hit your seed and try again.
Now that the foundations are set, let's RNG some Pokémon!
- From the Dream Radar, capture the Pokémon you want to RNG and send it to your Black 2/White 2 game. This guide does not cover this process, so refer to our dedicated Dream Radar guide if needed. Remember, you should only target one Pokémon to RNG at a time, and should send the legendaries (Therians or Gen 4 Legend) without any Regular Pokémon!
- Decide which category your target falls into—Regular Pokémon, Therians, or Gen 4 Legend—and which slot it occupies. For Regular Pokémon, the slot will be 1-6. The Therians and Gen 4 Legends should always be 1 if you're following this guide.
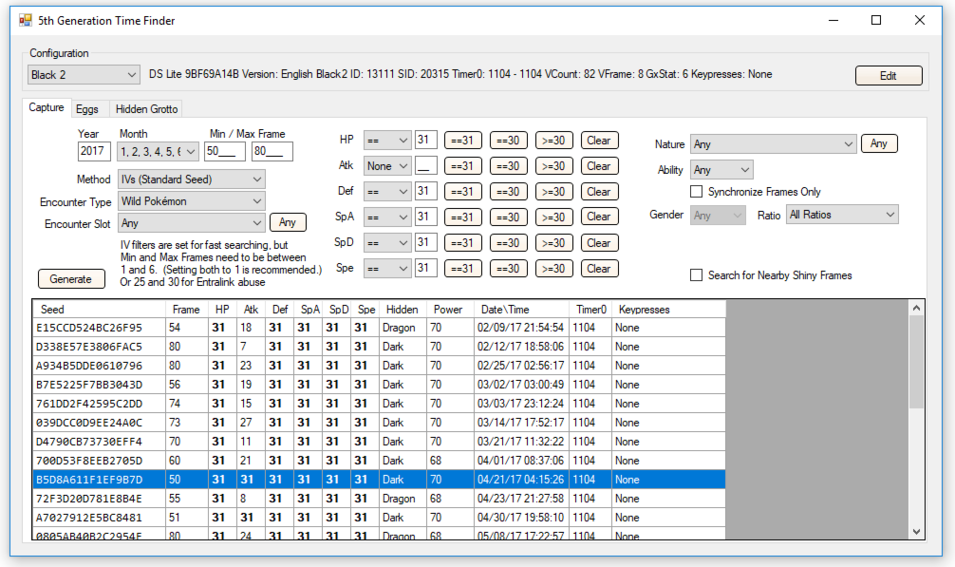
- Open the "5th Generation Time Finder" from the main window of the RNG Reporter, and select the "Capture" tab.
- Set up the Time Finder as shown in the image below:
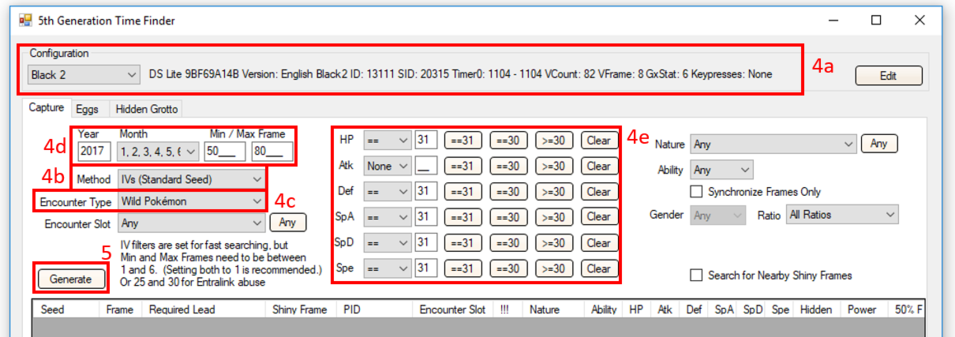
- Confirm you have the right profile selected.
- Choose a Method of "IVs (Standard Seed)".
- Choose an Encounter Type of "Wild Pokémon".
- Select the Year, Month, and Min/Max Frame you wish to search over. The Min/Max Frame you use is determined by the category you are trying to RNG (i.e. Regular Pokémon, Therians, or Gen 4 Legend) and how many advances you are willing to do. Based on the mechanics of the RNG, there is also a restriction on whether you can use even or odd IV frames. The table below can be used as a reference for choosing the proper Min/Max Frame range.
| Target |
Minimum Frame |
Recommended Minimum Frame |
Even/Odd Restricted |
| Regular Pokémon (slot 1,3,5) |
8, 34, 60 |
22, 50, 76 |
Even |
| Regular Pokémon (slot 2,4,6) |
21, 47, 73 |
47, 63, 89 |
Odd |
| Therians |
21 |
37 |
Odd |
| Gen 4 Legend |
8 |
32 |
Even |
The three entries for the (recommended) minimum frame correspond to the three possible slots in that category. For example, a Regular Pokémon in slot 1 has a minimum frame (a.k.a. starting frame) of 8. Similarly, a Regular Pokémon in slot 5 has a minimum frame of 60. The recommended frames are higher than the minimums because the process of confirming your seed advances the frame. Four checks of the spinner (equivalent to 8 advances of the frames) are typically enough to verify your seed. The recommended frames have a buffer of 4 additional checks built in, so feel free to tailor to your liking.
- Select your desired IVs.
As an example, suppose our target was a Regular Pokémon with a variable gender in slot 3, and we're primarily after a Special-oriented spread (i.e. IVs of 31/xx/31/31/31/31); all 31s if we can get it! Slot 1 is occupied by a genderless Pokémon, and slot 2 is a gendered Pokémon. You would enter a Min Frame of 50 into the Time Finder and set the Max Frame to whatever number you're comfortable reaching. I'll search up to a Max Frame of 80. Keep in mind that the frame is advanced in multiples of 2, and a higher Max Frame will return more viable seeds in the Time Finder.
- Click "Generate". Depending on your frame range and number of keypresses, this could take a while. If no seeds turn up, widen the restriction on your IVs, increase your maximum frame, use more keypresses, and/or change the month/year before searching again. You'll find something eventually. The results should look something like this:
- Filter through the results until you find a seed you like. Remember to keep the even/odd restriction in mind! I'll be using the frame highlighted in blue in the above image for an example. Remember, we're after a Regular Pokémon in slot 3, so we need to use an even frame. Fifty meets that requirement!
- Right-click on your seed and click “Copy Seed to Clipboard”.
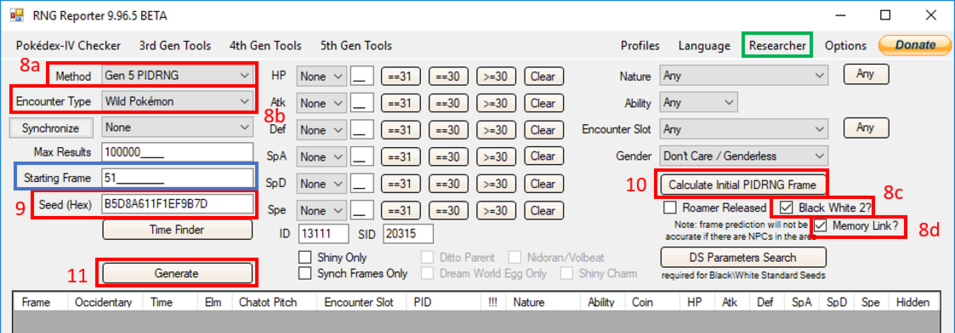
- Return to the main window and set it up as shown below. Note that I've used the Memory Link, so I checked the corresponding box. If you haven't used it, you don't need to check it:
- Select a Method of "Gen 5 PIDRNG".
- Select an Encounter Type of "Wild Pokémon".
- Check the "Black White 2?" box.
- If applicable, check the "Memory Link?" box.
- Paste your seed into the Seed (Hex) field.
- Click the "Calculate Initial PIDRNG Frame" button. The Starting Frame field will automatically be populated with your starting PID frame for the seed (blue box in the above image). For this seed, it appears the starting frame is 51.
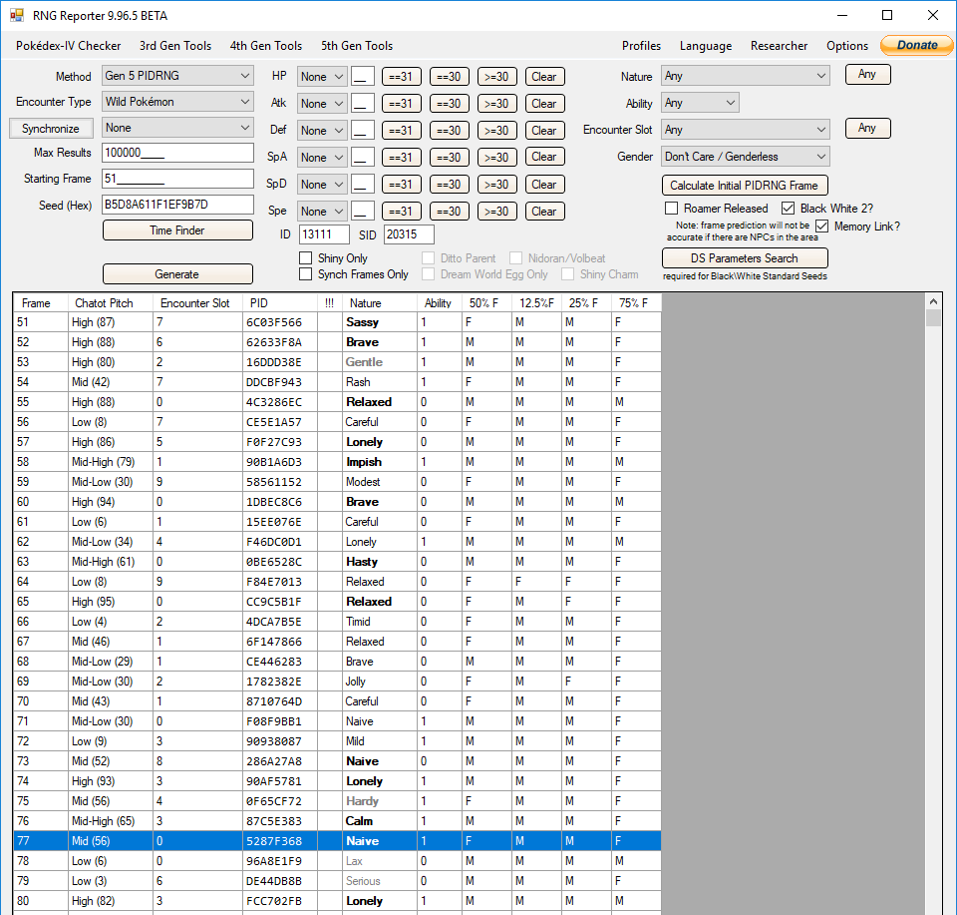
- Click "Generate". You'll get something that looks like this:
- Perform the calculations to determine the number of required advances and resulting PID frame.
- First, calculate the number of advances you need to perform to reach your desired IV frame. Taking our seed info in the above images, that would be:
[Number of advances] = 0.5*{[Desired IV Frame] – 8 - 13*([Slot of target] – 1)}
[Number of advances] = 0.5*{[50] – 8 - 13*([3] – 1)} = 8
That means I would need to check the spinner eight times before sending the Pokémon to my game. A few of those will be performed to validate that I hit my seed.
Next, calculate the PID frame you'll land on by performing the number of advancements you just calculated. Given the example, the starting PID frame is 51 (obtained from step 10), the gender offset is 2 (my target has a variable gender), the number of advances is 8 (see above), the target Pokémon is in slot 3, there is 1 genderless Pokémon before my target, and I've used the Memory Link (so I use an offset of 1). Therefore:
[Final Frame] = [Starting PID frame] + [Gender offset] + 2*[Number of advances] + 5*([Slot of Target]-1) – [Number of genderless Pokémon before target] – [Memory Link offset]
[Final Frame] = [51] + [2] + 2*[8] + 5*([3]-1) – [1] – [1] = 77
The Final Frame corresponds to the PID frame we'll land on in the main window. This frame contains the nature you'll receive for your target Pokémon. You'll notice that I've already highlighted frame 77 in the above image.
At this point the process is easy to mess up. Miscalculate the PID frame, and you'll end up with a different nature than you were expecting. So, to make things easier, here is a calculator! Simply enter the fields with the above information, and it will calculate the number of advances you have to do, your final PID frame, and the frame in the Researcher that corresponds to the first spinner you'll see when you open the "Send and Receive Keys" submenu (more on that later). Note that the calculators require Javascript to be enabled in your browser.
- Check the nature you'll receive by looking at the PID frame in the main window corresponding to your Final Frame. If you're happy with it, continue. Otherwise, go back to step 6 and select a different seed. If you've run out of seeds, adjust your search parameters in step 4 and regenerate the results to find new ones. You'll need to iterate the process until you get a nature and IV combination that you're satisfied with. The example shows a Naive nature on frame 77, perfect for the hex-flawless spread.
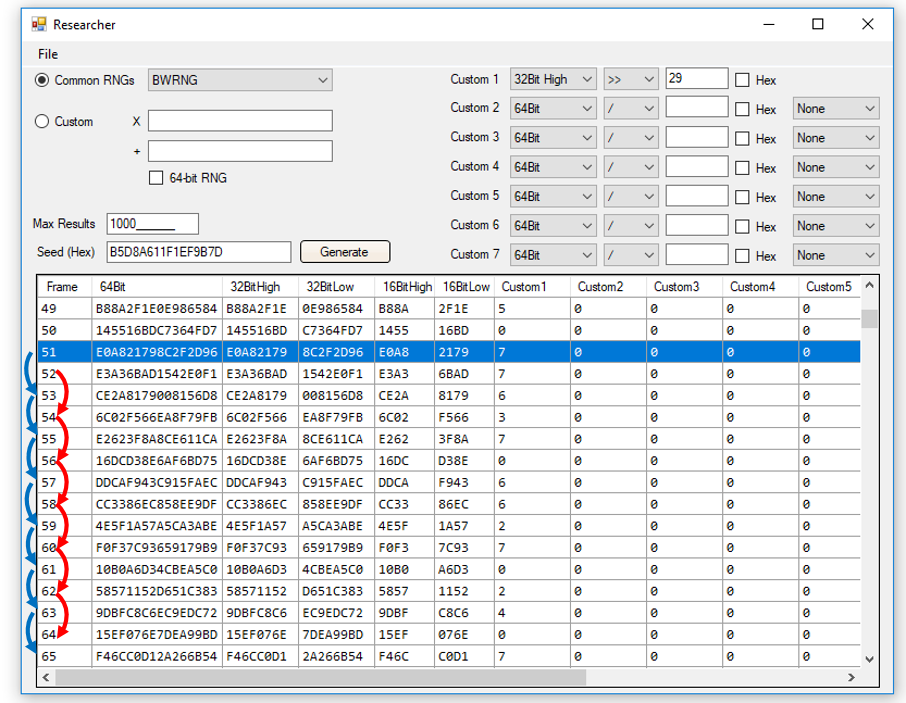
- From the main window of the RNG reporter, select the “Researcher” from the upper right corner (green box in two images above). The Researcher will tell us the spinner locations that correspond to our seed. By comparing the results in the Researcher to the spinner locations in the Send and Receive Keys menu, we can verify that we hit our seed. Set it up as follows:
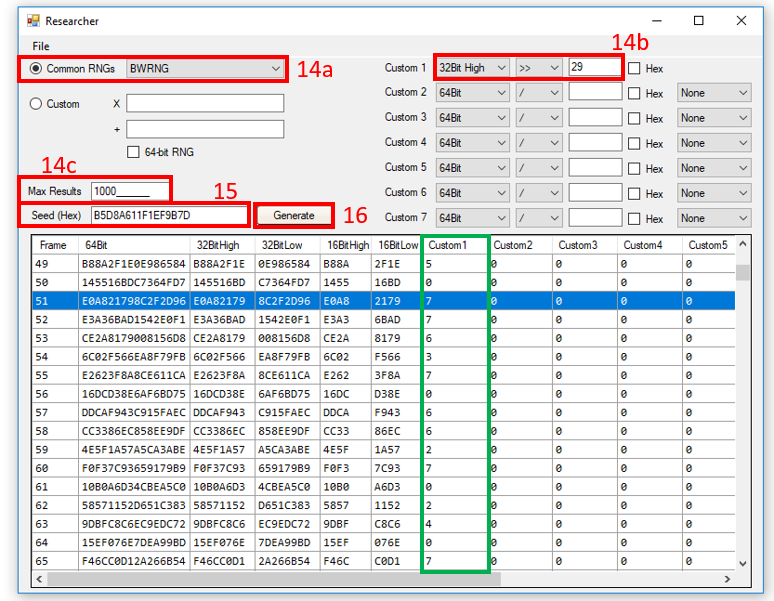
- With "Common RNGs" selected, choose "BWRNG" from the drop-down menu.
- Set Custom 1 to "32bit High" + ">>" + "29".
- Enter the maximum number of results you would like to see (the default is fine).
- Paste in your seed from step 6.
- Click "Generate".
- Find the frame corresponding to your initial PID frame (the number automatically populated into the Starting Frame field in step 10). For this example, the starting frame is 51 and is selected in the image above.
If you have used the Memory Link (or if your game behaves as if you have), click on the starting frame to highlight it. If you haven't used the Memory Link, click on the frame 1 after your starting PID frame. The calculators embedded in this guide will also tell you which frame to highlight in the Researcher (the frame identified as the "Frame in Researcher corresponding to first spinner match" in the calculator results).
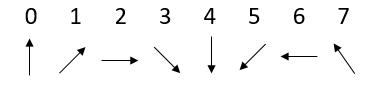
The only info that matters in the Researcher output is the Custom 1 column (boxed in green in the image above). Look through the results, and you'll see a series of numbers ranging from 0-7. These numbers correspond to the orientation of the spinner, as shown below:
The Custom 1 column is how we will be verifying our seed. The first time you confirm Yes on the Send and Receive Keys menu should have a spinner position matching the number in the Custom 1 column on the frame you've highlighted. Checking the spinner causes the IV and PID frames to advance by 2. When you re-enter the menu, the next spinner should match with the one 2 frames away, then 2 more, and so on. Here's an image to make this clearer:
The frames with the blue arrows correspond to the spinner pattern that should match if you have used the Memory Link. Because I've used the Memory Link, the first spinner that should match is on frame 51 (spinner in upper-left position), then 53, 55, and so on. The red arrows indicate the pattern if you have not used the Memory Link, with the first matching spinner being on frame 52.
For this guide, I need to do 8 advances and I've used the Memory Link. That means I need to check the spinner 8 times and look for the following pattern: 7, 6, 7, 6, 2, 0, 4, 7. In terms of spinner starting positions, that would be upper-left, left, upper-left, left, right, up, down, upper-left.
- Attempt to hit your seed.
- From the start menu, navigate to the Send and Receive Keys menu (again, that's start menu > Unova Link > Key System > Send and Receive Keys). Verify your seed by checking the spinner a few times, comparing with the output of the Researcher as you go (four times is usually enough to verify your seed, but check as many times as you feel is necessary).
- Once you've verified your seed, continue to perform the remaining required advances you determined back on step 12. I confirmed my seed with four checks of the spinner, so I need to enter and back out of the menu four more times for my eight total advances. If you find you did not hit your seed (i.e. the first few spinner starting locations do not match), return to step 18.
- You've verified your seed and performed the required advances, and now it's the moment you've been waiting for: receiving the Pokémon! Back out of the Key System to return to the Unova Link menu (the top screen should say "Main Menu" in the top left corner), and choose "Nintendo 3DS Link". Confirm you'd like to receive your Pokémon, and go check your boxes! If you did everything right, you'll find the Pokémon you received has your desired IVs and nature!
If you've made it this far, congrats, you've successfully performed RNG for the Dream Radar! And it only took…21 steps. Ok, so the process is a bit involved, but it feels good, right? RNG is an art, and the key is to not despair when it doesn't work out the first time. Keep practicing, and you'll get it. May your RNGs be numerous and your parameters stay true.
The spinners don't match. What did I do wrong?
- Likely nothing. Pokémon Black 2 and White 2 are infamous for the Timer0 (one of the "parameters" of your DS) often changing. Because a specific Timer0 is required to hit a seed, you most likely got the wrong value, causing you to hit a different seed and not find matching spinner locations. You cannot control your Timer0, so the best course of action is to try again.
- Although the Timer0 is the most likely cause of you missing your seed, make sure that you are setting your DS—whichever model that may be—to the correct date and time (remember, the RNG Reporter uses a 24-hour time clock). Ensure that Researcher is setup correctly, you don't have typos in your seed, and you are looking at the proper frames in the Researcher.
- It doesn't always work, but you can also try searching for adjacent seeds using the UnovaLinkCalibration tool (RNG Reporter main window > "5th Gen Tools" > "Unova Link Parameters"). Simply enter your seed, DS information, and the spinner locations you obtained into the menu that pops up. If you think the Timer0 was the culprit, enter a range of Timer0 to search over via the Min/Max fields. Hit "Search" and compare the result(s) to your target seed. You may find that you are off by a second or two. This tool is bugged in earlier versions of the RNG Reporter, so always make sure you are using the most updated version (this guide links to 9.96.5).
No matter what I do, I just cannot hit my seed. Does this process even work?
- We've all been there, and rest assured that this procedure does work. If you think your current seed is simply unhittable, try a different one. You may find that a different seed is easier to hit.
- It's also possible that you are not using your most common Timer0, which you should have found via calibration. You may consider recalibrating to ensure you are using your most frequent parameters.
The IVs and nature I received are not what I was expecting. What happened?
- Either you missed your seed or you did not perform the right number of advances. There's no going back, so if you can, recapture the Pokémon and try again. If you happen to be on version 10.2 of the RNG Reporter, there seems to be a bug in the Time Finder, causing it to display incorrect IVs. This bug seems to have been fixed in version 10.3.
I've noticed a Dream Radar tab in newer version of the RNG Reporter; can I use that?
- Unfortunately, no. It was never fully implemented, so the manual approach in this guide is the only option as of now.
I'm still not sure I'm doing this right. Where can I get help?
- We have a 5th Gen RNG Help/Info thread on the forums dedicated to helping users with RNG! If you have a question or problem, feel free to post there. Someone will be happy to assist.